A Virtual Pumpkin Makeup Job Using Photofuser
by ericCycles in Living > Halloween
2170 Views, 1 Favorites, 0 Comments
A Virtual Pumpkin Makeup Job Using Photofuser
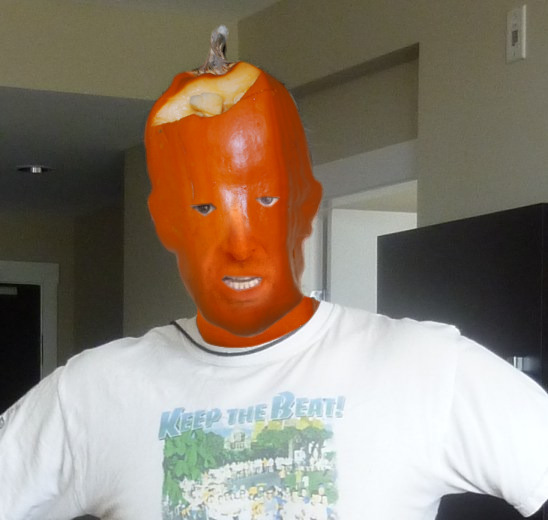
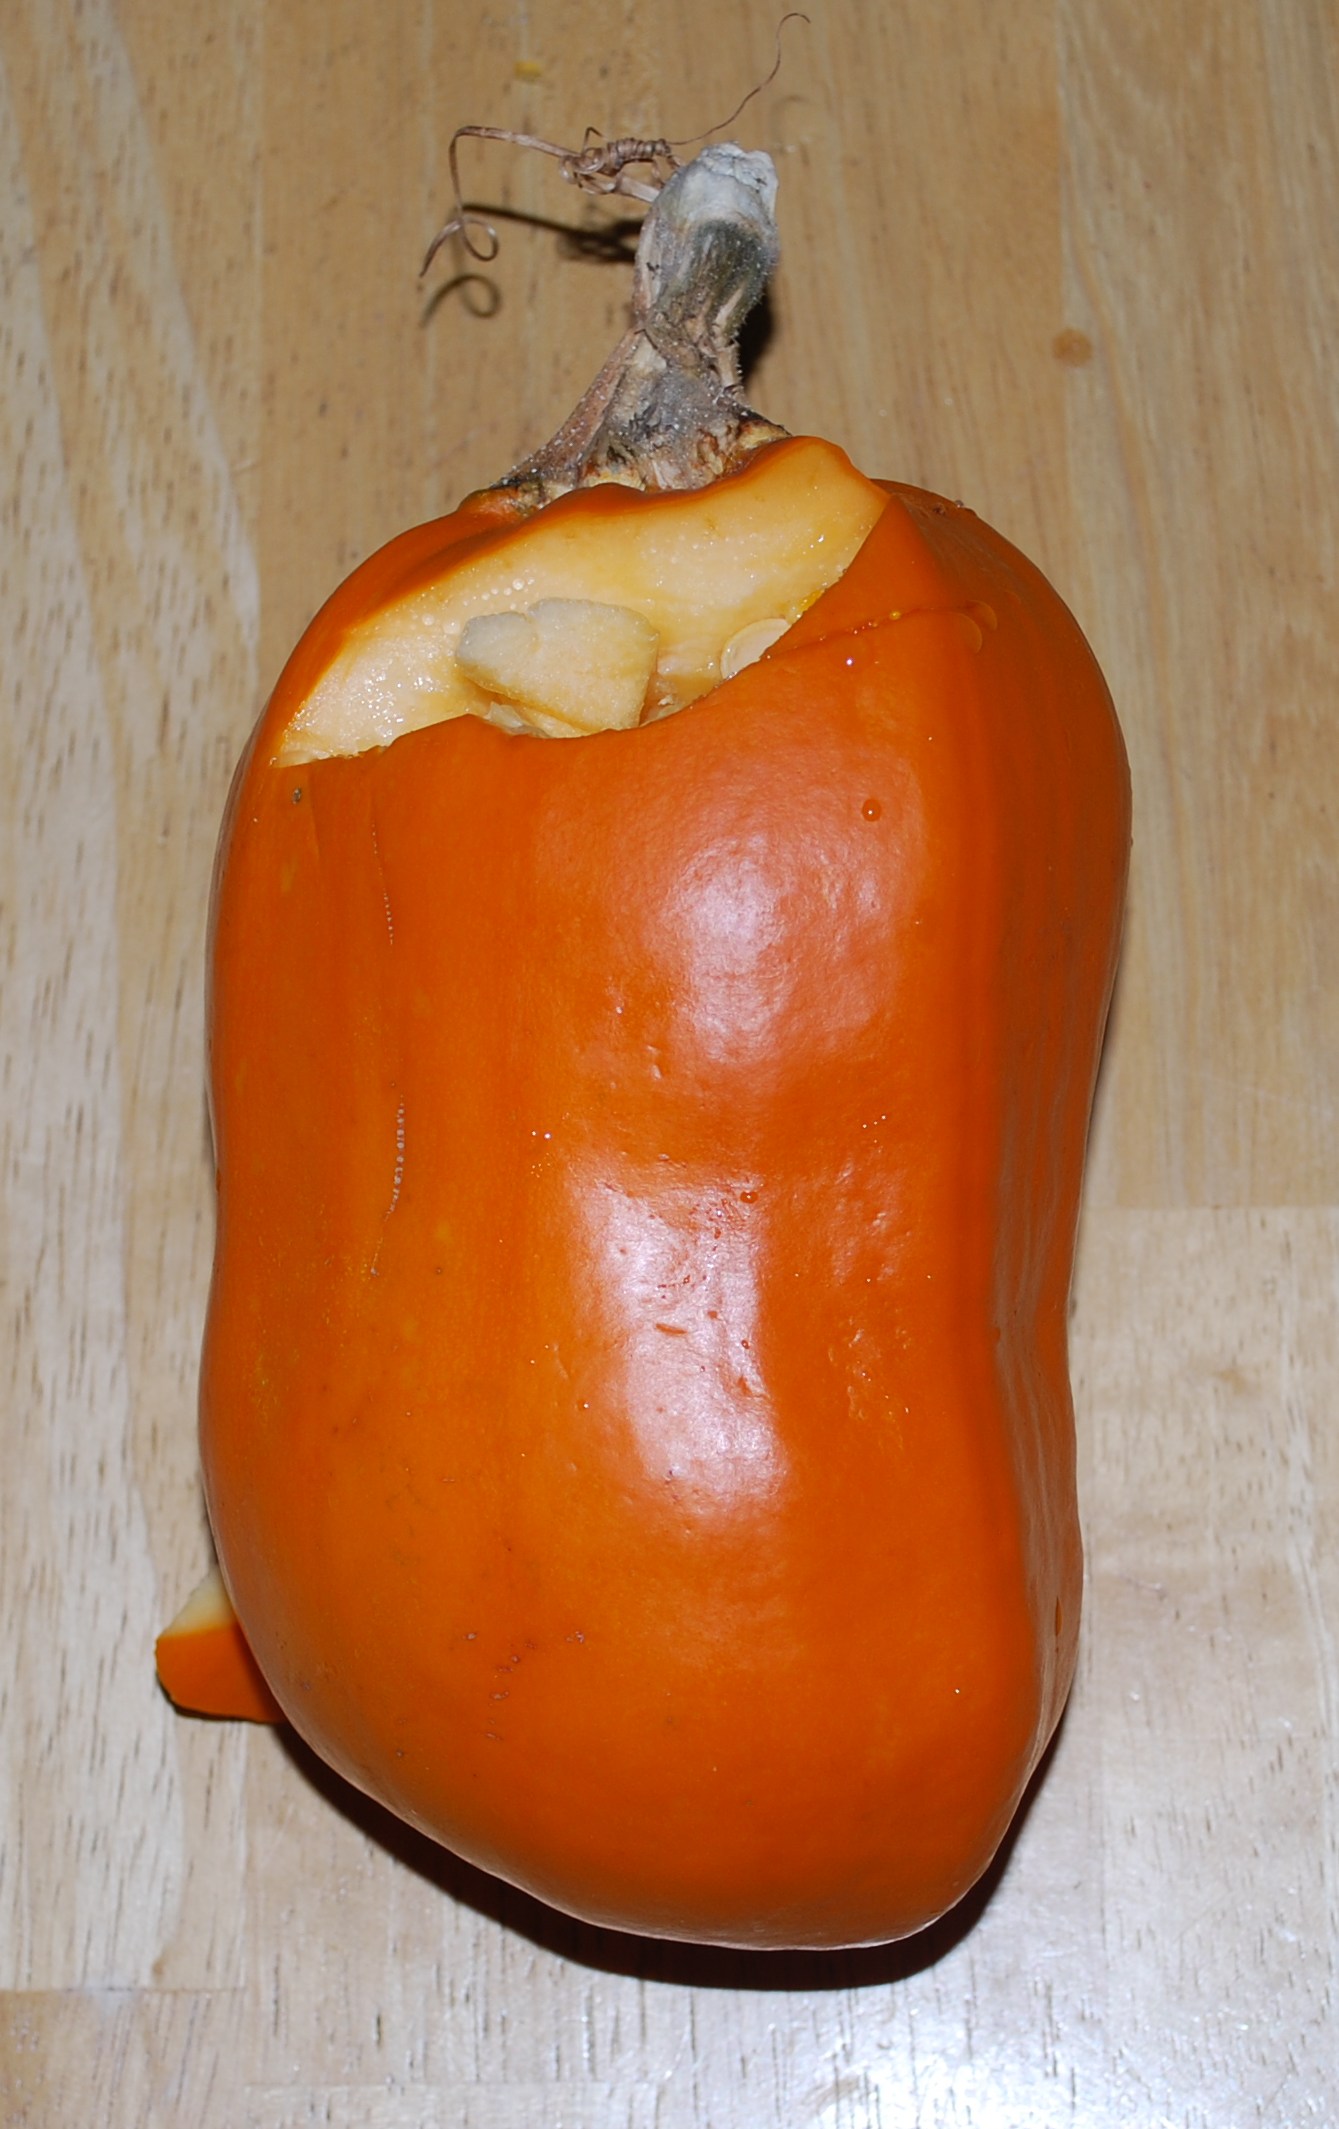
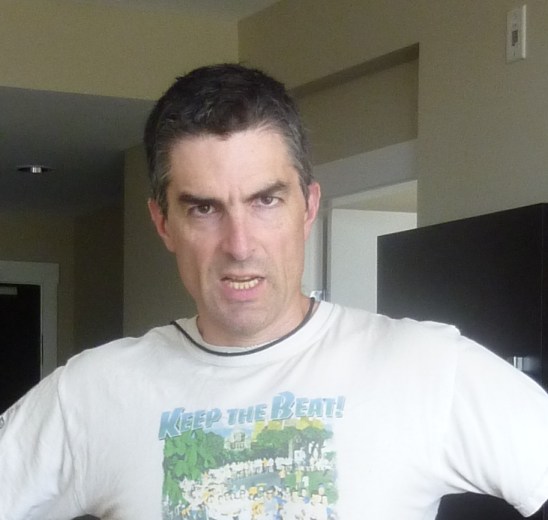
It was a bad year for growing squashes; all I grew was one meagre mis-shapen little pumpkin, barely large enough for a slice of pumpkin pie. However, with this instructable, I'll get some use of out it yet. In this instructable, I''ll demonstrate how to make a virtual mask from a pumpkin.
Photofuser is a free-to-use HTML5 application for taking a bit of "Artistic License" with your pictures. The HTML5 bit means that it runs inside your web browsers and is written in Javascript, and doesn't need any plug-ins. Photofuser is currently in beta so if you spot any problems, the authors would love to know about it.
The key concept in Photofuser is cutting out polygonal or blobby areas from one picture, and pasting them onto another picture. The pastes can be resized, rotated, re-colored and arbitrarily warped as needed. Photofuser gives you about 50% of the functionality of Photoshop with 10% of the complexity. In this instructable, we'll be making use of all of these.
Each of the steps in this instructable is broken down into numbered mini-steps. The numbers correspond to the numbered arrows on screen shots.
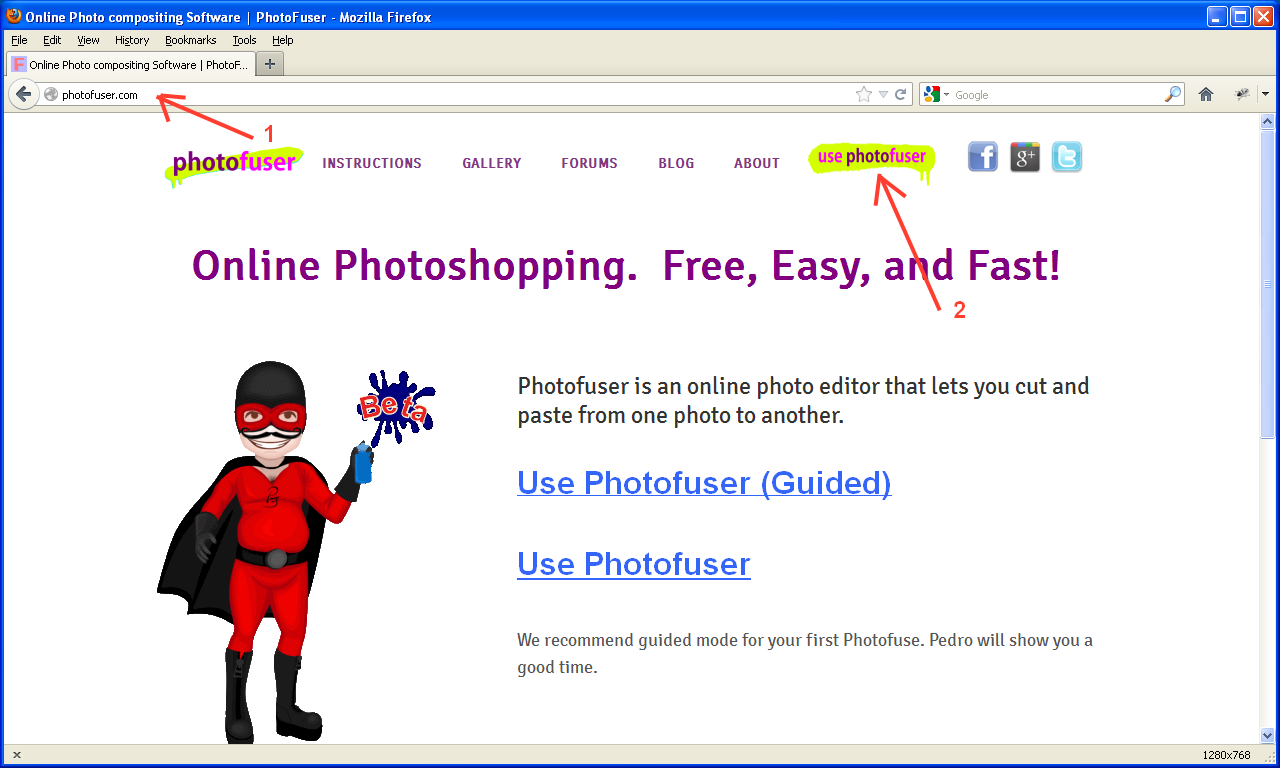
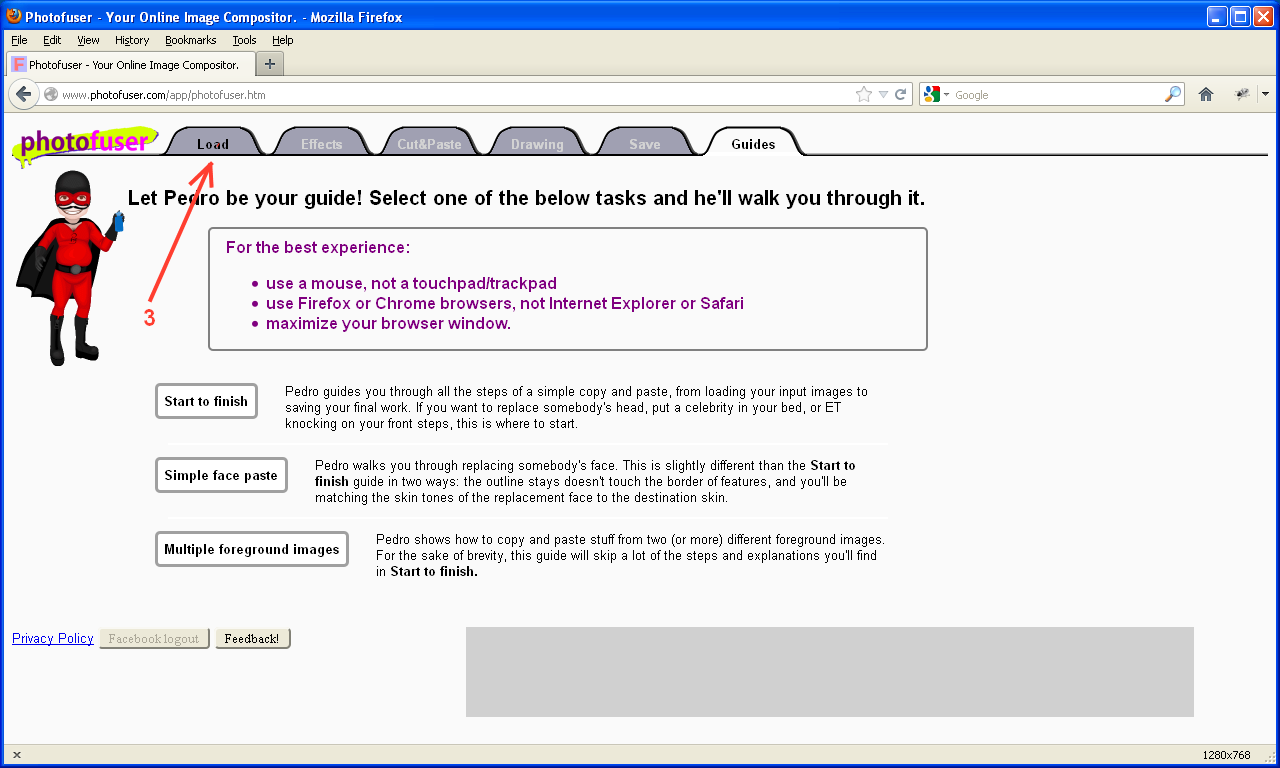
1: Point your favorite browser (Firefox and Chrome work best) at http://photofuser.com
2: Once the page comes up, Click on the button that "Use photofuser". That takes you to the Photofuser application itself.
3: Click on the "Load" tab.
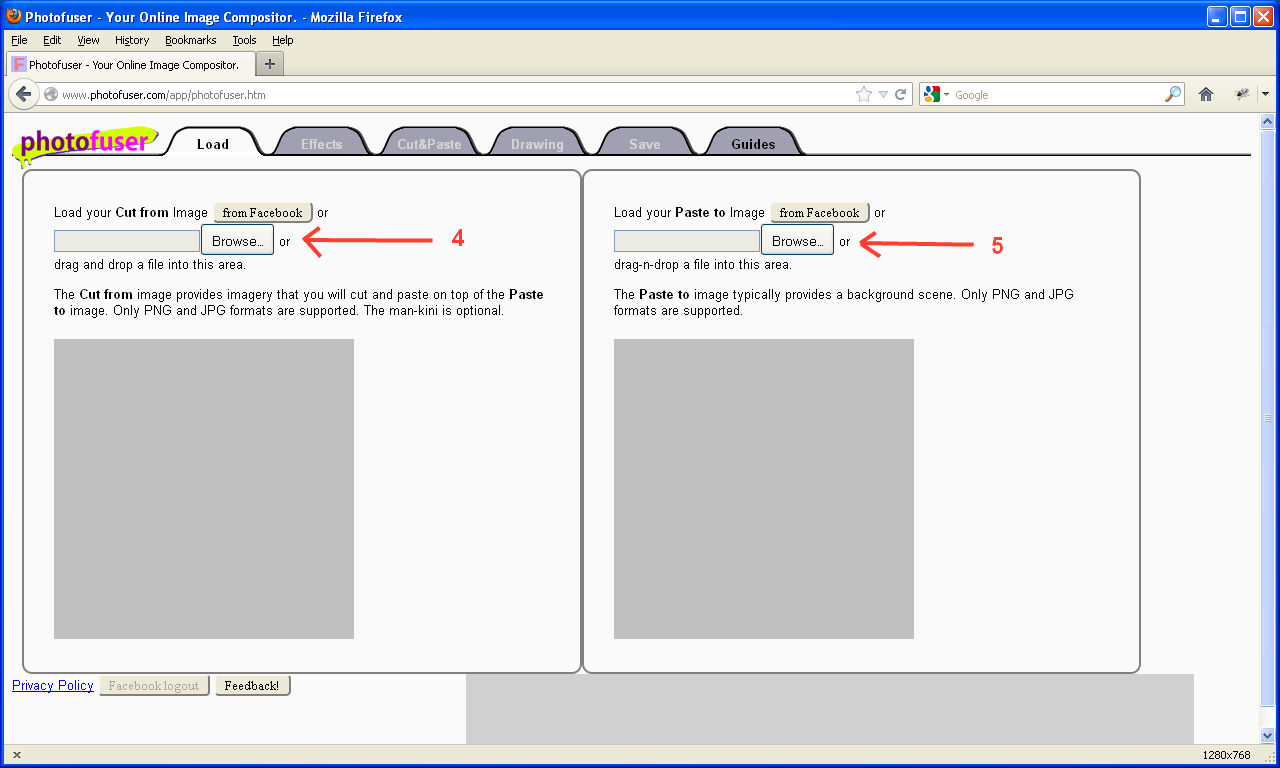
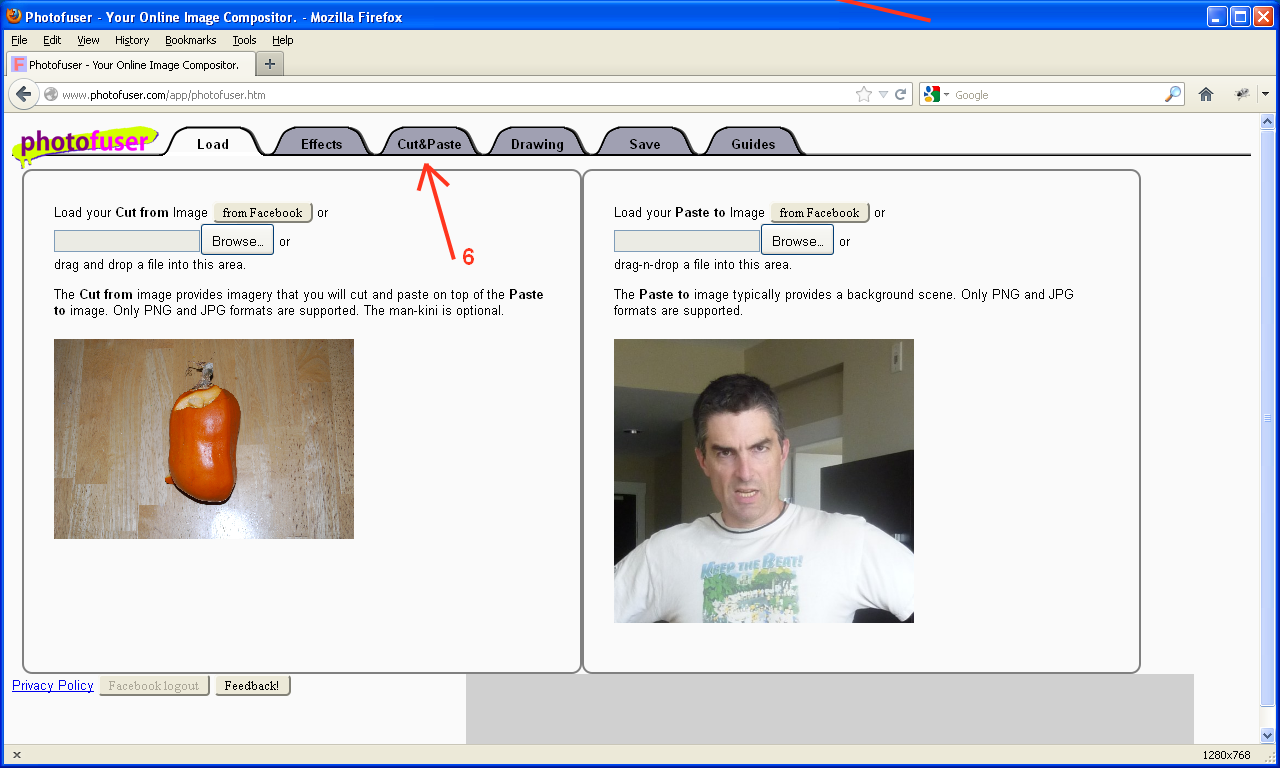
4: Use the "Choose file" options to load the pumpkin picture for the "Cut from" image. If you are using Chrome or Firefox, you can simply drag-n-drop a picture from a directory folder.
5: Do the same to load a picture of yourself (or somebody else) into the "Paste to" image.
6: Then click on the "Cut&Paste" tab.
Pasting Some Squash on the Neck.
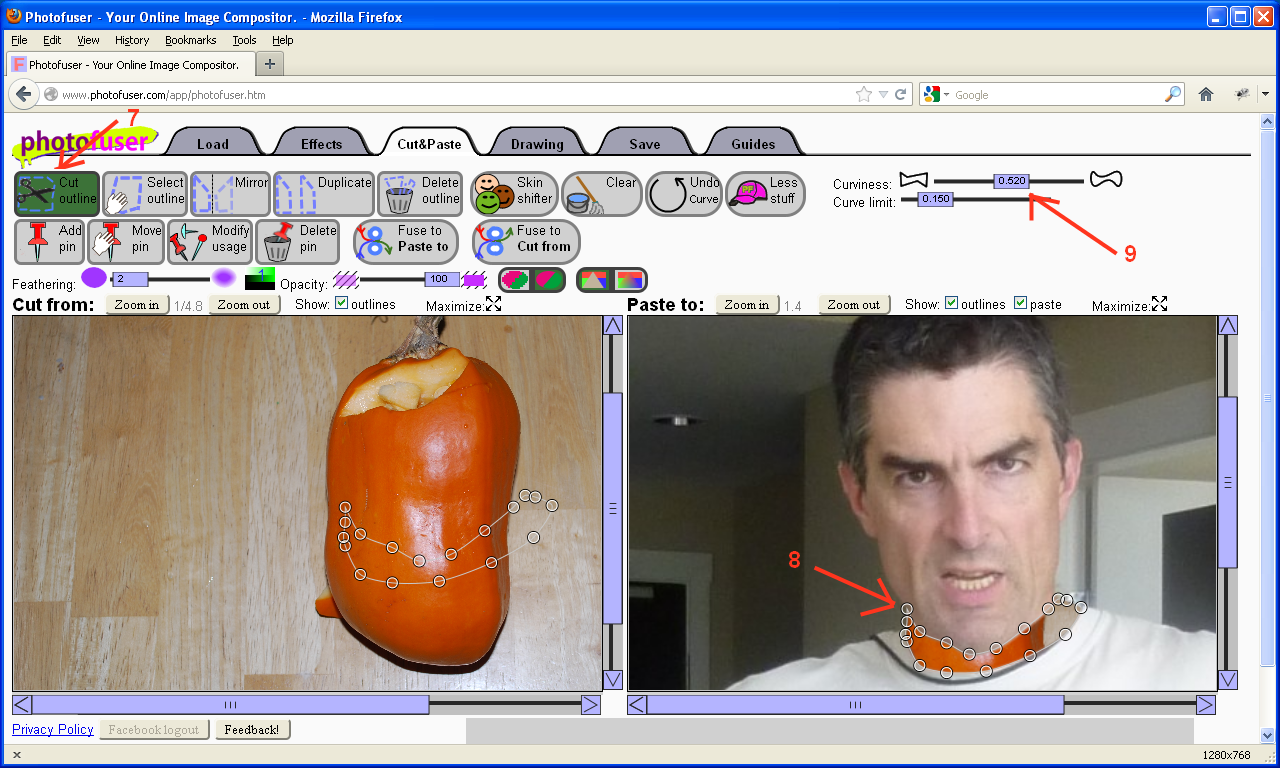
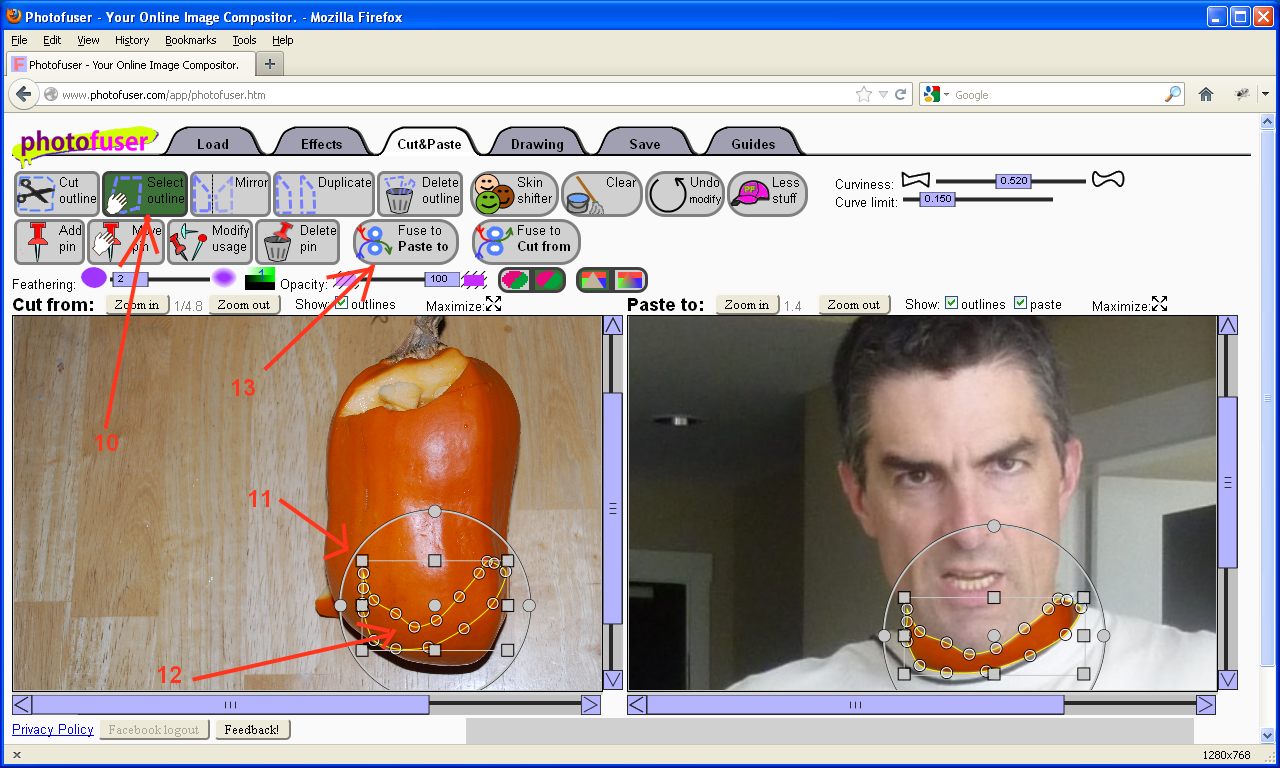
7: Press the "More stuff" button and then Select the "Cut outline" tool. By default, Photofuser only displays the most basic set of tools so that beginners don't get overloaded, but we'll need some of the more advanced tools in the course of this instructable, hence the clicking on the "More stuff" button.
8. Cut an outline around the neck in the "Paste to" pane by clicking in a clockwise direction. It doesn't really matter whether you go clockwise or counterclockwise, you just have to avoid crossing or doubling back on your path. The vertices of the outlines are represented by hollow circles and are called "pins". Each click creates a new pin.
There are zoom in and zoom out buttons for each image pane, as well scroll bars for paning. I'm going to omit instructions to zoom in, zoom out, and pan because not omitting them would clutter up this instructable with a lot more steps that will be pretty obvious.
When you are cutting an outline, it is useful to zoom and pan both image panes so that the area you want to cut from is completely displayed, and the area you want to paste to is completely displayed. For example, if you were pasting a face from a head in one picture to a head in another picture, you'd want to zoom and pan so that the heads filled their respective image panes. If you need further resolution, you can zoom further in after the first click of the outline.
9. Adjust the "Curviness" slider so that the outline looks less polygonal.
10. Select the "Select outline" tool. This will make rotate and resizing handles appear around your outline. The rotate handles are the filled circles, the resizing handles are the filled boxes.
11. Drag on a resizing handle in the "Cut from" pane to make the outline small enough to fit the pumpkin.
12. Drag inside the outline to move it completely inside the pumpkin.
13. Press "Fuse to" button to merge the paste with the "Paste to" image.
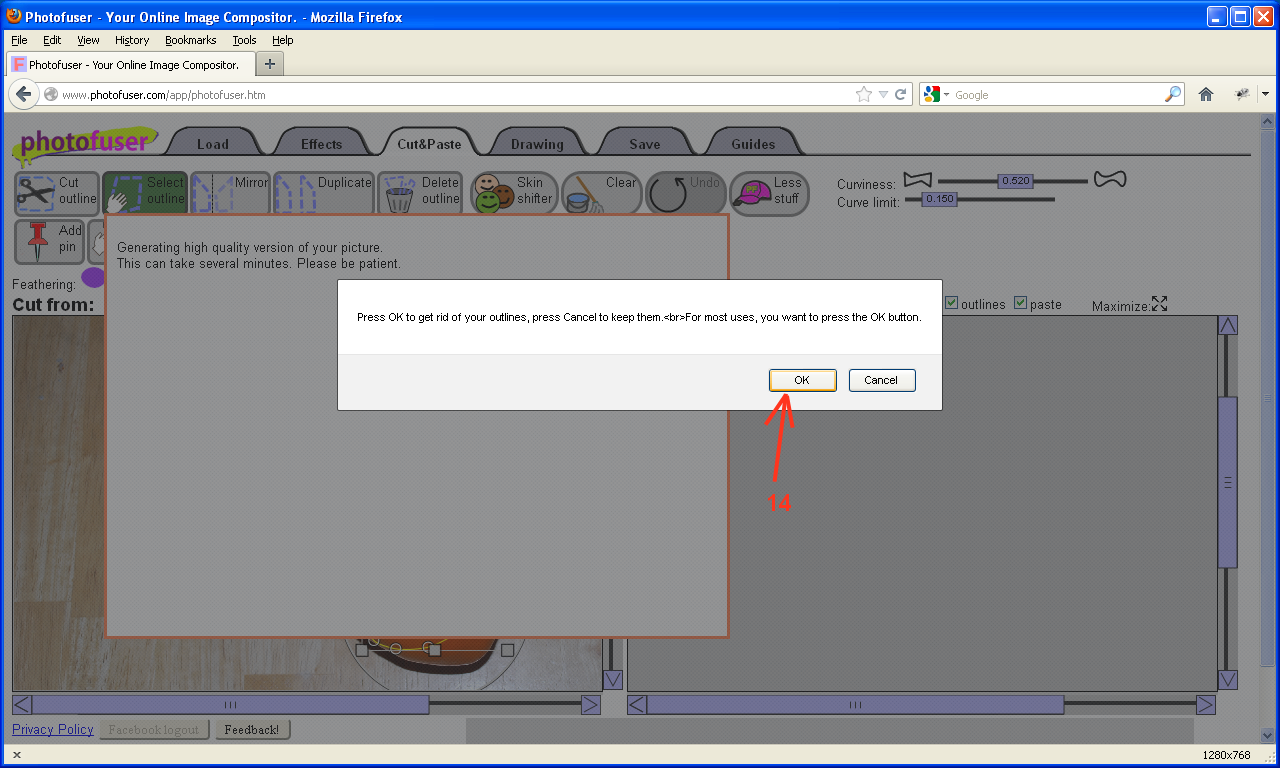
14. A dialog will pop up asking if the outlines should be removed after the fuse finishes. Click the OK button.
Adding Some Pumpkin Skin for the Face
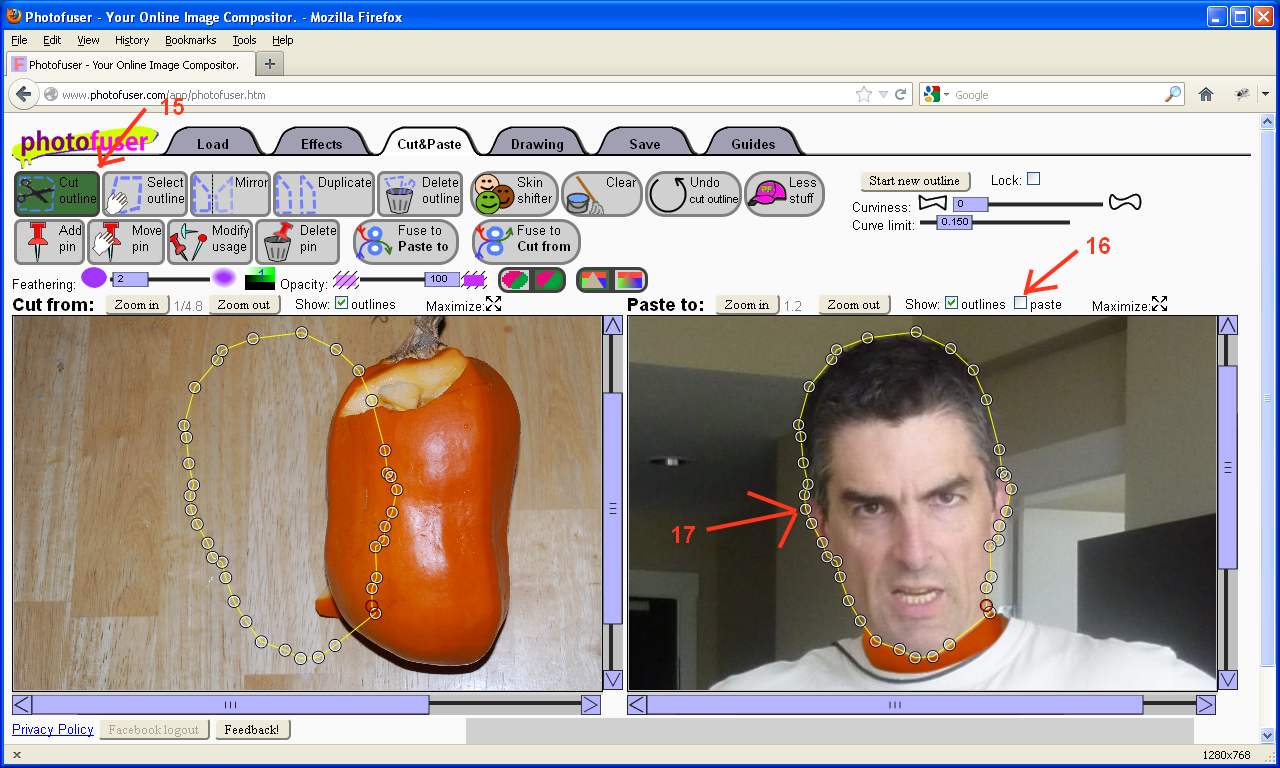
15. Select the "Cut outline" tool.
16. Uncheck the "Show paste" checkbox. We won't want the pasted image displayed during the next few steps because it will hide details in the Paste to image that we need to see, and slow the response time.
17. Cut an outline around the head in the "Paste to" pane.
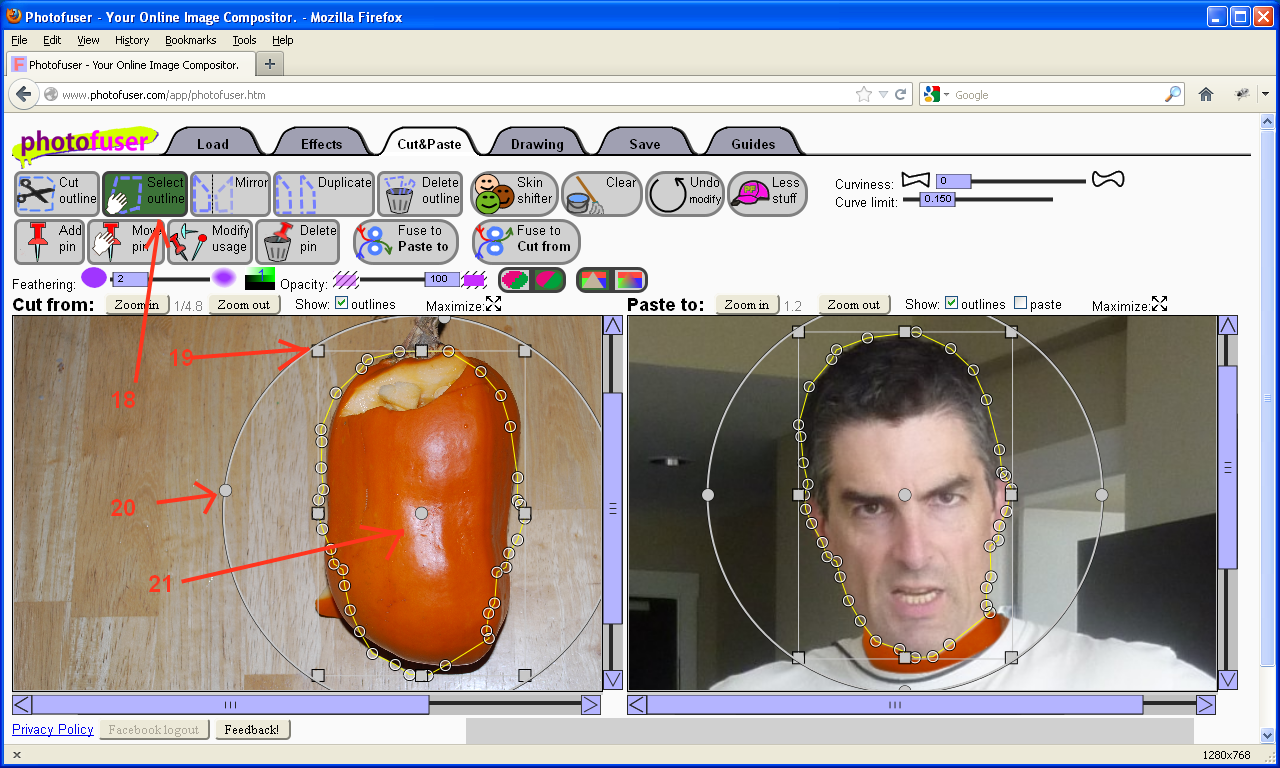
18. Select the "Select outline" tool.
19,20,21: Position the outline of the head over the pumpkin as close as you can by reposition, rotating, and scaling.
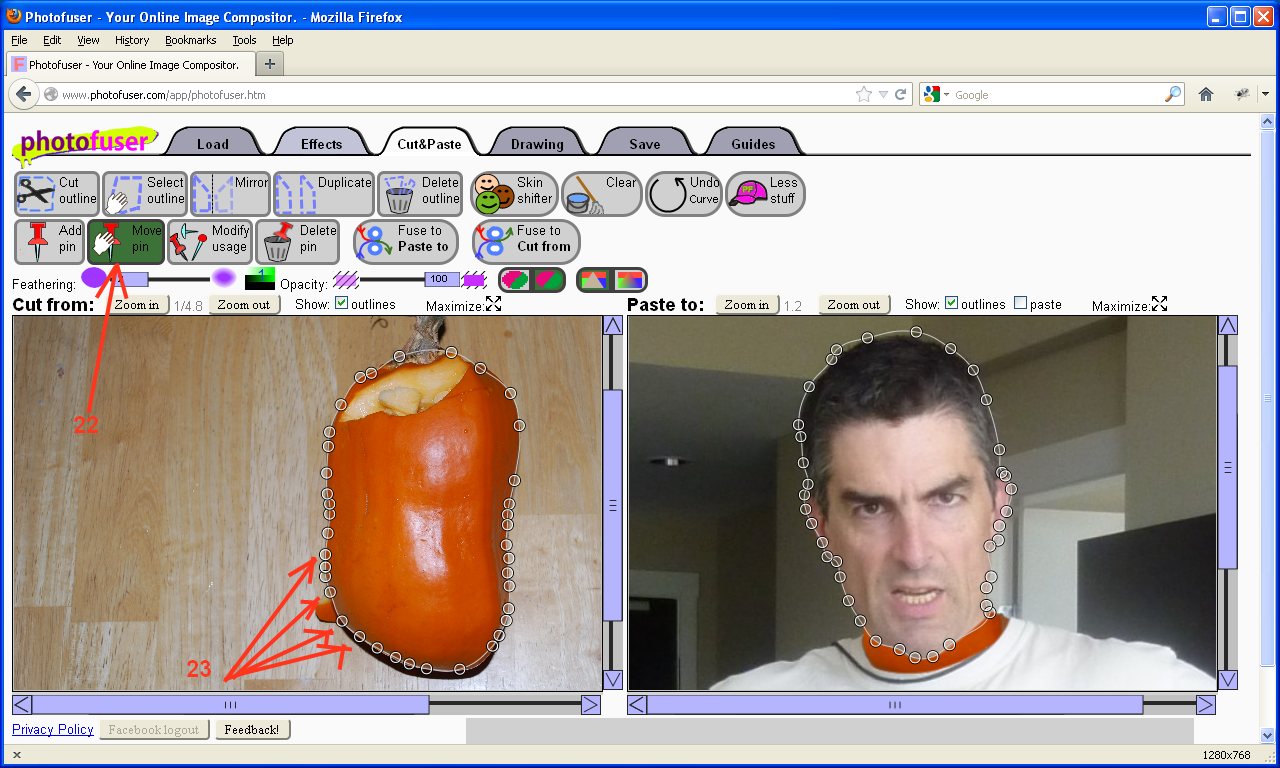
22: Select the "Move pin" tool. The "Move pin" tool allows you to arbitrarily shape the outlines, causing the pasted image to be warped to fit. Warping is analogous to painting on a sheet of rubber; when we move individual pins, the sheet of rubber gets stretched, deforming the pasted image, hopefully in ways that are useful.
23. Move pins on the outline in the "Cut from" pane to fit to the pumpkin, not including the stem.
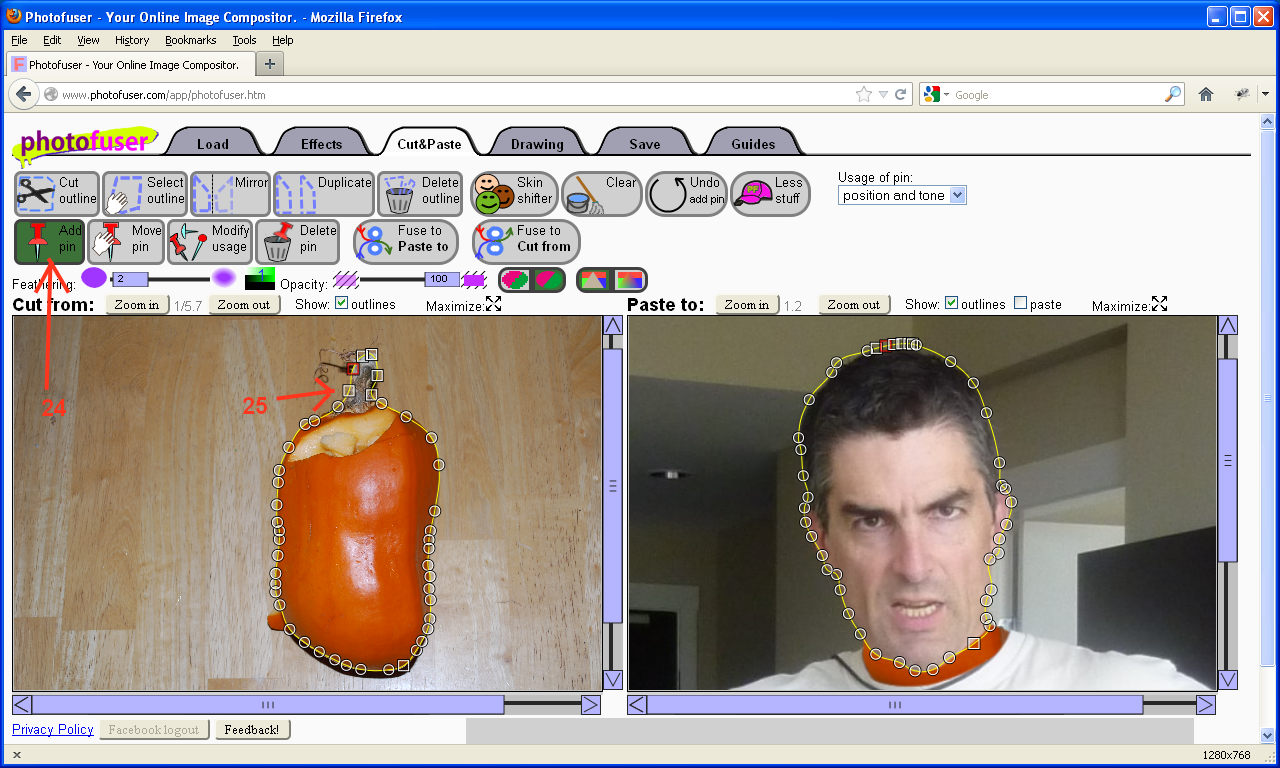
24. Select the "Add pin" tool.
25. Add some extra pins to reshape the outline in the "Cut from" pane to include the stem. For each pin, move the mouse cursor onto a desired segment, and drag it to a new position. You'll notice the new pins are square, not round. This will become signficant later, for now it's useful to keep track of which pins are new and which are old.
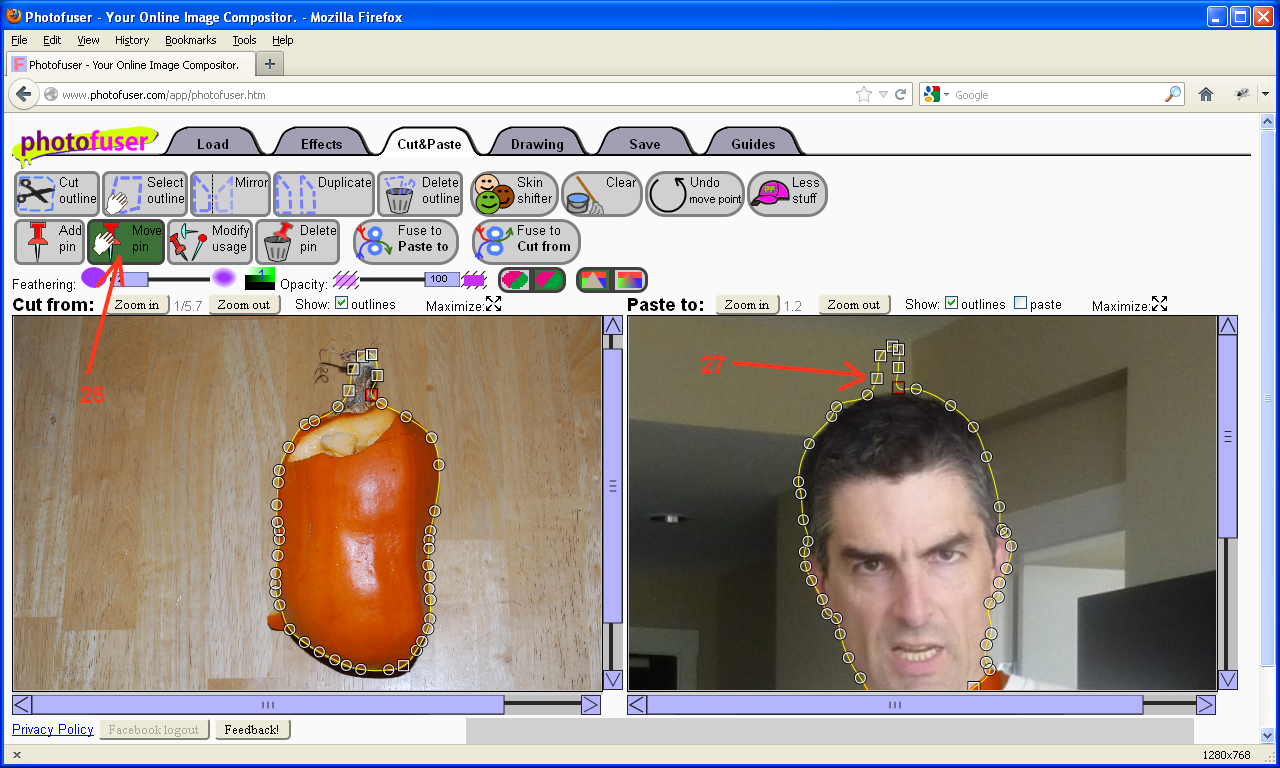
26. Select the "Move pin" tool.
27. Drag the new pins in the "Paste to" pane to the approximate shape of the pumpkin stem.
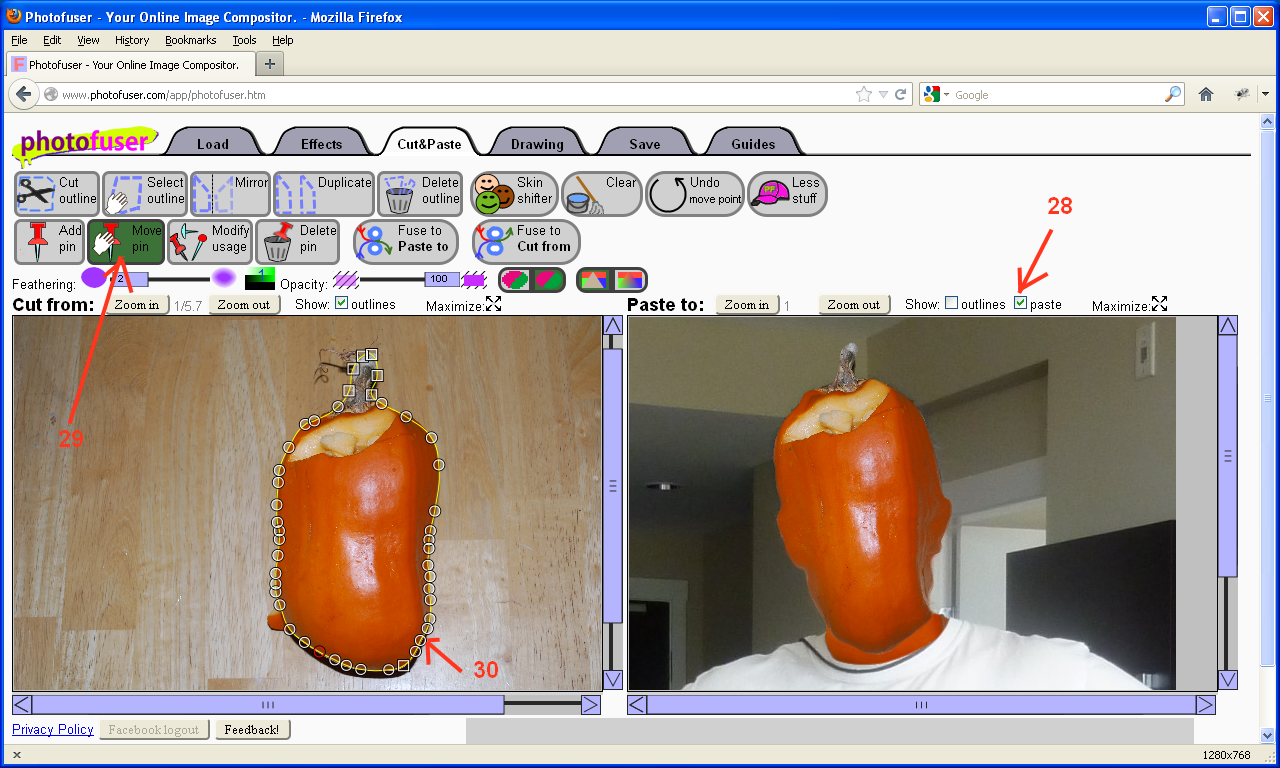
28. Check the "Show paste" checkbox so you can see what the pasted image will look like. In my case, there were some spots where the shadows in the "Cut from" pane were being pasted over. In the next two steps, we'll fix those.
29: Select the "Move pin" tool.
30. Move pins in the "Cut from" pane inwards on the pumpkin as needed to eliminate dark areas from showing up in the "Paste to" image.
Cutting Out Holes for the Eyes and Mouth.
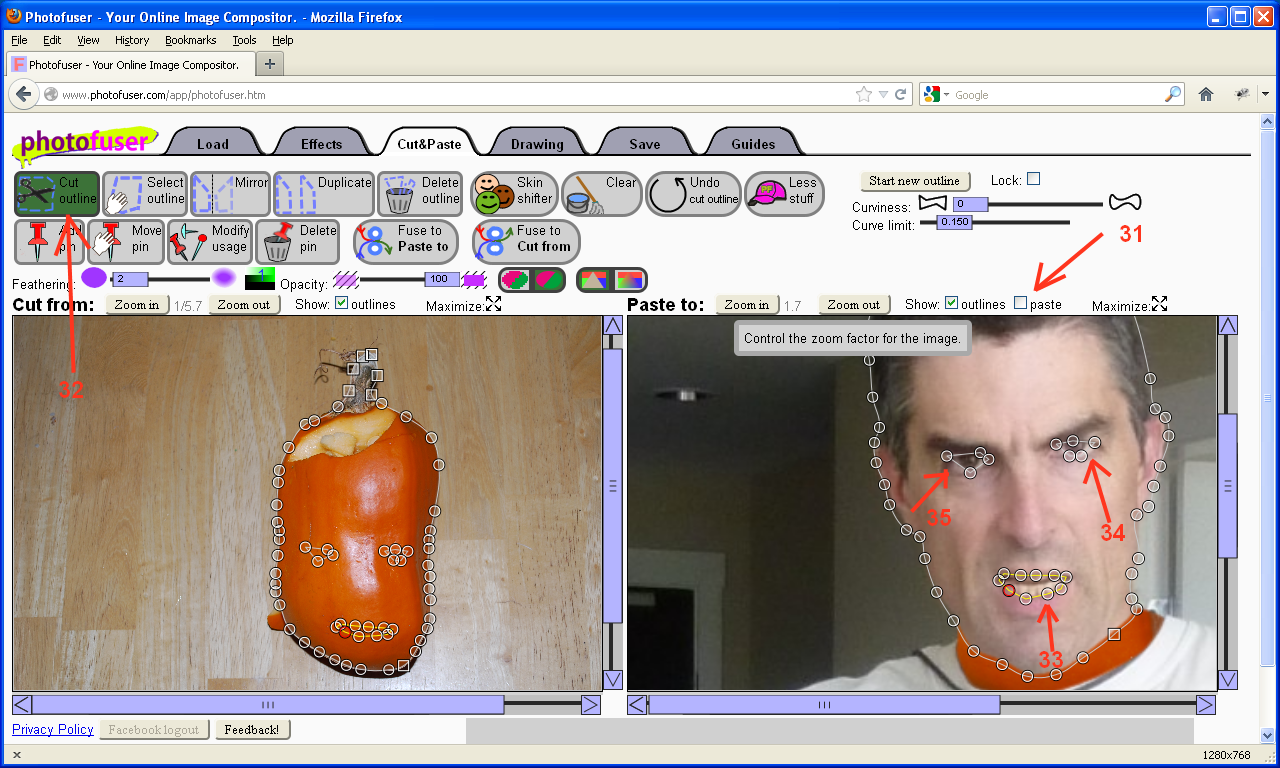
31. Uncheck the "Show paste" checkbox as you'll want to be able to see the eyes and mouth of the original face.
32. Select the "Cut outline" tool.
33,34,35. Cut outlines around the eyes and the inside of the mouth. When Photofuser detects one outline inside another, it treats the inner outline as a hole.
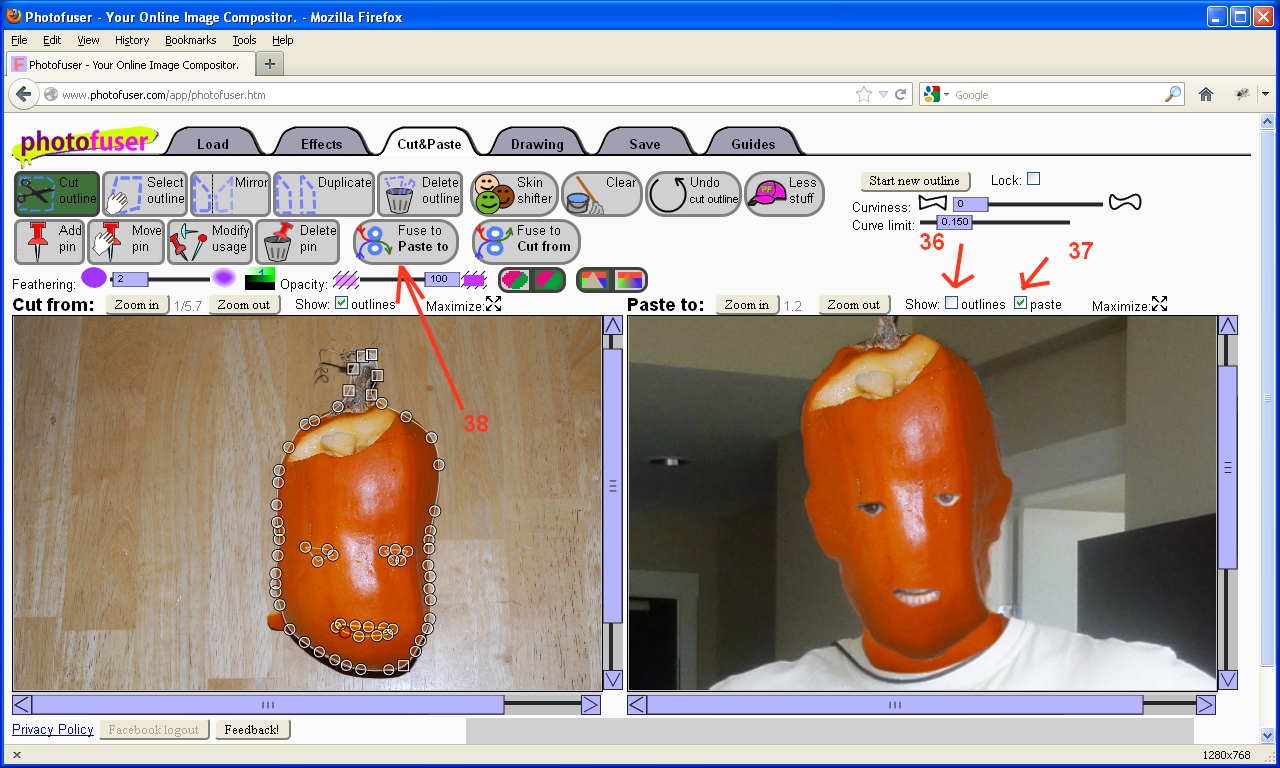
36,37. Unselect the "Show outlines checkbox, and select the "Show paste" checkbox.
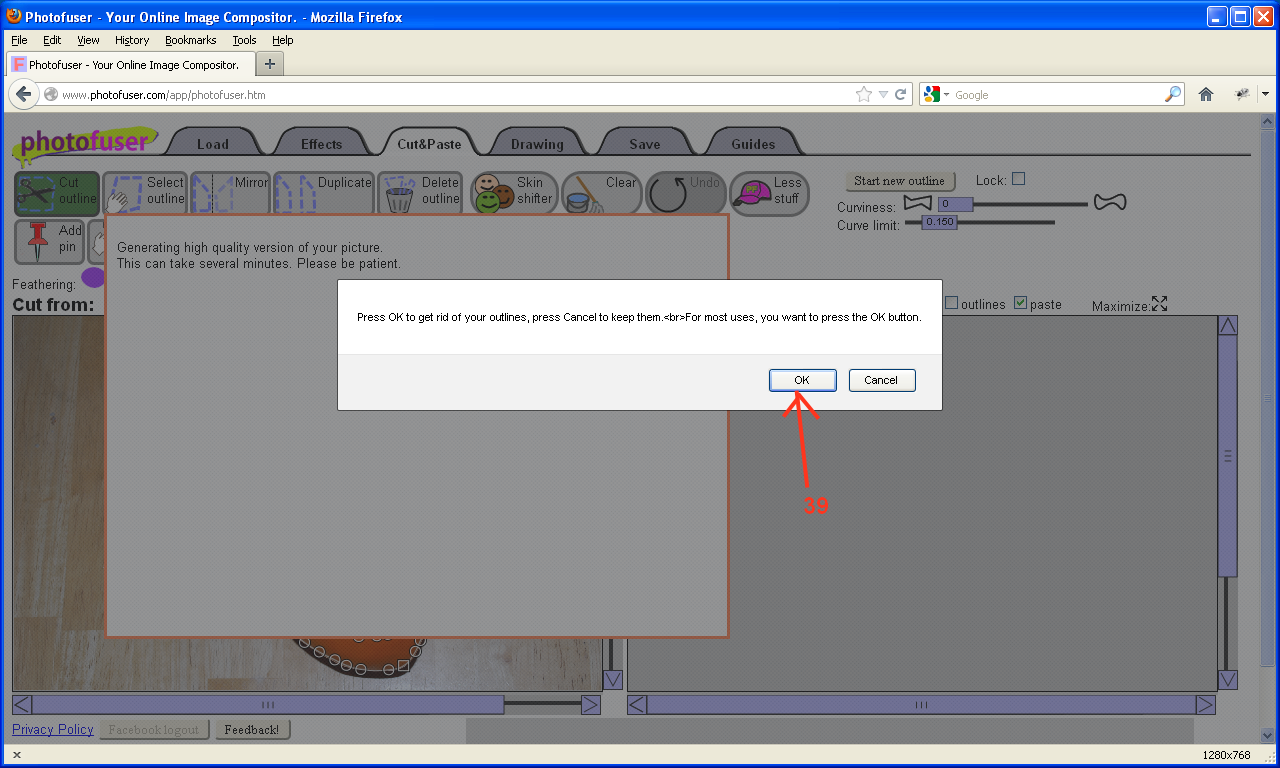
38,39. Press the "Fuse to Paste to" button and select the OK button when the confirmation dialog pops up.
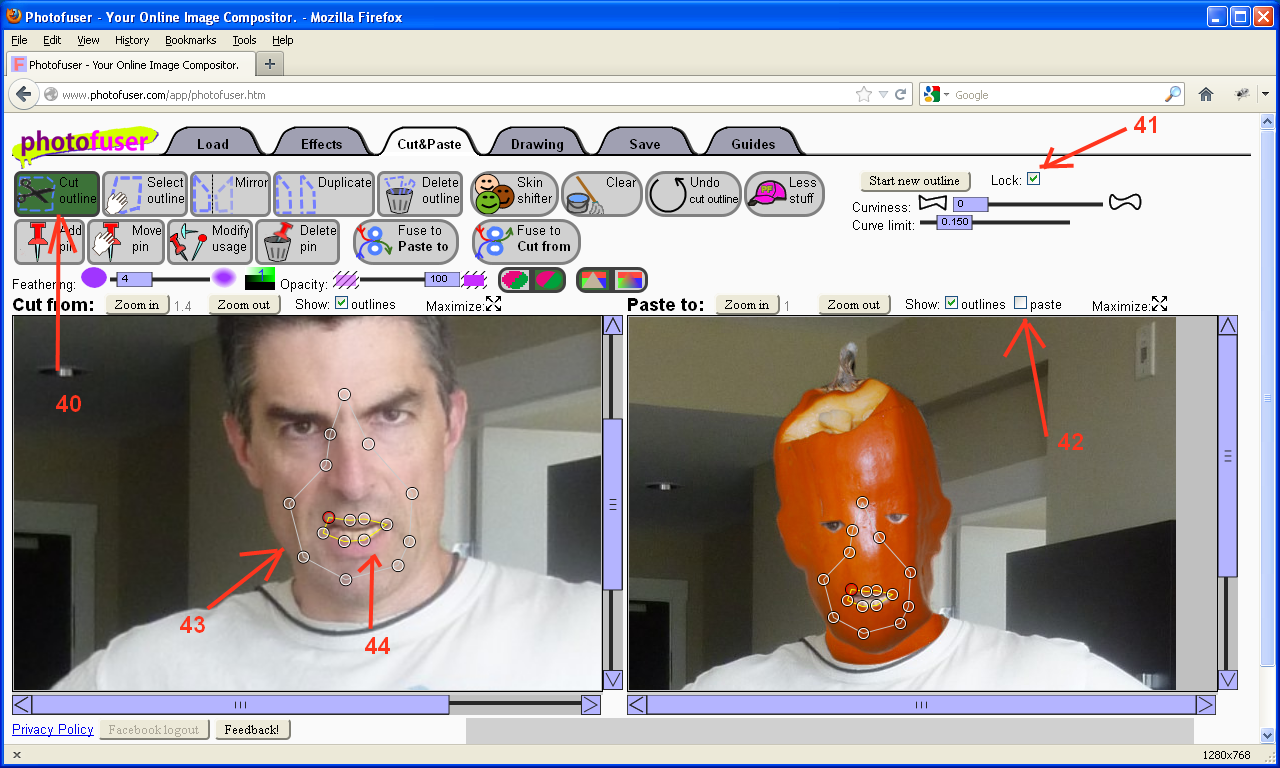
In the next few steps we're going to add a nose and lips to our pumpkin head. To do that, we need to load the original face picture into the "Cut from" pane. If you are using Firefox or Chrome, you can do it the easy way with drag-n-drop; just drag and drop the picture file into the Cut from pane, you don't even need to leave the "Cut&Pane" pane. Otherwise you need to go to the "Load" tab again, load the picture in to "Cut from" pane there, and then return to the "Cut&Paste" pane.
40. If you are wondering why the "Cut from" pane looks different in my screenshot, you skipped reading the above paragraph; read it before proceeding. Select the "Cut outline" tool.
41. Select the "Lock" checkbox. The Lock checkbox is very useful when your Cut from and Paste to images have the same size and registrations (features are at the same pixel locations in both images). When you are cutting a new outline with Lock enabled, it forces the outline in each pane to occupy identical pixel locations, regardless of zoom or paning.
42. Unselect the "Show paste" checkbox.
43. Draw an outline around the nose and mouse area. You want to include area surrounding the lips.
44. Draw another outline around the inside of the mouth.
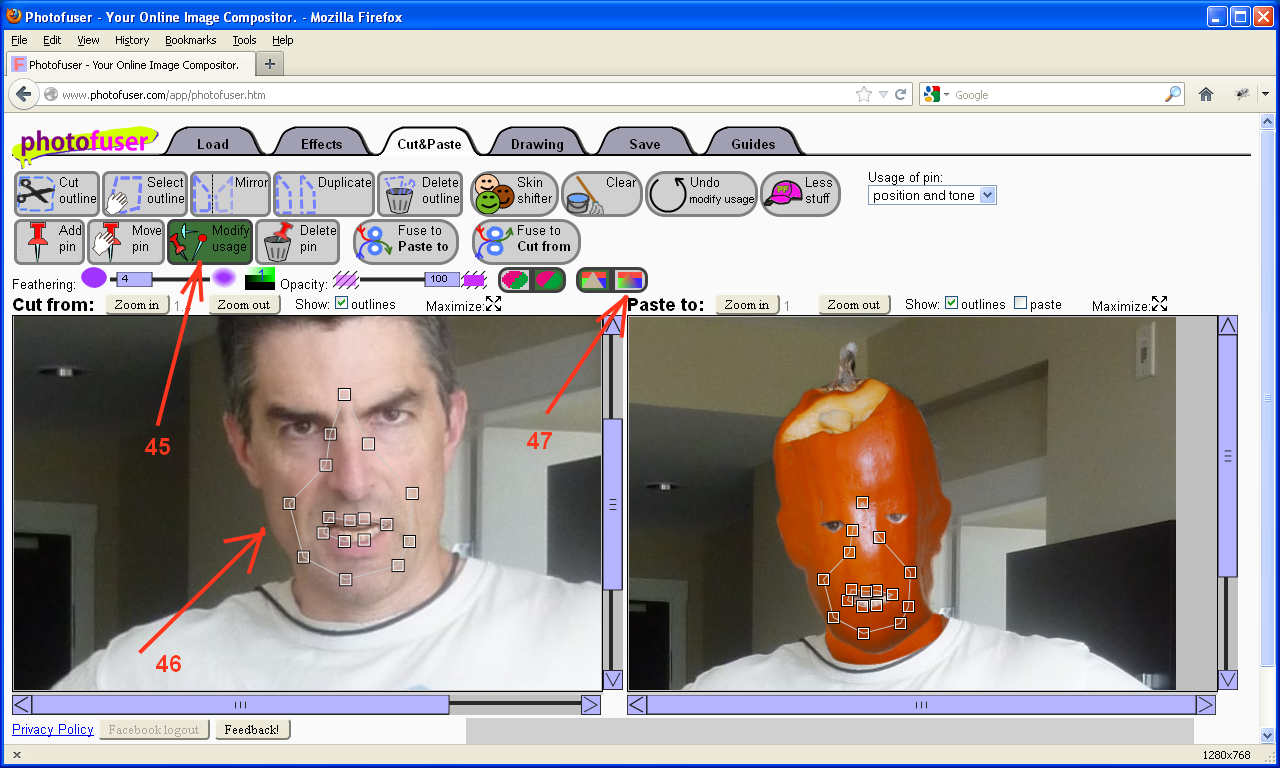
45. Select the "Modify usage" tool. This tool lets you change an attribute of a pin. Be default, when you draw an outline, pins affect only the warping of the pasted image (the warping) and the area covered. By default, this tool will let you change the attribute of a pin or group of pins to "position and tone" (from "position"), so that pins determine how tone matching works as well.
46. Drag a box around all pins in one image pane or the other. Alternatively, you can click on each pin. Afterwards the pins will change from hollow circles to hollow boxes, indicating that their attribute is "position and tone".
47. Click on the "Match tones" icon (a fading triangle inside a red, green, and blue area) to enable the tone matching. Tone matching will adjust the pasted image (once we turn "Show paste" back on) so that it's pixels have the same color as "Paste to" pixels they cover at the pin locations that determine tone (ie, all the pins).
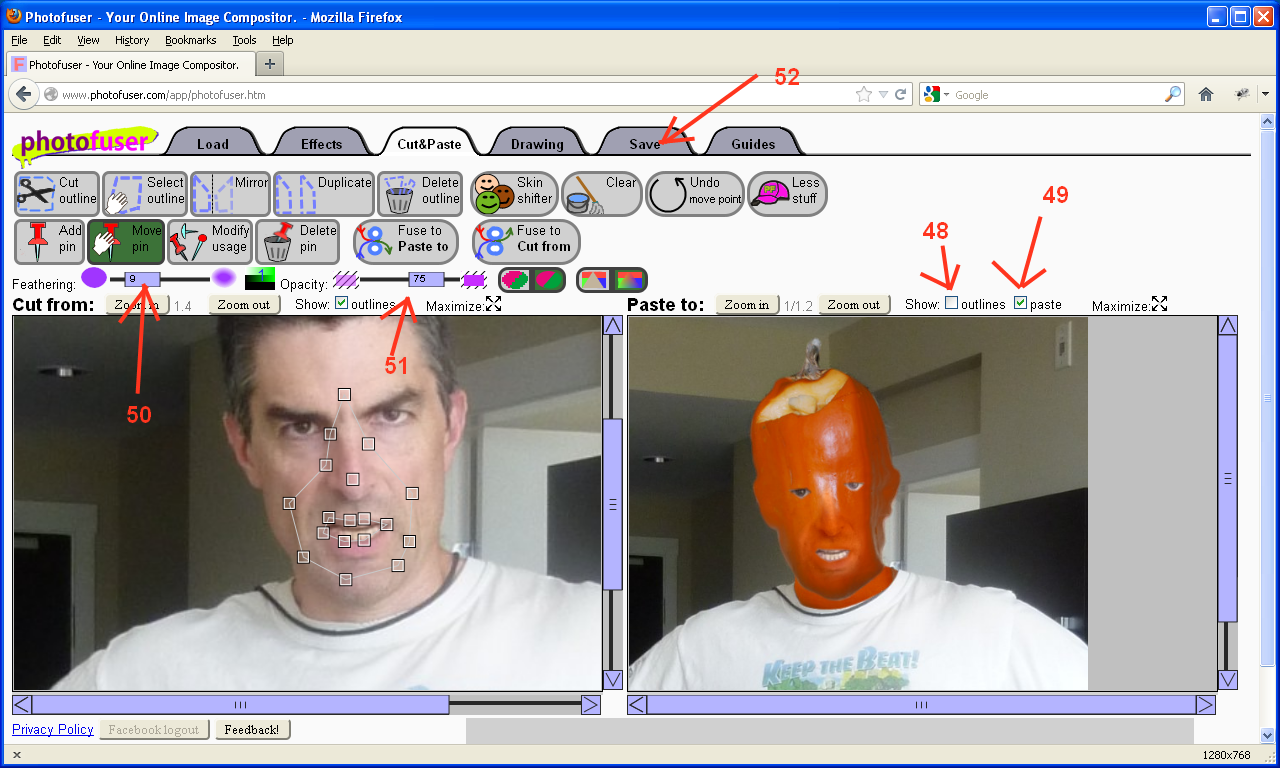
48. Uncheck the "Show outlines" checkbox, since outlines will just hide stuff we want to see now.
49. Check the "Show paste" checkbox. It will take longer to update the display than before because tone matching is turned on. Tone matching is quite expensive to compute.
50. Adjust the Feathering slider so that the edges of the nose and mouse outline aren't obvious.
51. I found that setting the Opacity to 75 worked well to allow the nose and lips to show while not removing too much of the underlying pumpkin skin texture.
52. Once you are happy with the appearance of the face, click on the "Save" tab.
Save Your Picture
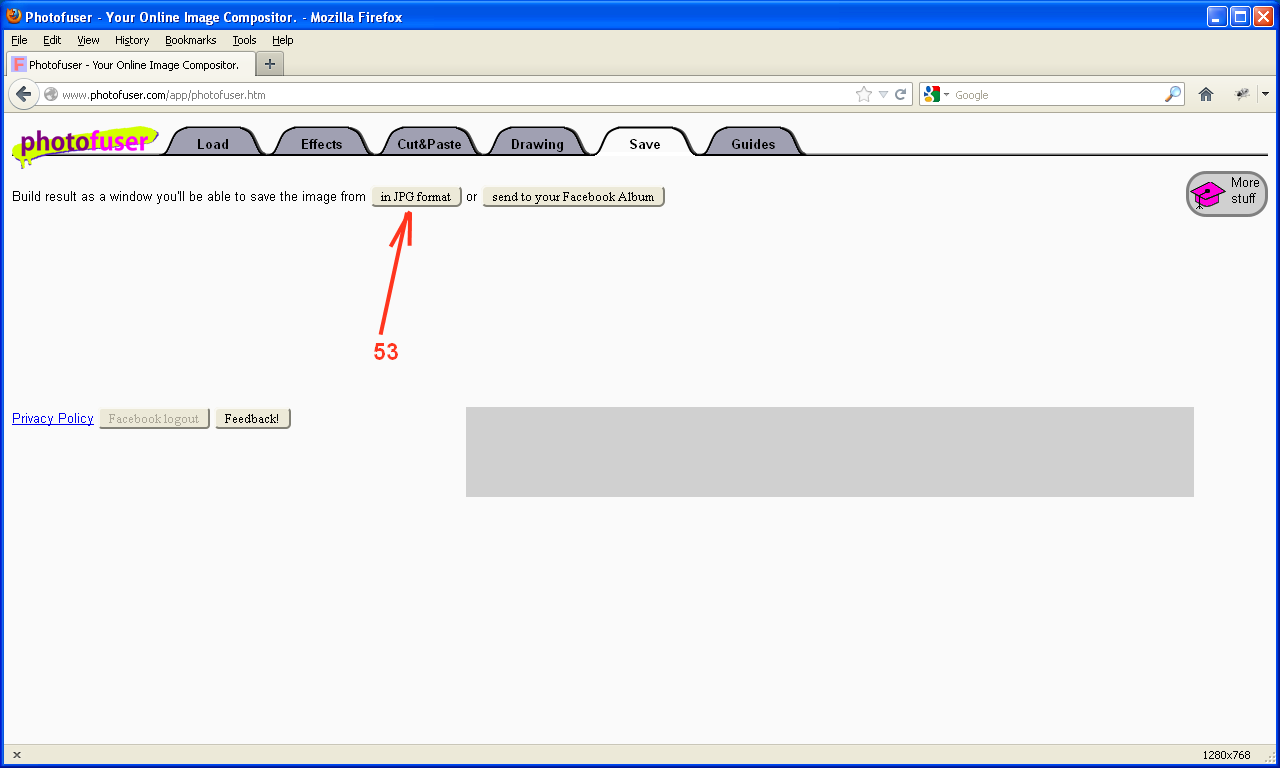
Step 53: Click on the "In JPG format" button. If your browser is anything except Chrome, this will bring up a dialog box with your picture in it. If you are using Chrome, you'll get a file save dialog box or your picture will be saved to your downloads directory (depending on your browser settings).
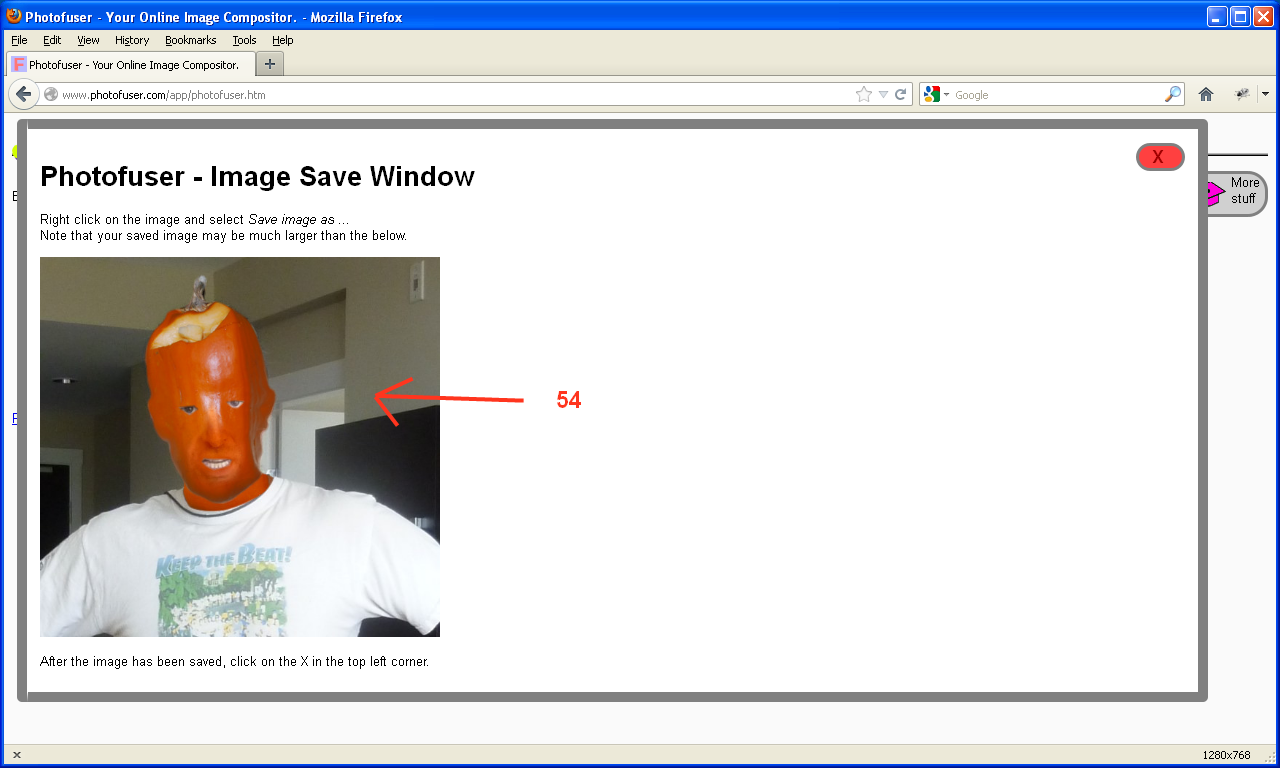
Step 54: If you aren't using Chrome, right click on the image that came up and select the "Save image as" item.
Step 54: If you aren't using Chrome, right click on the image that came up and select the "Save image as" item.