A Simple Raspberry Pi CCTV With Online Video Feed and Control Interface
by Kuumaver in Circuits > Raspberry Pi
419 Views, 3 Favorites, 0 Comments
A Simple Raspberry Pi CCTV With Online Video Feed and Control Interface


Here's a simple surveillance camera using a Raspberry Pi Zero 2w and a Flask Webserver. This guide aims to help everyone who wants to get started with Raspberry Pi through a very easy to do project. I wanted to write this for documentation, but I am open to share it with everyone who reads this post, along with some references I used.
Supplies


To work on this project, these are the things you would need to have:
- Raspberry Pi - I chose the Zero 2w for this project because of it's small size. Regarding it's processing performance though, I would upgrade for a bigger board (like the RPI 4 or 5 maybe) if I wanted to add more functions to it like facial recognition. Here's a good YouTube video about this which I also used for inspiration for the project if you're interested.
- Camera Module - The one I am using is not an official Raspberry Pi Camera Module. I found this a lot cheaper, compared to the official one. It may be lacking some functions the original one can do but it's enough to do the job I want it to do properly. Even with that, I do recommend getting the official one if you can because of the more things you could definitely do with it, allowing you to explore more. If you are interested, you should check their documentation here.
- 9g Servo - The servo will be used for the rotation function of the camera to view blind spots. This servo is small but it's enough to provide rotations for the camera.
- Micro SD card - This will be used to flash the Raspbian OS image into the Pi. I am using a 32GB card for this one (I would recommend this too, or you step up a little bit more to 64GB or even 128GB).
- Charging cable and Adapter - Use a suitable one for the Pi (I will be using a micro USB for Zero 2w). This will be used to power our project.
Setting Up the Your Raspberry Pi


You would first need to install the Raspberry Pi OS imager from Raspberry Pi's official website.
For a more detailed instruction on how to set your Pi up, I recommend checking this video out.
Just to further note, I went with the recommended option, which was Raspberry Pi OS 64-bit. I chose the one with desktop available since it has some of the libraries we would need already, like the picamera2 library.
Setting Up Hardware


Once you got your Pi good to go, it's time to connect things up.
Connecting the camera
Start by connecting your camera into the Pi, if you are using the same board as I am (Raspberry Pi Zero 2w), you should see a small tab on right side near the power (PWR) port (as shown in Figure no. 1 of this step). Now, if you look at your camera module, there should be the shiny side at the end of the connector (as shown in Figure no. 2 of this step), you connect it to the tab on the Pi with the shiny side facing on the board (as shown in Figure no. 3 of this step).
Connecting the Servo
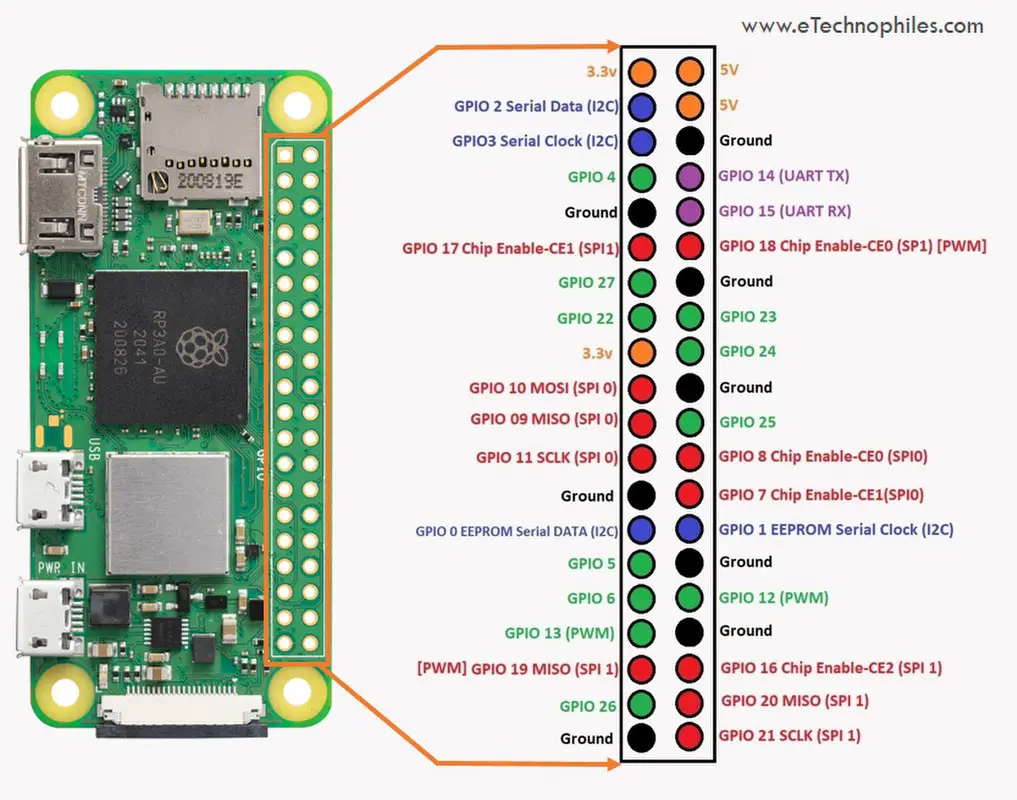
For the camera to rotate, it would need to have a servo. Connect the Servo's red wire into the 5v pin, the brown wire into the ground(GND) pin, and the orange wire into GPIO pin 27 in the Pi (as shown in Figure no. 4 of this step). You may refer to this for the GPIO pin layout on your Raspberry Pi.
Code
Python Script
Here is the link of where I referenced the code for the camera from, if you're interested.
Paste this code into Thonny, then save the file with using this format: name.py
To run the code, you can press the run button in Thonny (the button on top of the editor pane that looks like a green play button), and the stop button (it is the red button on top of the editor pane). Alternatively, if you're using terminal, you can go the directory of your code using cd then your folder or directory first, like this:
once you are inside the directory then you can run your code using this command (If you have your code in your main directory, you can just directly use):
HTML for the App
Since we will be using a webserver for the app, we would need an HTML file.
I would recommend you watch this video to have a little bit of background and understanding with regard to using Flask. We will use this to run the video feed from the camera and our control interface for the servo through a web server.
create a folder in your Pi and name it templates. Make sure that it is in the same directory as your Python script. Name this as Cyver_index.html. You can change the name with anything you want, but make sure you also edit the one in the Python script above, mainly the lines where return render_template is being stated.
If you would prefer downloading the files, both are in my GitHub Repository.
Running the Code
For running the code, you we
Accessing the App


We're almost there, now we just have to access the app.
Accessing the app is as simple as just connecting to the same network your Pi is connected. Once you're connected, you can check your Pi's IP address in its terminal using the ifconfig command (it should be on the wlan section), or you can check the connected devices on your router by going to its admin page by entering its IP address into your web browser. It's either 192.168.1.1 or 192.168.0.1, but it really depends on your router (try checking the back of router, it's usually there). Another option is to download Angry IP Scanner, which is basically a program for your pc that scans the IP addresses connected to your local network. Now, with either of these methods, you should be able to identify your Pi's IP address by looking for its hostname. Here's a video for your reference on this method.
Once you got your Pi's IP address, just enter it on your web browser with its port as well. It would look like this:
IP address:5000
Final Notes
I still plan on implementing better updates to the code like controlling the servo using a scroll feature instead of a button, or I can keep the button and make it so that with every press, it increments its movement relative to where the button is directed. For now, I just kept it simple with a front and rear view feature.
I hope this guide was helpful to some of those who are new to Raspberry Pi just like me, and are interested to learn more. I believe that there are still a lot of developments that can be added to this project but I will leave it to you guys to explore further by yourselves to learn and gain more insights as well.
Thank you very much for reading!