A Simple Acrylic Desk Light
by Dawn_of_justiz in Workshop > 3D Printing
1651 Views, 40 Favorites, 0 Comments
A Simple Acrylic Desk Light


Hey there, I made a prototype model of a desk lamp using Fusion 360. This is a beginner-friendly project and is super cheap to make. This lamp can act as decor or as a light to your gaming setup. If you wanna make a custom shape, feel free to check out my website where I take you through the step-by-step process of making a custom shape. So, Let's begin ^__^
Supplies


Here is a list of the tools and parts needed for the build.
Tools
Parts
Additionally
Making the Bear


The general idea behind this light is to diffract the led lights, thus making a glow effect. For that, we should cut a shape we like on an acrylic sheet. I used an online laser cutting service to cut the desired shape in an acrylic sheet. We just have to give them a .dxf file which contains the shape. If you wanna make a custom shape, check out my website by clicking here or check out the video above to learn how to make a .dxf file in fusion 360.
Downloads
3D Print?


The design of this light was made simple so that everyone should be able to build this, irrespective of knowledge in the field. The 3d models were made with software called Fusion 360. All the parts were printed using PLA+ filament. Altho I printed using white filament, I would recommend going with black since the led lights can leak through the body. The files to print can be found on my Thingiverse page.
Parts to Print
1 x Base Plate
5 x Holder
1 x Power-port
1 x Cover
My print settings
100% infill
Support needed
Hot-end temperature: 200
Bed temperature: 50
Slapping Some Color

For a professional look, I recommend initially sanding it with some sandpaper and then again after giving it a coat of sandable primer. Then for the final touch, paint it with wood-coloured spray paint.
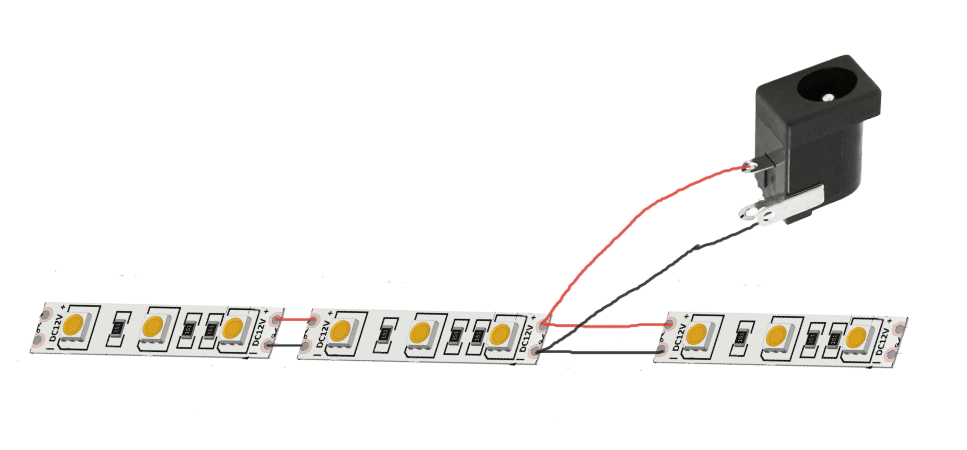
Wiring Up

The circuit for this light is fairly simple. The circuit diagram can be viewed by clicking here. The led strips are cut into three pieces and glued using a glue gun as shown in the picture. The positive terminal is connected to the positive and the negative terminal of the led strip is connected to the negative of the power jack. And with that, we are almost done.
La Touche Finale 😎

And with that, we just need to glue the cover in place and we are done. Overall, this desk lamp project is a great way to get started with 3D printing and electronics. It's beginner-friendly and can be customized to fit any style or room decor. Plus, it's an affordable way to add a functional yet stylish piece to your home or office. So, grab your tools and let's get started on making your own custom desk lamp today!
If you reached here, consider leaving a comment :D