3d Model Animal Cell for the Classroom
by lamichhanebis in Teachers > 9
2644 Views, 17 Favorites, 0 Comments
3d Model Animal Cell for the Classroom
When the teacher is just talking and talking as a student I find it very difficult to follow them and visualize what they are taking about. I would guess that many other students agree with me. I find it is far easier for me to learn something when teachers use models to explain something. This is why for this instructables I made a 3d model of an animal cell in tinker cad for teacher to use to better help their students understand and picture a cell in their minds.
Supplies
All you need is a 3d cad software. You are free to print this out as well but it is not necessary.
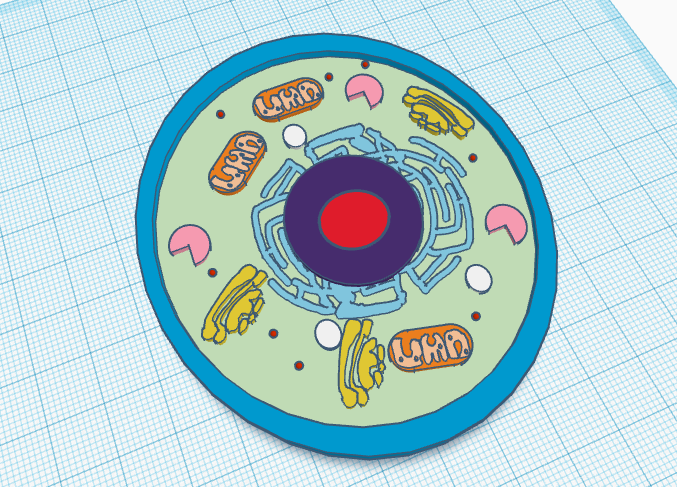
Building the Cell Membrane and Cytoplasm
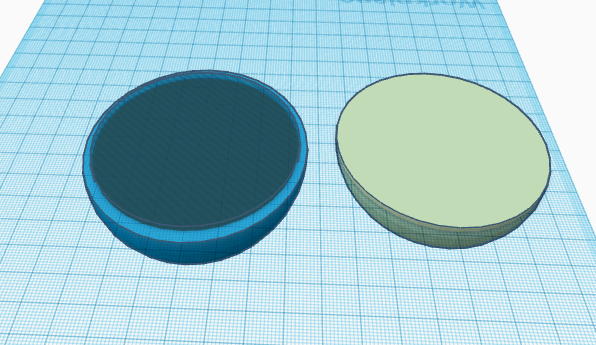
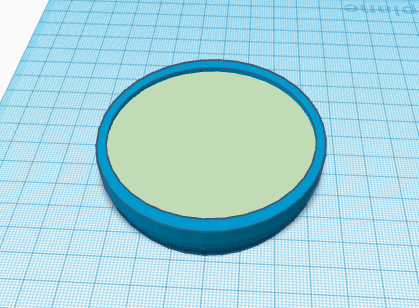
Place down 2 semi-circles inside one another and resize the inner one. The outside semi circle represents the cell membrane and the inside the cytoplasm. Change the cytoplasm a different color to differentiate from the membrane. I changed the height of the cytoplasm so that it is shorter then the membrane to add some depth to the model.
Adding the Rest of the Organelles
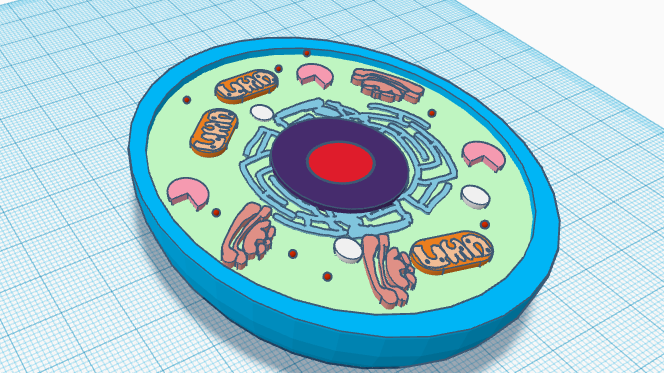

Now it is time to make the rest of the organelles. Here are all the organelles I added and how:
- Nucleus - Create a smaller semicircle and put it in the center of the cytoplasm
- Nucleolus - Create a smaller semicircle and put in inside of the Nucleus
- Ribosome - Small spheres doted around the cytoplasm
- Endoplasmic Reticulum - Use the scribble tool to create a web of lines sounding a circle. When finished resize the circle so that it fits around the nucleus
- Golgi Apparatus - Use the scribble tool to create blob like arcs
- Vacuoles - Use small spheres
- Lysosomes - Use the Pac Man shape and slice it in half
- Mitochondria - Use a cylinder and 2 semi circles as the body and cut it in half. Finally, using the scribble tool draw out a pattern and group the shapes into one.
Label
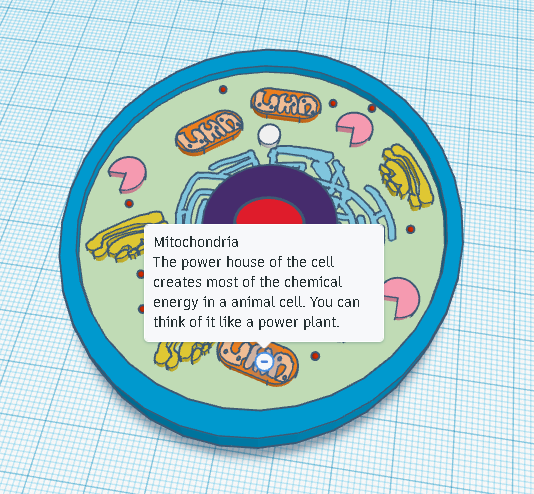
The final step and one of the most important steps in creating a model is labeling all of the parts. All you have to do is use that note tool and attach them to different parts of the model. I recommend along with the name you include the function and maybe a helpful mnemonic to remember the organelles. Here are a few examples:
Mitochondria -The power house of the cell creates most of the chemical energy in a animal cell. You can think of it like a power plant.
Cell Membrane - The cell membrane surrounds the inner organelles protecting them. Its job is to decide what comes in and what goes out of the cell. Like a border patrol for the cell.
Now you can use this model how ever you want. I think this would be a very useful class room resource for both students and teachers to learn about cell structure. If you are a teacher I would advise sharing the tinker cad model to all of you students. If you use google classroom you can even do it directly form the tinker cad page.