3D Print Your Trek, in Color!
by drhatch in Workshop > 3D Printing
79011 Views, 481 Favorites, 0 Comments
3D Print Your Trek, in Color!
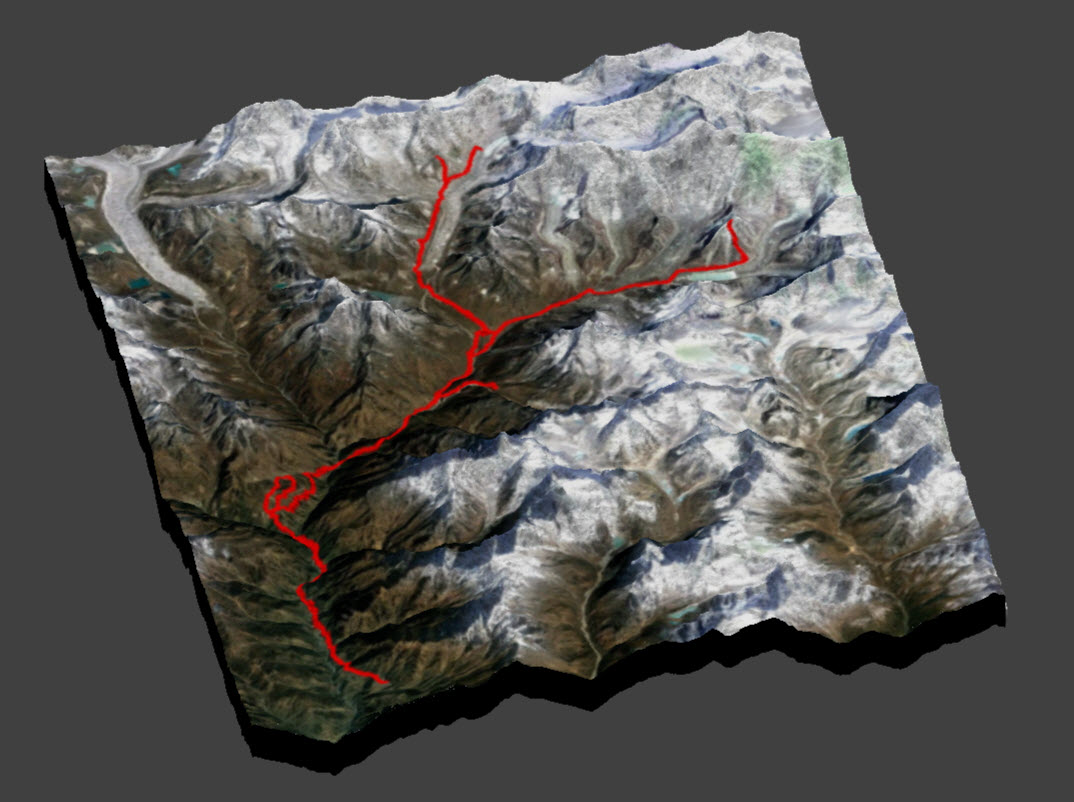
Do you take a GPS device when you go hiking, biking or other outdoor activity? This Instructable will show you how to create a 3D printout of your adventure, in color, with accurate elevation data.
Even if you do not log your adventures with a GPS device, you can use this Instructable to create a beautiful 3D printout of any region in the world. Make color 3D printouts of your adventure "bucket list"!
The example I will show comes from a recent trek I took to Nepal, in the Mount Everest region. The color 3D printout shown was fabricated at http://www.shapeways.com from files I generated using the steps I will give you in this Instructable.
Download the Elevation Data
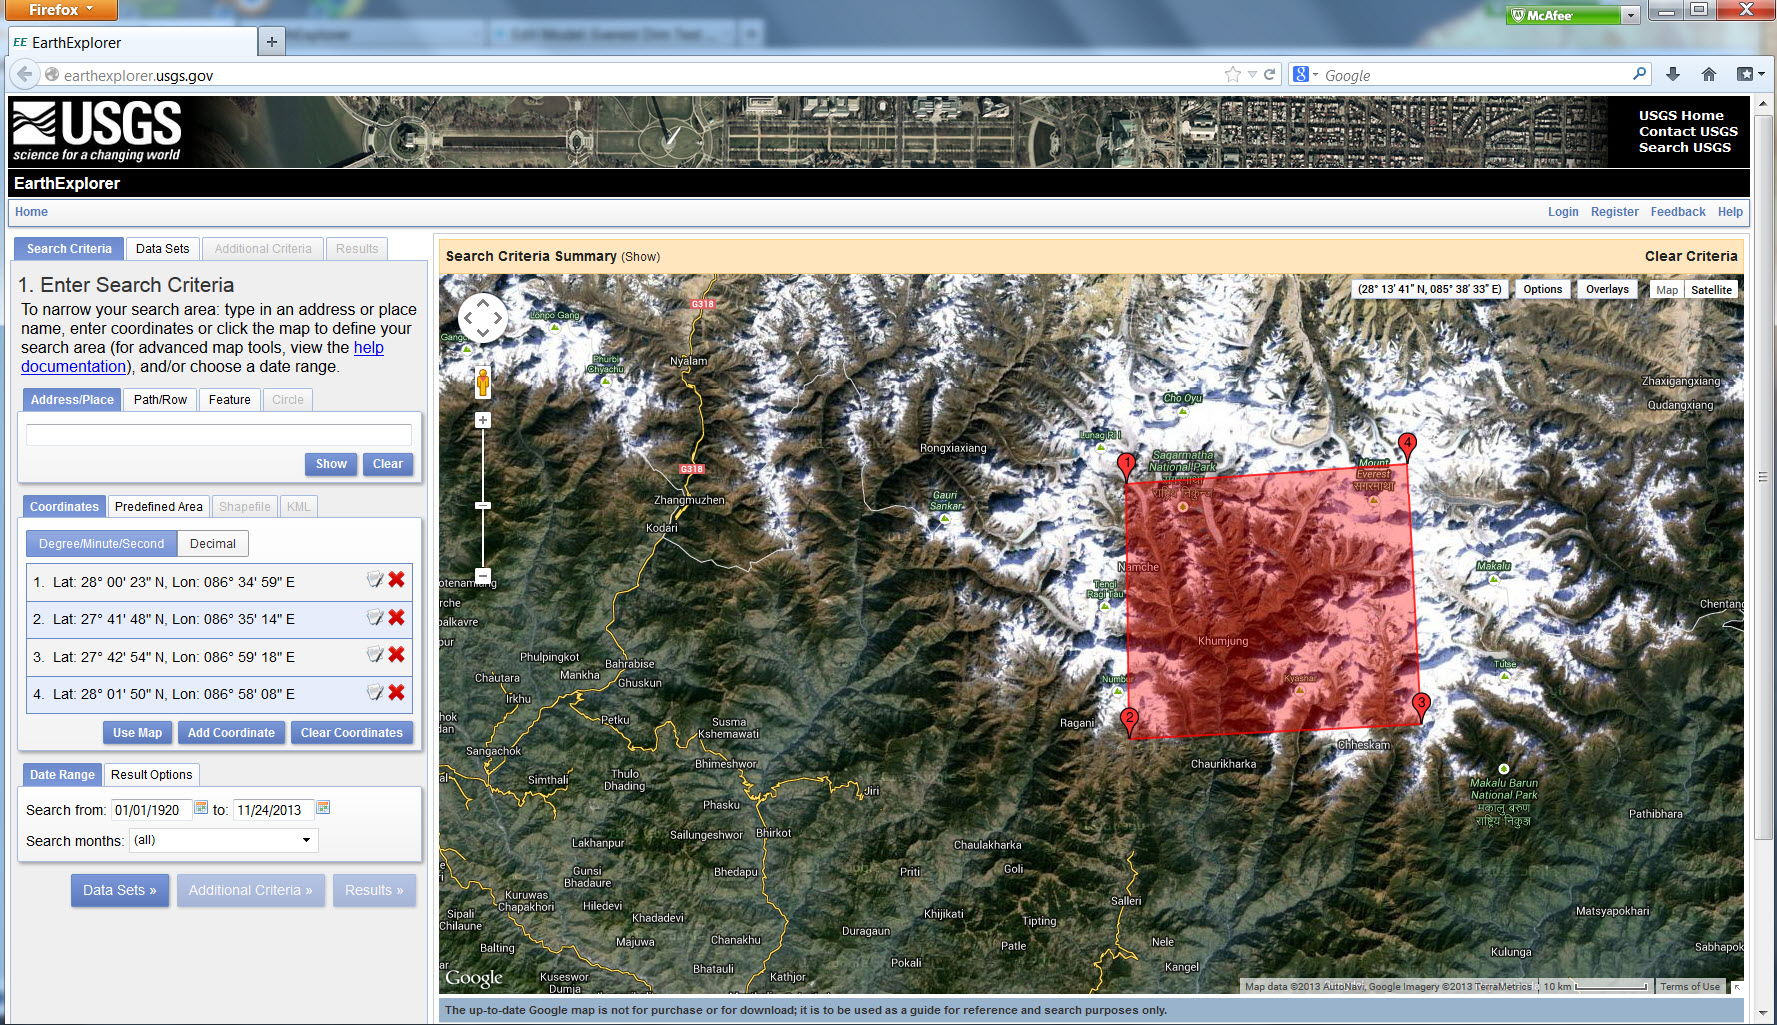
To make a 3D model that we can print, we need the elevation data. I like to use http://earthexplorer.usgs.gov because it is run by the United States Geological Survey and has data for everywhere in the world. The data is free.
Select the general area around where you hiked. Do this by clicking "Use Map" under the "Coordinates" section. Click the red X's to delete any coordinates that may exist. Then you can navigate on the map area, and define your own region by clicking. Select a region that is just slightly larger than the area you hiked in. A simple rectangle that encloses your hike is sufficient.
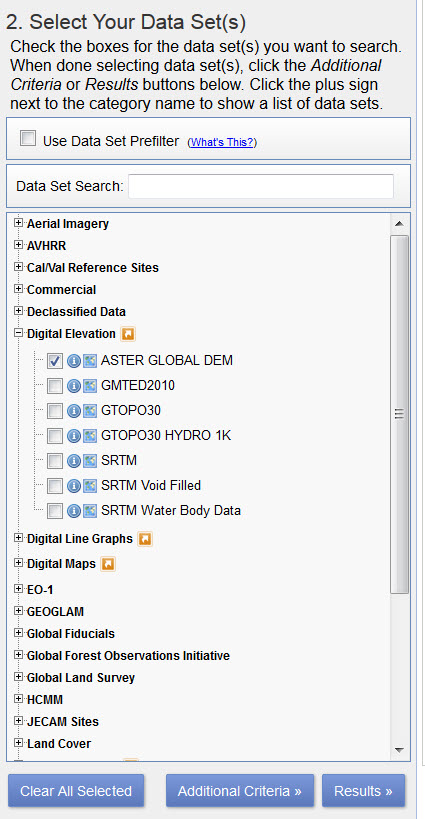
Click the "Datasets>>" button.
Expand the "Digital Elevation" line, and click on the "AsterGlobalDEM" box.
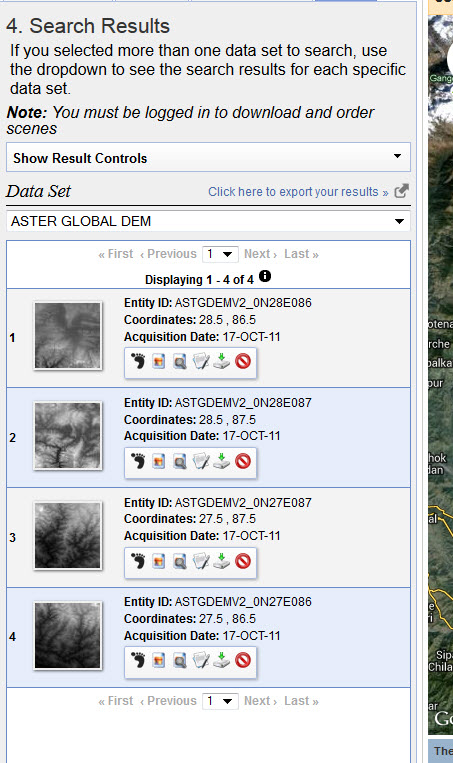
Click the "Results>>" button.
You will be presented with a list of the files you need to download. Note that the data is in blocks of terrain one degree Latitude, and one degree Longitude, on each side. If the area you selected encroaches into any one-degree region, the file for that region will show up on the list of results.
Also note that if more than one file is on the list of results, then you will need to "stitch" the data into one contiguous region. The steps for doing this are provided on the next page.
Download the .ZIP file or files onto your computer using the icon with a green down arrow. (You may need to create a free account.)
From the .ZIP file(s), extract the .TIF file and save it. You will not need the other files in the .ZIP files.
Stitching Together Multiple Regions Into a Single Map
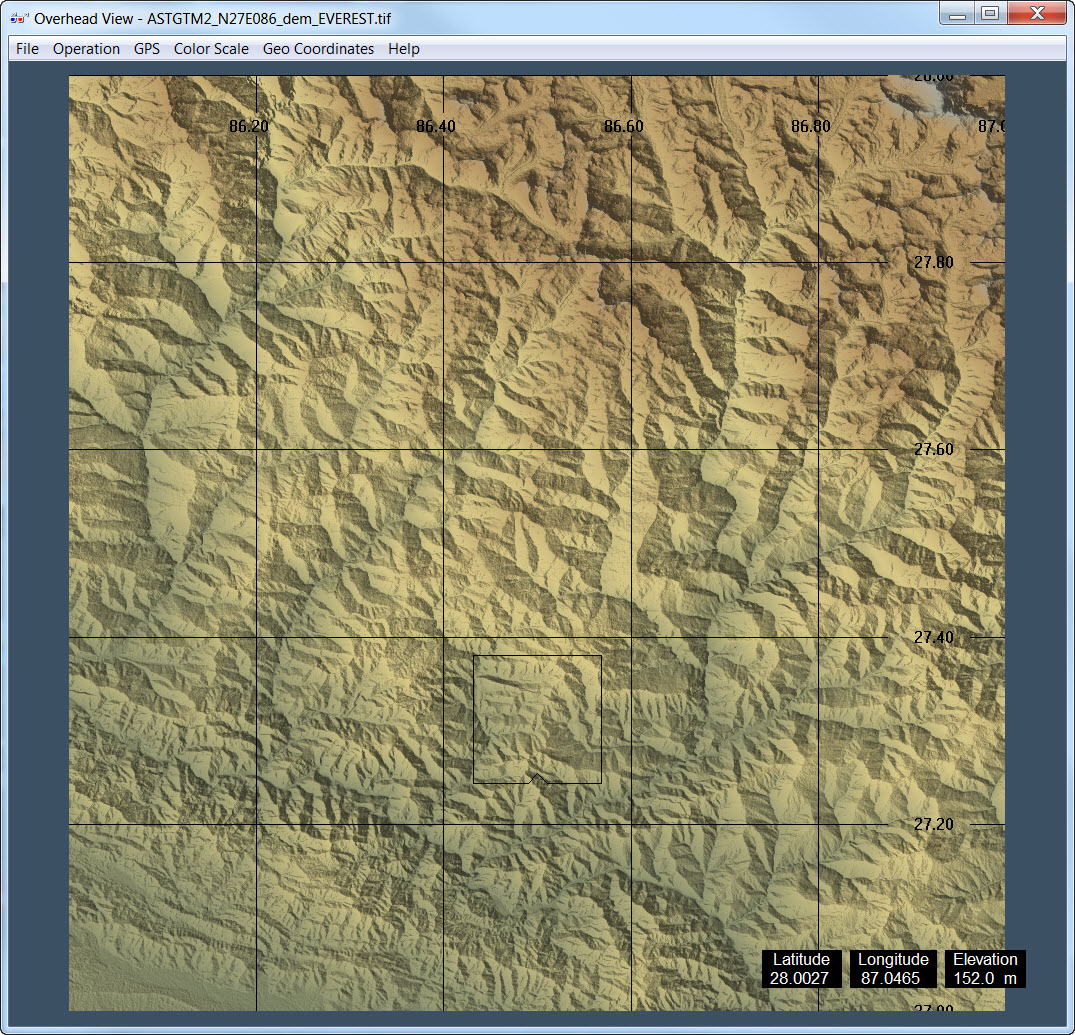
The data you downloaded covers very large areas, and you probably will want to select a smaller region. Or perhaps you need to tile multiple regions together, and then select the area you want to print. Here is how to do that.
First, download a program called "3DEM" from http://www.visualizationsoftware.com/3dem.html. (It is free software.)
We will use this program to import, tile, crop, and export the raw terrain data that was downloaded.
Run the program and select "File" -> "Load Terrain Model" and then click the "GeoTif DEM" radio button.
Next, select and open the .TIF file you saved in the previous step.
If your hike is fully contained within this region, you can skip to the next step in this Instructable. Otherwise, you need to "stitch" or "tile" the multiple regions together. (A single one-degree region is shown in the above image.)
To stitch multiple data sets into a single map, save the first .TIF file as a .BIN file.
Click "File" -> "Save Terrain Matrix" and select the Binary Floating Point format. Save the .BIN file in a new directory that you will use to hold all of the .BIN files.
Repeat the process, opening each .TIF file, and saving each of them as .BIN files, putting them all in the same directory.
Now, open all of the .BIN files at once. Click "File" -> "Load Terrain Model" and select "Terrain Matrix (bin, txt)" and navigate to the directory holding all of the .BIN files.
Select all of the .BIN files (CTRL-click each one or SHIFT-click a range or use CTRL-A) and click "Open."
You should now see a map of the large region. If not, make sure all of your map data blocks lie next to each other.
You are now ready to select a smaller region that you will eventually be printing out.
Select a Region to 3D Print
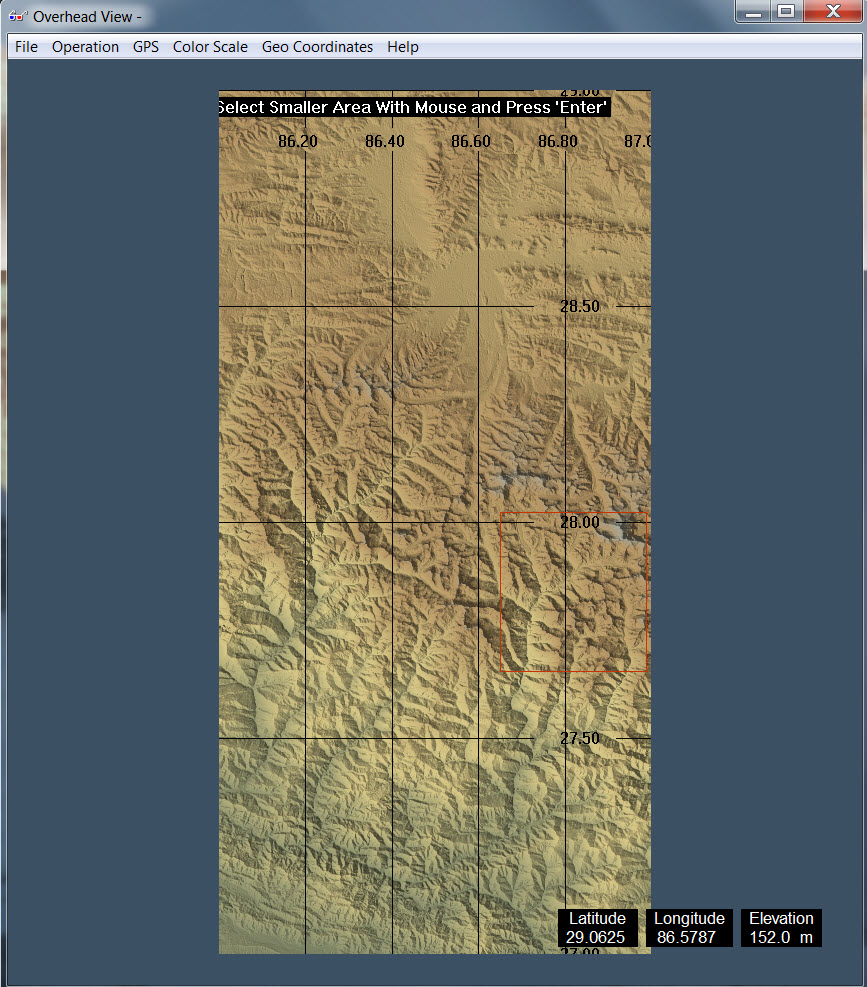
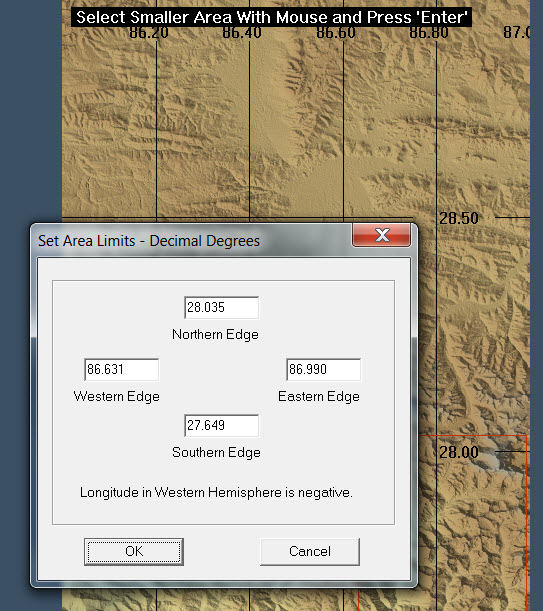
You will now want to select a rectangular region that encompasses the region of your trek.
Select "Operation" -> "Select Smaller Area" and then click-and-drag the area you want. Note that the area you select here will be precisely the area that is eventually 3D printed.
Confirm the Latitudes and Longitudes that define the sides of the region. IMPORTANT: Write down the four numbers! We will use them later to select the overlay image that will provide the color surface. Writing these numbers down allows you to select an image region that corresponds with the elevation data.
Once you see the smaller region on the screen, you may want to verify that the data does not contain any missing data. Select "Operation" -> "Patch Missing Data" and then select the entire region of the map. (To do this you may need to make the map display smaller in order to select the whole thing. Use the Operation -> Resize or F6 key to do this.)
Save the region as a "USGS ASCII DEM" file.
Convert to .X3D Format
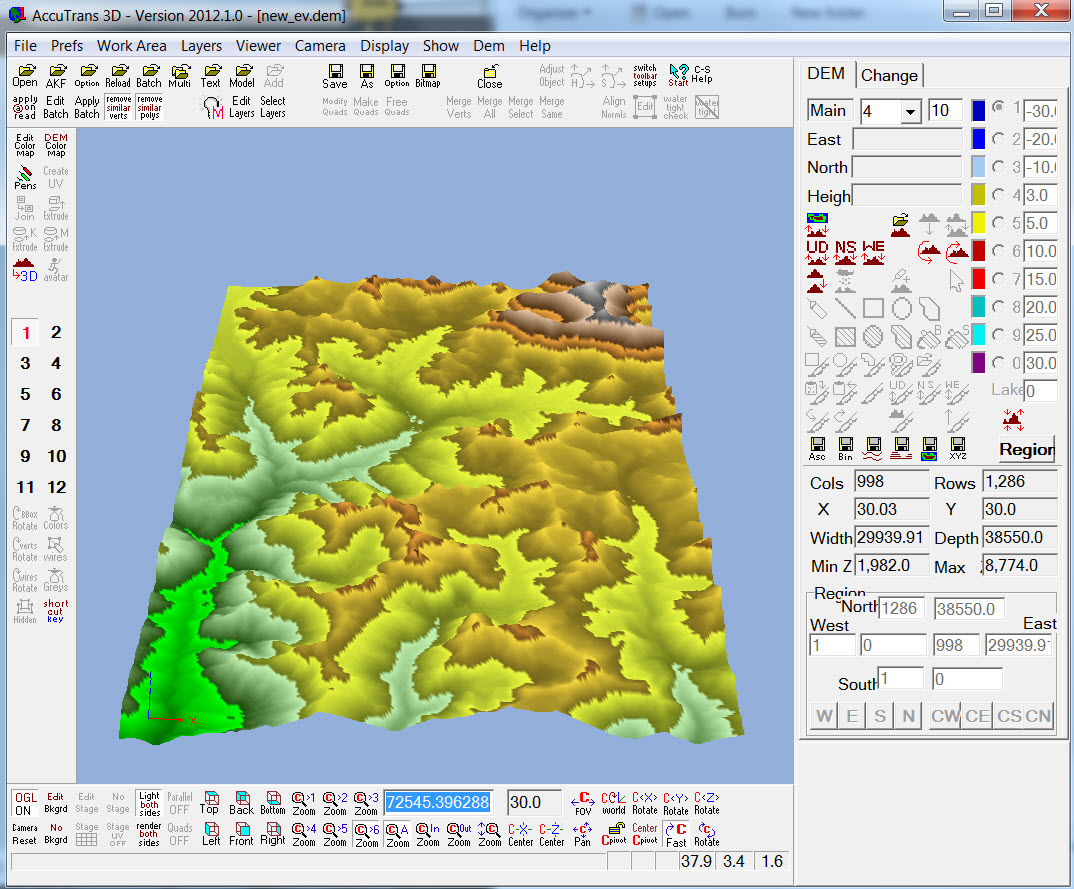
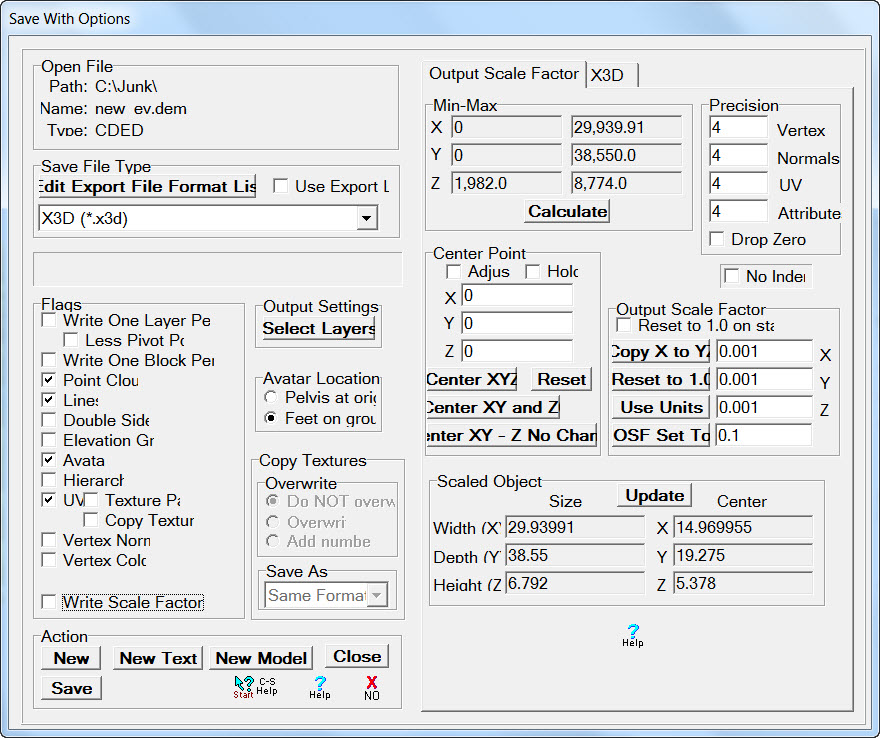
In order to color print the model the data needs to be converted from .DEM format to .X3D format.
To convert the data, I use AccuTrans3D located at http://www.micromouse.ca It is free for 30 days, and then you can buy it for $20.
Run the program, and click the "Open" icon. Select "CDED (*.dem)" as the file format, and select the .dem file you created in the previous step.
Next we simply save the data to the new data format (.x3d). When we convert (save) the data in the new format, we also want to scale it down. This is accomplished during the "Save" step:
Select "File" -> "Save With Options."
There are many regions in the window that appears. Set the "Output Scale Factor" to 0.001 in the X, Y and Z boxes. Click "Update" in the "Scaled Object" area.
Set the "Save File Type" to "X3D (*.x3d)"
On the "X3D" tab (upper right), uncheck all of the viewpoints. Leave "WorldInfo" and "NavigationInfo" checked.
Click the "Save" button. In the window that appears, set the "Vertex Interval" to "2" to generate lots of terrain details in your model, or "4" for less terrain detail. Try to get the "# of Triangles" under 200,000 so that editing and uploading the model will not be slow. Once you see the terrain data later, you can always come back and change this setting to generate more, or less, detail.
Click "OK" to create the file. This may take a few seconds.
I now click "No" (red x) button to close the dialog window and leave AccuTrans 3D running with the model open, but you can close it now, because we are done with AccuTrans 3D.
Summary of the upcoming steps. We will:
- Create a 3D model in a 3D CAD program (using Blender.)
- Generate a color image for the surface of the 3D printout.
- Create a UV map of the surface of the 3D model, and then link the image to that.
- Extrude the terrain surface to create a model that can be 3D printed.
- Prepare the package of files (2 files) for uploading to Shapeways.
Create the 3D Model in Blender
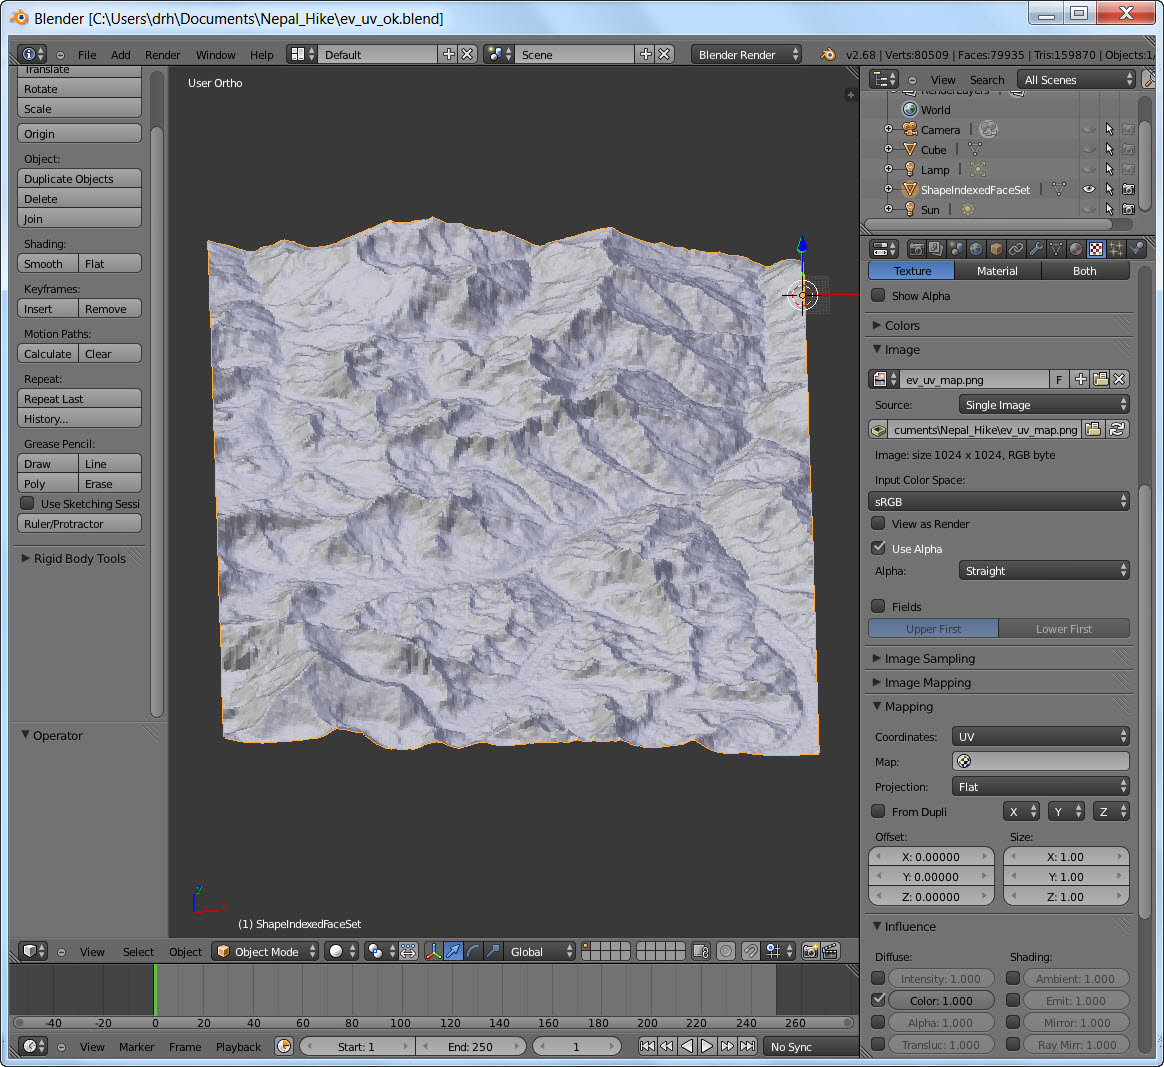
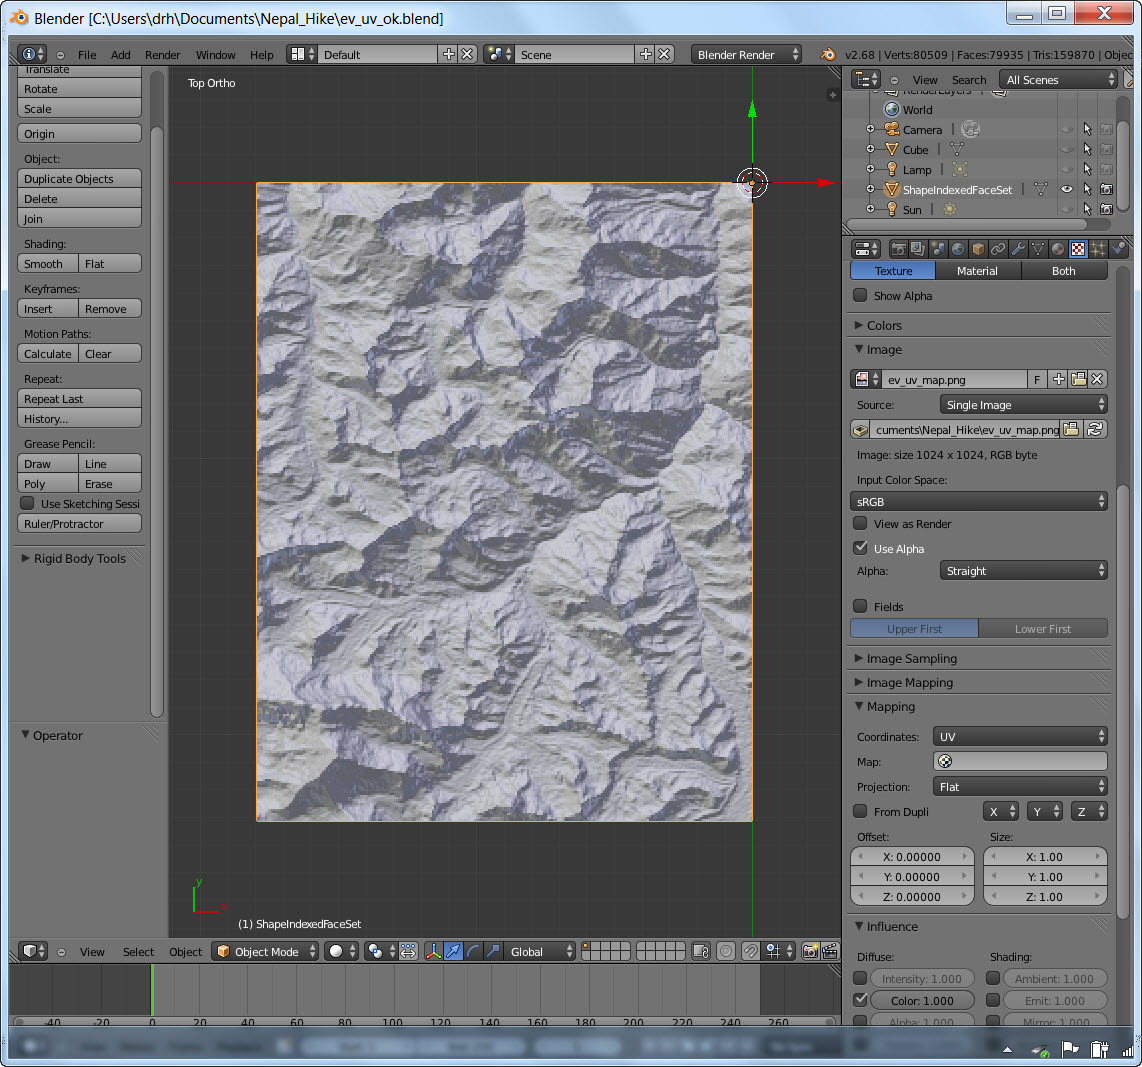
The data we just saved does not have any thickness yet, and so it cannot be 3D printed. It also does not yet have a graphic overlay that shows where you hiked. To do this, we can use Blender.
Blender is an open source software package for 3D modeling. You can download it for free at http://www.blender.org.
Note that there is a learning curve for this very powerful software! I will try to walk you through it, but you will probably want to have a reference book like "Blender for Dummies" (http://www.amazon.com/Blender-Dummies-Jason-van-Gumster/dp/0470584467) and you may need to spend a little time learning the the basics of this program in order to use it well.
After running Blender, select "File" -> "Import" -> "X3D Extensible 3D (.x3d/.wrl)" and then navigate to your .x3d file and select it.
Some useful Blender navigation commands:
Near the bottom of the screen, select "View" -> "View Persp./Orth"
Press SHIFT-c to center the image.
Select "View" -> "Top"
You should now see your map as a rectangle, probably with South at the top and North at the bottom. We will flip the graphic overlay later to match.
Save often!
ADDING A LIGHT SOURCE
We need to add a light source to the model. This will illuminate it later so that we can see the .JPG image that will be placed on the surface.
To do this, press SHIFT-A. This will bring up a menu on the screen. Left-click on Lamp, then Sun.
A sun icon will appear on the screen. Click and drag the red and green arrows to center it over the landscape. You will need to rotate the model a few times to see that it is centered. Then, click and drag the blue arrow to move it high above the surface.
On the far right sub-window, you will see the word "Sun." Turn off the "eye" icon, as before. Leave the "camera" icon on.
We are now ready to prepare the color graphic that will be printed on the top. This will give the 3D printout the surface color of the terrain, and optionally, the path of your trek.
Blender is an open source software package for 3D modeling. You can download it for free at http://www.blender.org.
Note that there is a learning curve for this very powerful software! I will try to walk you through it, but you will probably want to have a reference book like "Blender for Dummies" (http://www.amazon.com/Blender-Dummies-Jason-van-Gumster/dp/0470584467) and you may need to spend a little time learning the the basics of this program in order to use it well.
After running Blender, select "File" -> "Import" -> "X3D Extensible 3D (.x3d/.wrl)" and then navigate to your .x3d file and select it.
Some useful Blender navigation commands:
- Use your mouse wheel to zoom in and out.
- Press and hold the middle mouse button while moving the mouse to rotate the image in 3D.
- Left click to move the cursor cross-hatch.
- Press ALT-Home to recenter the image wherever the cursor cross-hatch is.
- SHIFT-c to center the image.
- If the sub-window region that shows the image ever changes to another mode (if you accidentally hit the "Render" button on the right, for example), click in this sub-window and press SHIFT-F5.
Near the bottom of the screen, select "View" -> "View Persp./Orth"
Press SHIFT-c to center the image.
Select "View" -> "Top"
You should now see your map as a rectangle, probably with South at the top and North at the bottom. We will flip the graphic overlay later to match.
Save often!
ADDING A LIGHT SOURCE
We need to add a light source to the model. This will illuminate it later so that we can see the .JPG image that will be placed on the surface.
To do this, press SHIFT-A. This will bring up a menu on the screen. Left-click on Lamp, then Sun.
A sun icon will appear on the screen. Click and drag the red and green arrows to center it over the landscape. You will need to rotate the model a few times to see that it is centered. Then, click and drag the blue arrow to move it high above the surface.
On the far right sub-window, you will see the word "Sun." Turn off the "eye" icon, as before. Leave the "camera" icon on.
We are now ready to prepare the color graphic that will be printed on the top. This will give the 3D printout the surface color of the terrain, and optionally, the path of your trek.
Prepare the GPS Data From Your Trek (optional)
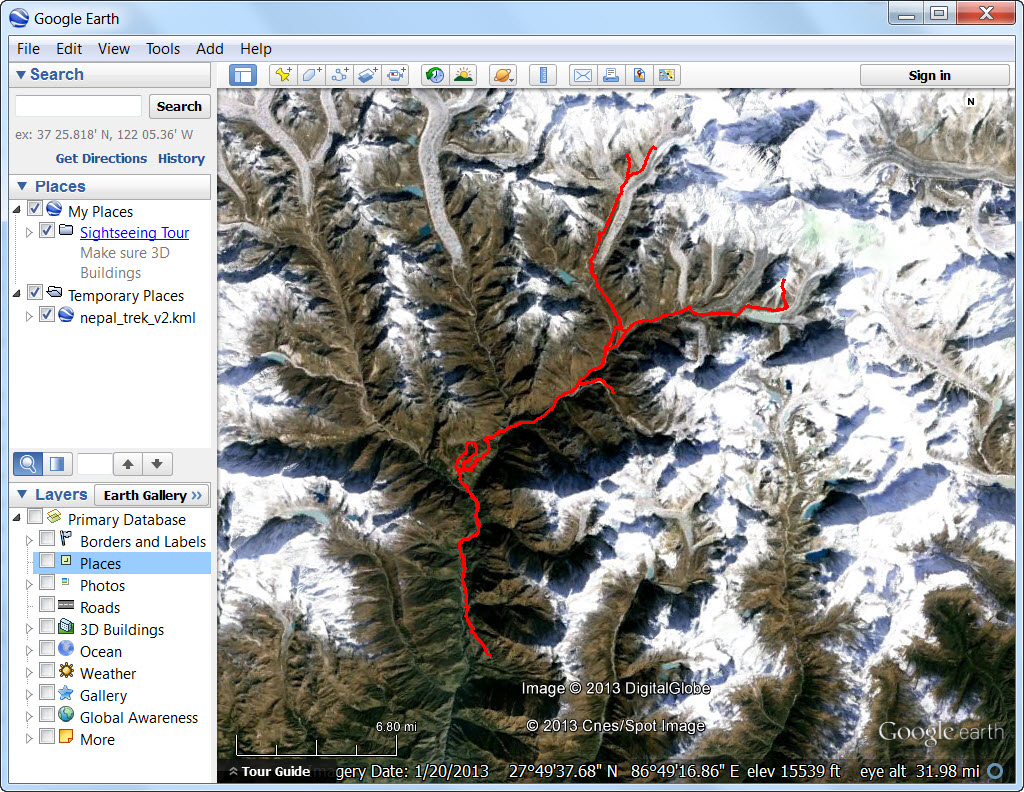
When I hike, I carry a GPS logger. Every 5 seconds, it saves the coordinates into memory for downloading later.
If you have done this, and want the path to show up on the surface of the 3D model, then follow the steps in this section.
I use a Q-1000XT (aka BT-Q1000XT) from Qstarz. I recommend it highly for logging your hikes, cycling, or other outdoor activities.
From the Qstarz software, you can export a logged hike to the format "KML file (Google Map File)." Other data loggers probably have this option as well.
After you have done this, you can launch Google Earth (free at http://www.google.com/earth/download/ge/agree.html) and open the file.
Google Earth will then show your path, and perhaps some waypoints.
The surface of your model will appear as you see the screen, so you may want to customize how it looks. For example, on the left "Primary Database" section, you can turn on or off the borders, names of places, the location of photos, etc... Personally, I turn off everything to get a clean image of the surface terrain.
Also, the path of your trek may not look the way you want it to. It may have errant data, or the line is the wrong color, or the line is too fat. If you want to change things a bit, you can simply edit the .KML file directly, because it is just a normal text (XML) file.
Open the file in any text editor.
Once the image on the screen looks like you want the surface of your 3D printout to look, proceed to the next step.
If you have done this, and want the path to show up on the surface of the 3D model, then follow the steps in this section.
I use a Q-1000XT (aka BT-Q1000XT) from Qstarz. I recommend it highly for logging your hikes, cycling, or other outdoor activities.
From the Qstarz software, you can export a logged hike to the format "KML file (Google Map File)." Other data loggers probably have this option as well.
After you have done this, you can launch Google Earth (free at http://www.google.com/earth/download/ge/agree.html) and open the file.
Google Earth will then show your path, and perhaps some waypoints.
The surface of your model will appear as you see the screen, so you may want to customize how it looks. For example, on the left "Primary Database" section, you can turn on or off the borders, names of places, the location of photos, etc... Personally, I turn off everything to get a clean image of the surface terrain.
Also, the path of your trek may not look the way you want it to. It may have errant data, or the line is the wrong color, or the line is too fat. If you want to change things a bit, you can simply edit the .KML file directly, because it is just a normal text (XML) file.
Open the file in any text editor.
- To change the color of the path, change the value (for example) from ffb37fa5 to ff0000ff. That would make the line red.
- To remove waypoints, remove all text from the "Placemark" sections.
- If you have any errant GPS data points, you can delete those values directly.
- To change the width of the line, change the value of "width" from 5 to 3, for example.
Once the image on the screen looks like you want the surface of your 3D printout to look, proceed to the next step.
Generate the Overlay Picture
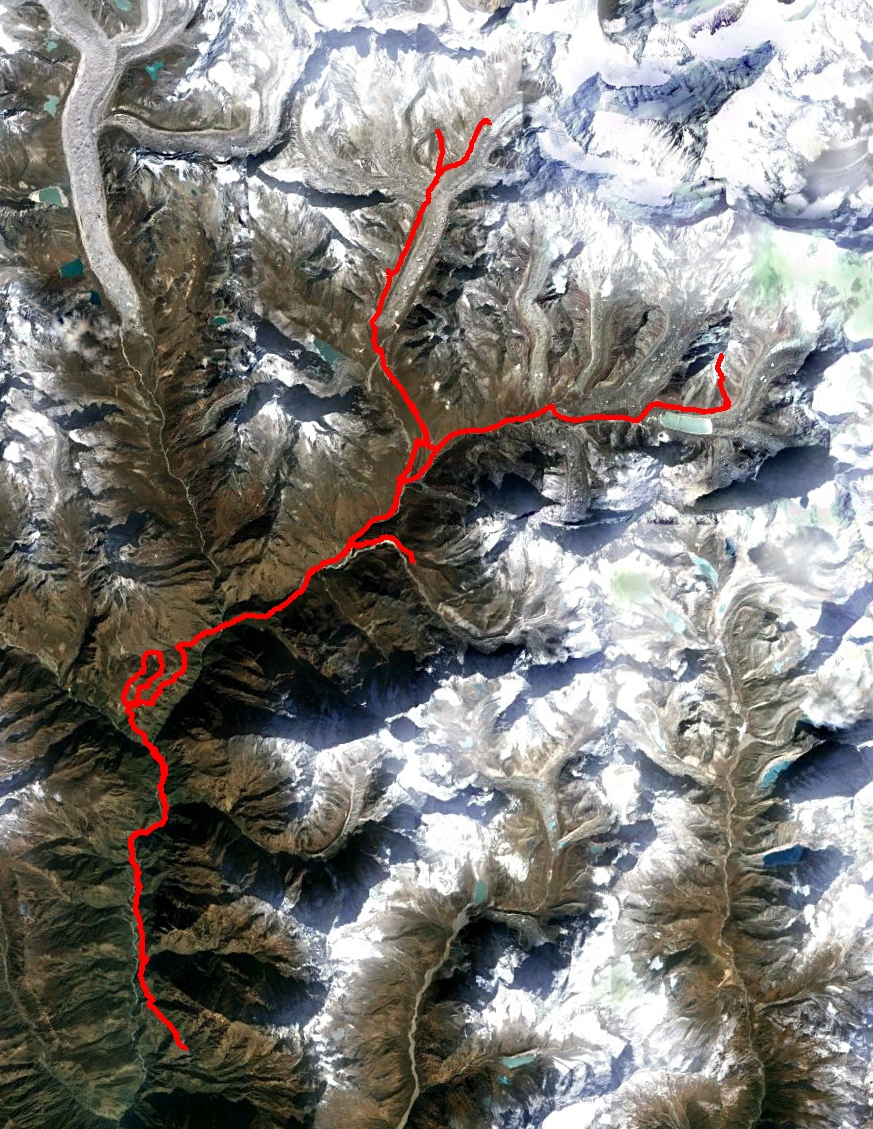
Now we need to create a .jpg picture to lay over the surface of the model. This will give the 3D model the proper colors. If you did the previous step, the 3D model will also show where you hiked. If not, use Google Earth and navigate to the region you want to use.
You should now have on your screen Google Earth showing the region that you want to print onto the top of your 3D model (with or without the path of your trek showing).
Make sure the view is "straight down" and with North at the top of the screen by using: "View" -> "Reset" -> "Tilt and Compass"
Now we need to select the section of the screen that corresponds precisely with the borders of our 3D data that we downloaded from the USGS.
In Google Earth, change the way it shows the Latitude and Longitude in the lower right corner. Select "Tools" -> "Options" -> "3D View" and look for the section called "Show Lat/Long." Change the setting to "Decimal Degrees."
Note that as you move the hand icon over the Google Earth display that you see the Latitude and Longitude numbers change in the lower right of the screen.
Remember the four coordinates you wrote down earlier? Now it is time to use them.
Move the hand icon to the upper left and move it around until the Lat/Long values displayed correspond to the upper left values you wrote down earlier.
Once they match, you need to mark that location ON YOUR MONITOR SCREEN. I use the corner of a post-it note flag. With the tip of the corner of the post-it, mark the precise CENTER of the palm of the hand icon.
Do the same for the lower-right coordinates.
You should now have two post-it notes marking the corners of the image you want to put on your 3D printout.
You now need to capture just that region of the screen as an image file. I use Snagit (www.techsmith.com) which allows me to select a portion of the screen, and then save that portion as a .JPG file. Snagit has a free trial, or you can buy it for $50. For Windows, you can use the built-in (i.e. free) snipping tool: Start -> Accessories -> Snipping Tool, and then capture the rectangular area and save it as a .JPG file.
Alternately, you can have Google Earth save the entire image as a .JPG and then you can trim it in any photo-editing software, but I find that method is less precise in selecting the exact area needed.
Note that when you select the area for the surface image, you will want it to be just slightly larger than what will show on the surface of your 3D printout.
Overlay the Image Onto the 3D Model
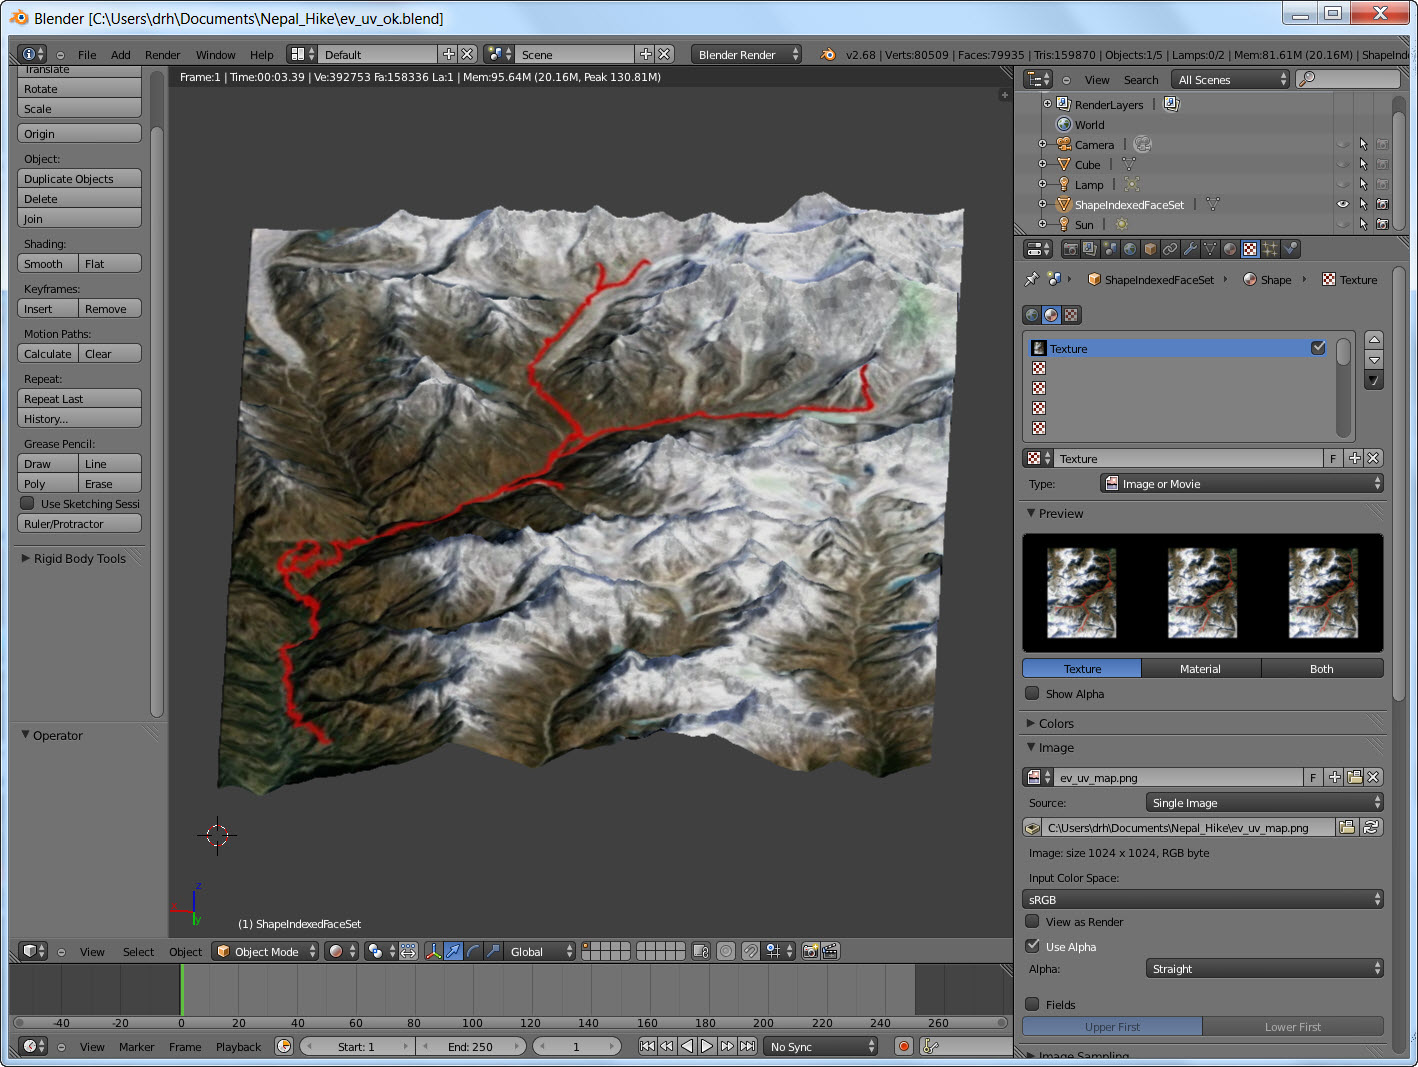
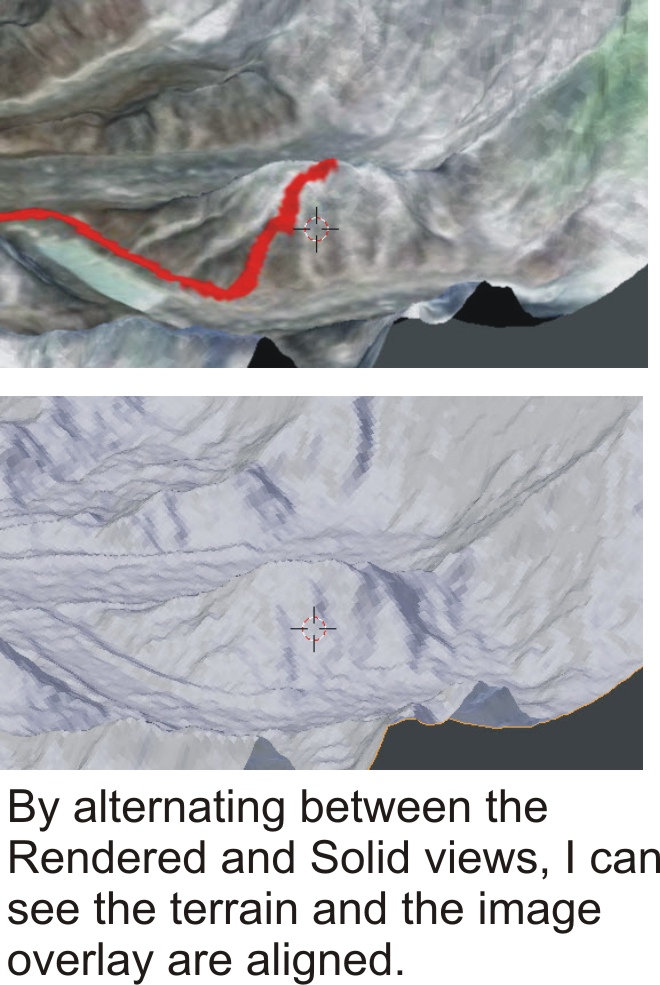
In this step we will place the overlay .JPG image on top of the 3D model, and then align it with the terrain. After that it will be ready for Shapeways to print!
Side Note: "Texture" versus "UV Mapping"
A note about placing a graphic on top of a model: Shapeways does not support adding a "texture" to a model; they require that color be added via a process call "UV mapping." (And frankly, UV mapping is the best way to go for accurate 3D printing anyway.)
A "texture" is an image placed onto a 3D model to give it a realistic look. The image is usually of something like dirt, or granite, or something where there is no need to align the image with the terrain of the model. Because we need precise placement, we cannot use a "texture" to place our overlay image.
We need to use a different process, called "UV mapping." UV mapping places (and aligns) the overlay image with the polygons that make of the surface of the 3D model. The advantage is that you can then stretch and scale and modify the 3D model, and the image will always be automatically stretched to match.
Applying the surface image via UV mapping
Go back to Blender, and view the plain white 3D model from before.
View the model from the top, as a perfect rectangle. (Shift-C, View -> Top, and make sure the view is set to Ortho via View->Persp/Ortho.)
Split the viewport window: In the upper right of the sub-window that shows the model, there is a small triangular grab area. Drag it to the right. You should now see two windows with the model in each.
In the new model window (the one on the right), at the bottom left, there is an icon that looks like a cube. Left-click it and select "UV/Image Editor."
Back in the left window, select the terrain model (right-click on the 3D model).
Select Edit Mode using the button that says "Object Mode" in the lower left.
In the left pane is a button called "Unwrap" in the "UV mapping" section. Click "Unwrap" and select "Project From View."
You'll see a orange rectangle appear in the sub-window on the right. In that sub-window, click on the "UVs" button and select "Export UV layout." Save it as a file such as "uv_grid.png."
On the left window, change from "Edit Mode" back to "Object Mode." (Button on lower left.)
Close the right sub-window that was used to show the UV grid by sliding the triangular drag handle from left-to-right, the opposite of how you created the second sub-window.
Editing the .png File
The magic happens here.
At this point, any changes you make to the UV .png file will show up on the surface of the model. If you draw on that .png file with a paint program, it is the same as painting the 3D model!
To edit the .png file, I use CorelDraw, but you can also use Gimp or Photoshop. The process to overlay the .jpg terrain image is:
Now you can bring the .png file back into Blender using these steps:
In Blender make sure the ShapeIndexedFaceSet item is selected.
On the right side of the screen, click on the checker-board icon (probably located just above the "Animation" button.)
The line under the checkerboard should now say something like ShapeIndexedFaceSet > Shape > Texture.
Note: There are three icons together, in a row, just underneath this text. Confusingly, the right-most one is also a checkerboard. If you ever need to get back to editing the overlay image (the texture) you may need to select the ShapeIndexedFaceSet, and then click the middle of these three icons.
Click the "New" button to add the .png file.
Click where it says "Clouds" and select "Image or Movie."
Lower down, you should now see an "Open" button. Click it, browse to the .png file you modified above, and double-click the file name to load it.
Lower down, there is a "Mapping" section. There is a pull-down menu called "Coordinates:" Change the setting from "Generated" to "UV."
RENDER
We are now going to "Render" the model to see what it will look like.
Near the lower left of the screen is an icon that looks like a plain white sphere illuminated from above. Click on this, and select "Rendered." It will take a few seconds to generate a rendered image of the 3D model. Use this button to switch between rendered and solid views.
FINALIZE THE IMAGE PLACEMENT
You can now rotate the model, and zoom in and out. The important thing is to verify that the image overlay aligns with the terrain.
To do this, you can switch between the "Rendered" and "Solid" modes. By alternating back-and-forth between modes, and zooming in on certain regions, you can verify that the overlay image is properly aligned with the terrain.
I used parts of my trek that were related to the terrain somehow. For example, my trek ended at the summit of a mountain. When I switch between Solid and Render mode, I can tweak the .png file to see that the end of my trek (in Render mode) aligns with the summit of the mountain terrain (in Solid mode).
If there is a mis-alignment, go back to the image editing program (used to edit the .png file), and then shift or stretch the .jpg layer. Save the file, and then go back to Blender and update the image file. To update, just click on the reload icon in the right-hand sub-window. It looks like a re-cycle button, and is just to the right of the filename line. The render will automatically update, showing you the changes you made to the .png file.
This iterative process is quick and easy once you get used to it.
Side Note: "Texture" versus "UV Mapping"
A note about placing a graphic on top of a model: Shapeways does not support adding a "texture" to a model; they require that color be added via a process call "UV mapping." (And frankly, UV mapping is the best way to go for accurate 3D printing anyway.)
A "texture" is an image placed onto a 3D model to give it a realistic look. The image is usually of something like dirt, or granite, or something where there is no need to align the image with the terrain of the model. Because we need precise placement, we cannot use a "texture" to place our overlay image.
We need to use a different process, called "UV mapping." UV mapping places (and aligns) the overlay image with the polygons that make of the surface of the 3D model. The advantage is that you can then stretch and scale and modify the 3D model, and the image will always be automatically stretched to match.
Applying the surface image via UV mapping
Go back to Blender, and view the plain white 3D model from before.
View the model from the top, as a perfect rectangle. (Shift-C, View -> Top, and make sure the view is set to Ortho via View->Persp/Ortho.)
Split the viewport window: In the upper right of the sub-window that shows the model, there is a small triangular grab area. Drag it to the right. You should now see two windows with the model in each.
In the new model window (the one on the right), at the bottom left, there is an icon that looks like a cube. Left-click it and select "UV/Image Editor."
Back in the left window, select the terrain model (right-click on the 3D model).
Select Edit Mode using the button that says "Object Mode" in the lower left.
In the left pane is a button called "Unwrap" in the "UV mapping" section. Click "Unwrap" and select "Project From View."
You'll see a orange rectangle appear in the sub-window on the right. In that sub-window, click on the "UVs" button and select "Export UV layout." Save it as a file such as "uv_grid.png."
On the left window, change from "Edit Mode" back to "Object Mode." (Button on lower left.)
Close the right sub-window that was used to show the UV grid by sliding the triangular drag handle from left-to-right, the opposite of how you created the second sub-window.
Editing the .png File
The magic happens here.
At this point, any changes you make to the UV .png file will show up on the surface of the model. If you draw on that .png file with a paint program, it is the same as painting the 3D model!
To edit the .png file, I use CorelDraw, but you can also use Gimp or Photoshop. The process to overlay the .jpg terrain image is:
- Open the .png, and then import the .jpg image as an overlay or layer.
- Stretch and rotate the .jpg to match the UV grid.
- Save the .png file (and keep the image editor open).
Now you can bring the .png file back into Blender using these steps:
In Blender make sure the ShapeIndexedFaceSet item is selected.
On the right side of the screen, click on the checker-board icon (probably located just above the "Animation" button.)
The line under the checkerboard should now say something like ShapeIndexedFaceSet > Shape > Texture.
Note: There are three icons together, in a row, just underneath this text. Confusingly, the right-most one is also a checkerboard. If you ever need to get back to editing the overlay image (the texture) you may need to select the ShapeIndexedFaceSet, and then click the middle of these three icons.
Click the "New" button to add the .png file.
Click where it says "Clouds" and select "Image or Movie."
Lower down, you should now see an "Open" button. Click it, browse to the .png file you modified above, and double-click the file name to load it.
Lower down, there is a "Mapping" section. There is a pull-down menu called "Coordinates:" Change the setting from "Generated" to "UV."
RENDER
We are now going to "Render" the model to see what it will look like.
Near the lower left of the screen is an icon that looks like a plain white sphere illuminated from above. Click on this, and select "Rendered." It will take a few seconds to generate a rendered image of the 3D model. Use this button to switch between rendered and solid views.
FINALIZE THE IMAGE PLACEMENT
You can now rotate the model, and zoom in and out. The important thing is to verify that the image overlay aligns with the terrain.
To do this, you can switch between the "Rendered" and "Solid" modes. By alternating back-and-forth between modes, and zooming in on certain regions, you can verify that the overlay image is properly aligned with the terrain.
I used parts of my trek that were related to the terrain somehow. For example, my trek ended at the summit of a mountain. When I switch between Solid and Render mode, I can tweak the .png file to see that the end of my trek (in Render mode) aligns with the summit of the mountain terrain (in Solid mode).
If there is a mis-alignment, go back to the image editing program (used to edit the .png file), and then shift or stretch the .jpg layer. Save the file, and then go back to Blender and update the image file. To update, just click on the reload icon in the right-hand sub-window. It looks like a re-cycle button, and is just to the right of the filename line. The render will automatically update, showing you the changes you made to the .png file.
This iterative process is quick and easy once you get used to it.
Give the Model Some Thickness
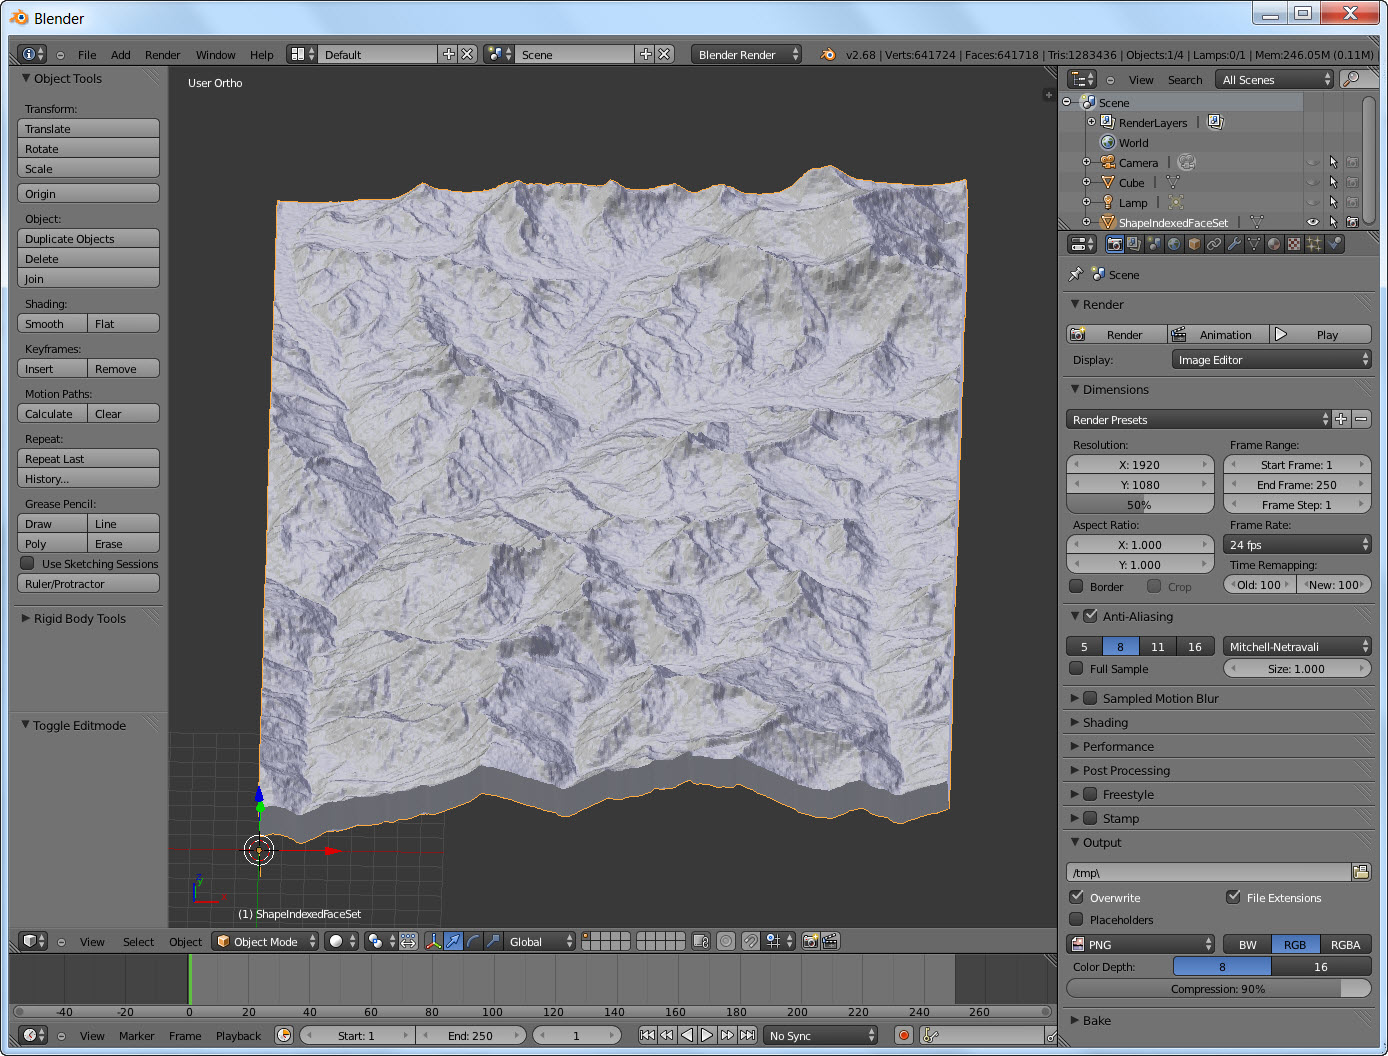
EXTRUDING THE MODEL
Now we will give the model some thickness. This allows it to be 3D printed.
Tip the model away from you. (Press and hold the middle mouse button while moving the cursor up.)
Make sure the surface is selected. (It has an orange border. Right-click it, if not.)
Note: Take the next steps slowly. There may be a long pause between your actions and the screen updating, especially if your model has lots of faces.
Near the bottom-left of the screen is a button called "Object Mode." Click it and select "Edit Mode." The whole model will turn orange.
Move your mouse somewhere near the middle of the screen. Press the "e" key. (Do not move your mouse after pressing "e" for a few seconds.)
Move your mouse SLOWLY down. You will see the extrusion happening. Only move the mouse a little bit.
Hit Enter or left-click.
Note: To abort this operation, or if you do not like the results, do NOT hit the ESC key. Hit Enter, and then CTRL-Z to undo the extrusion.
Change back into "Object Mode" using the "Edit Mode" button.
You should now see your model with some thickness. If not, hit CTRL-Z to undo the extrusion, and try again!
MEASURE THE MODEL
At some point, you will want to scale the model to fit the 3D printer. First you should measure the model to see how big it is.
To measure, select the "Ruler/Protractor" button on the left side of the screen.
On your model, left-click-and-drag between two points, and release. The length, in mm, is shown.
After releasing, you can move the two endpoints of the ruler by simply dragging them. Use the CTRL key to snap to a location.
Make sure you rotate the model to verify that the ruler is located properly in 3D space. Move the endpoints to adjust.
Press ESC to clear the ruler.
SCALE THE MODEL
To scale the model, make sure it is selected (right-click on it to produce an orange outline), then click the "Scale" button on the left side of the screen.
Type in the scale factor, such a "2" to make it twice as large. Press enter, or left click to finish.
Note: For Shapeways color printouts, do not exceed 200 mm x 250 mm.
Also note that the colored sandstone material is one of the more fragile materials, so keep things a little thicker than you might otherwise think is necessary. I find that anything over 5 mm thick, or so, is pretty strong.
EXPORT THE FINISHED MODEL
For Shapeways to 3D print a colored item, it needs to be in the proper format. We will use the .x3d format.
To do this, export the completed model by clicking "File" -> "Export" -> "X3D Extensible 3D (.x3d)".
Create a 3D Printable File
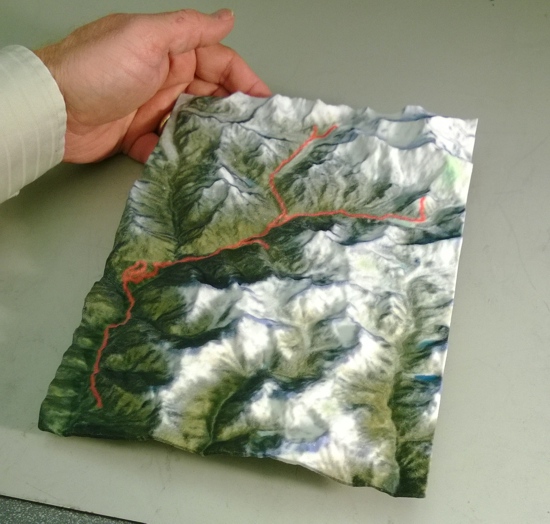
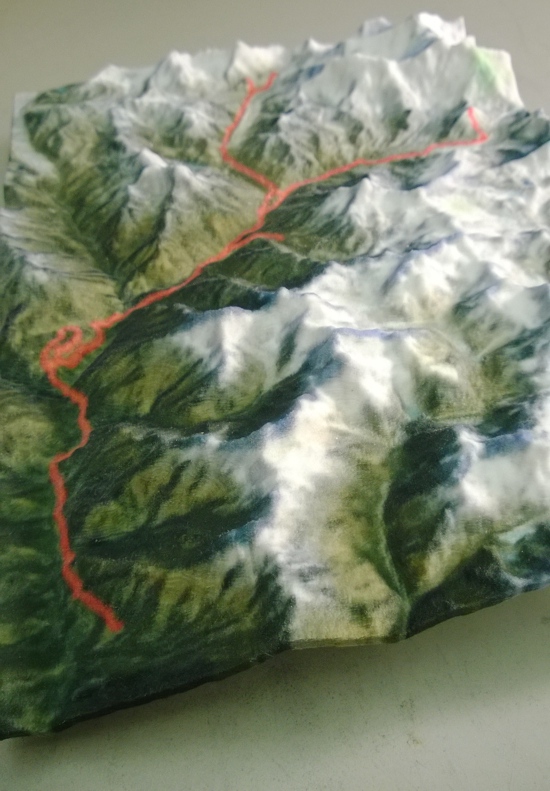
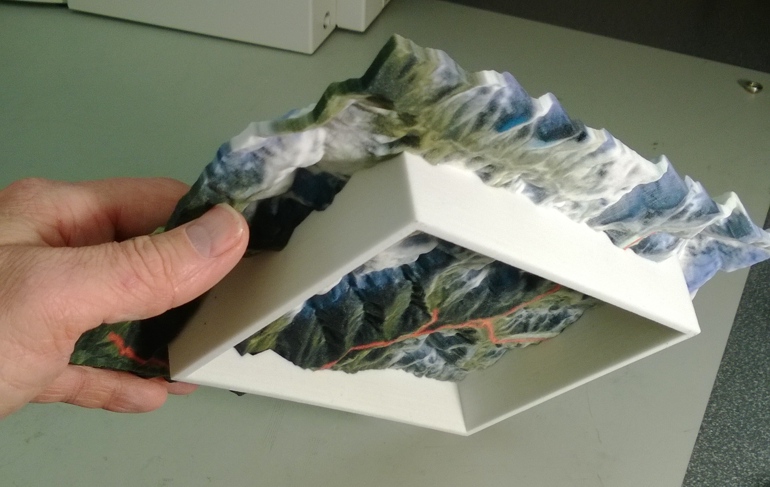
Now we are ready to create a file that can be sent to a color 3D printer, such as the ones at shapeways.com.
The main file is the .x3d file created in the previous step, but the .png file is needed as well, so simply create a .ZIP file with those two files in it.
You can now upload that single .ZIP file to Shapeways, or send it to any other color 3D printer. Shapeways will ask you what the units are. Select "millimeters."
Before purchasing the model, ensure that the preview looks like what you expect, that size of the object is what you expected, and that you have selected the color sandstone material.
SUMMARY
I know that there are many steps, and that this is not easy, but the results are amazing. Even if you are not plotting your "trek of a lifetime", you can still make beautiful color 3D printouts of any terrain using these steps. Have fun!