3D Print Your Own Bike Flag Illumination
by ChrisR387 in Outside > Bikes
3520 Views, 21 Favorites, 0 Comments
3D Print Your Own Bike Flag Illumination
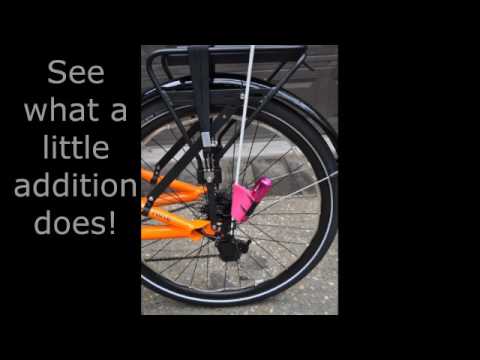
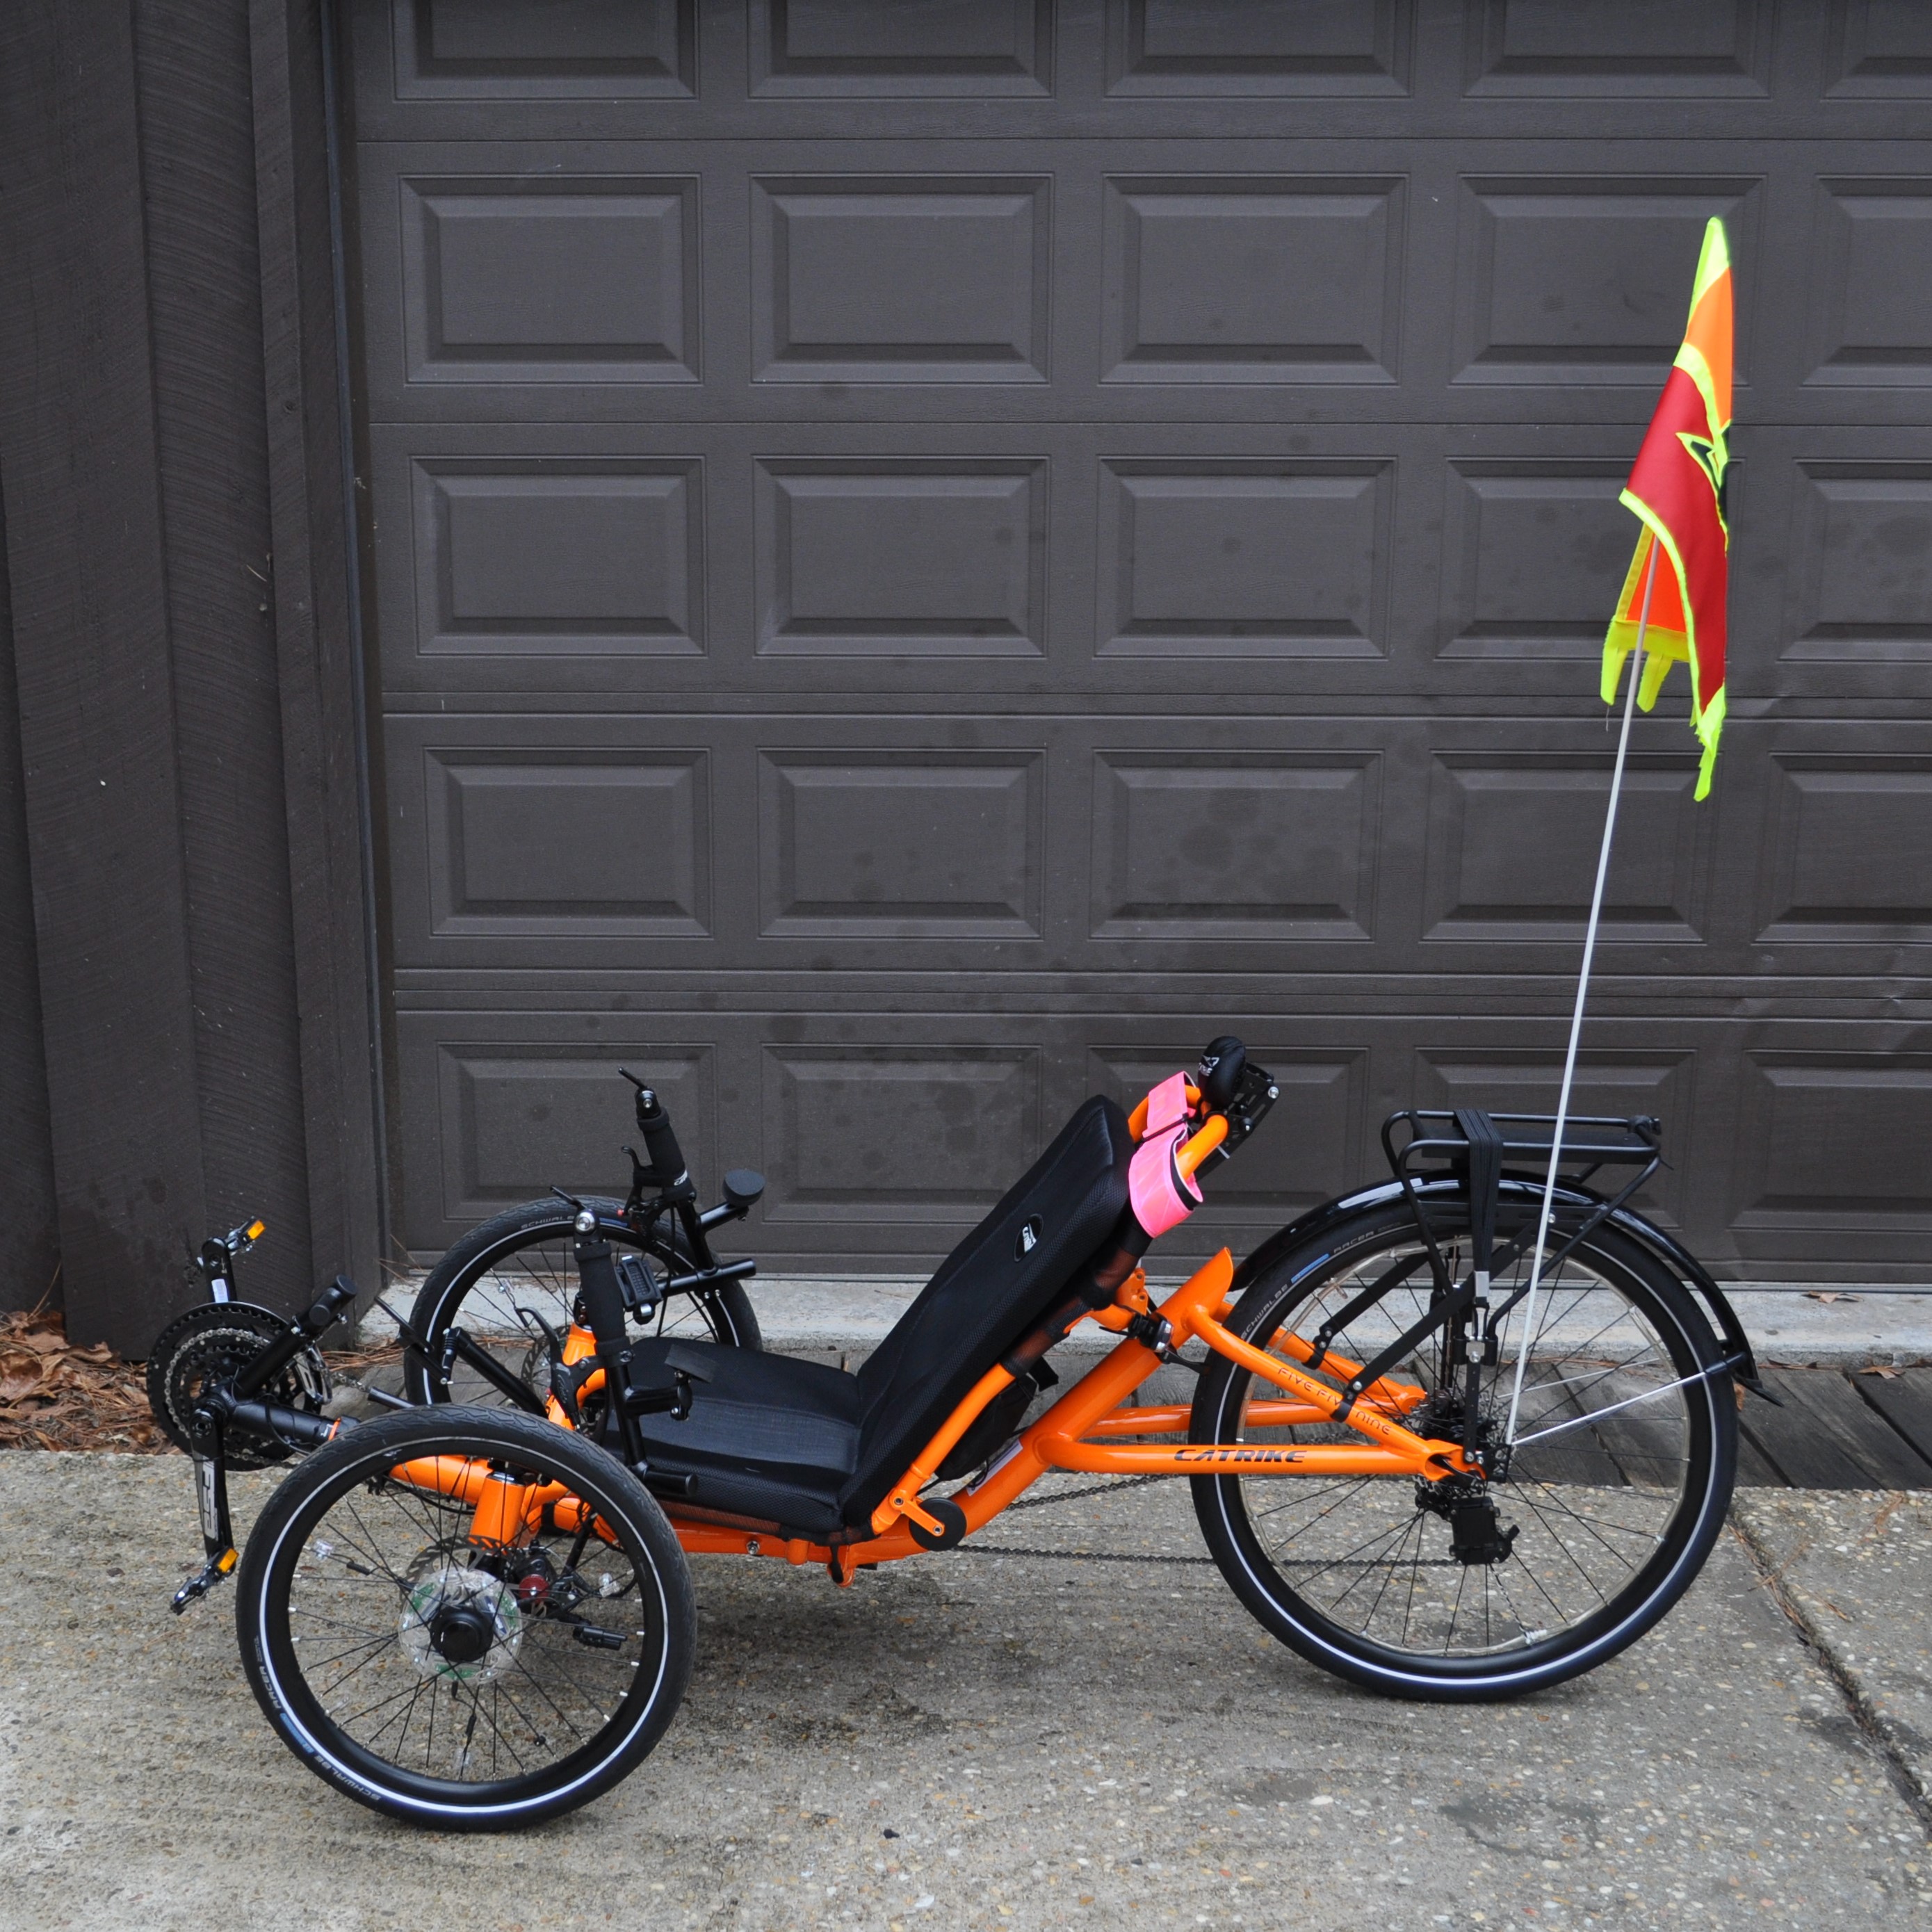
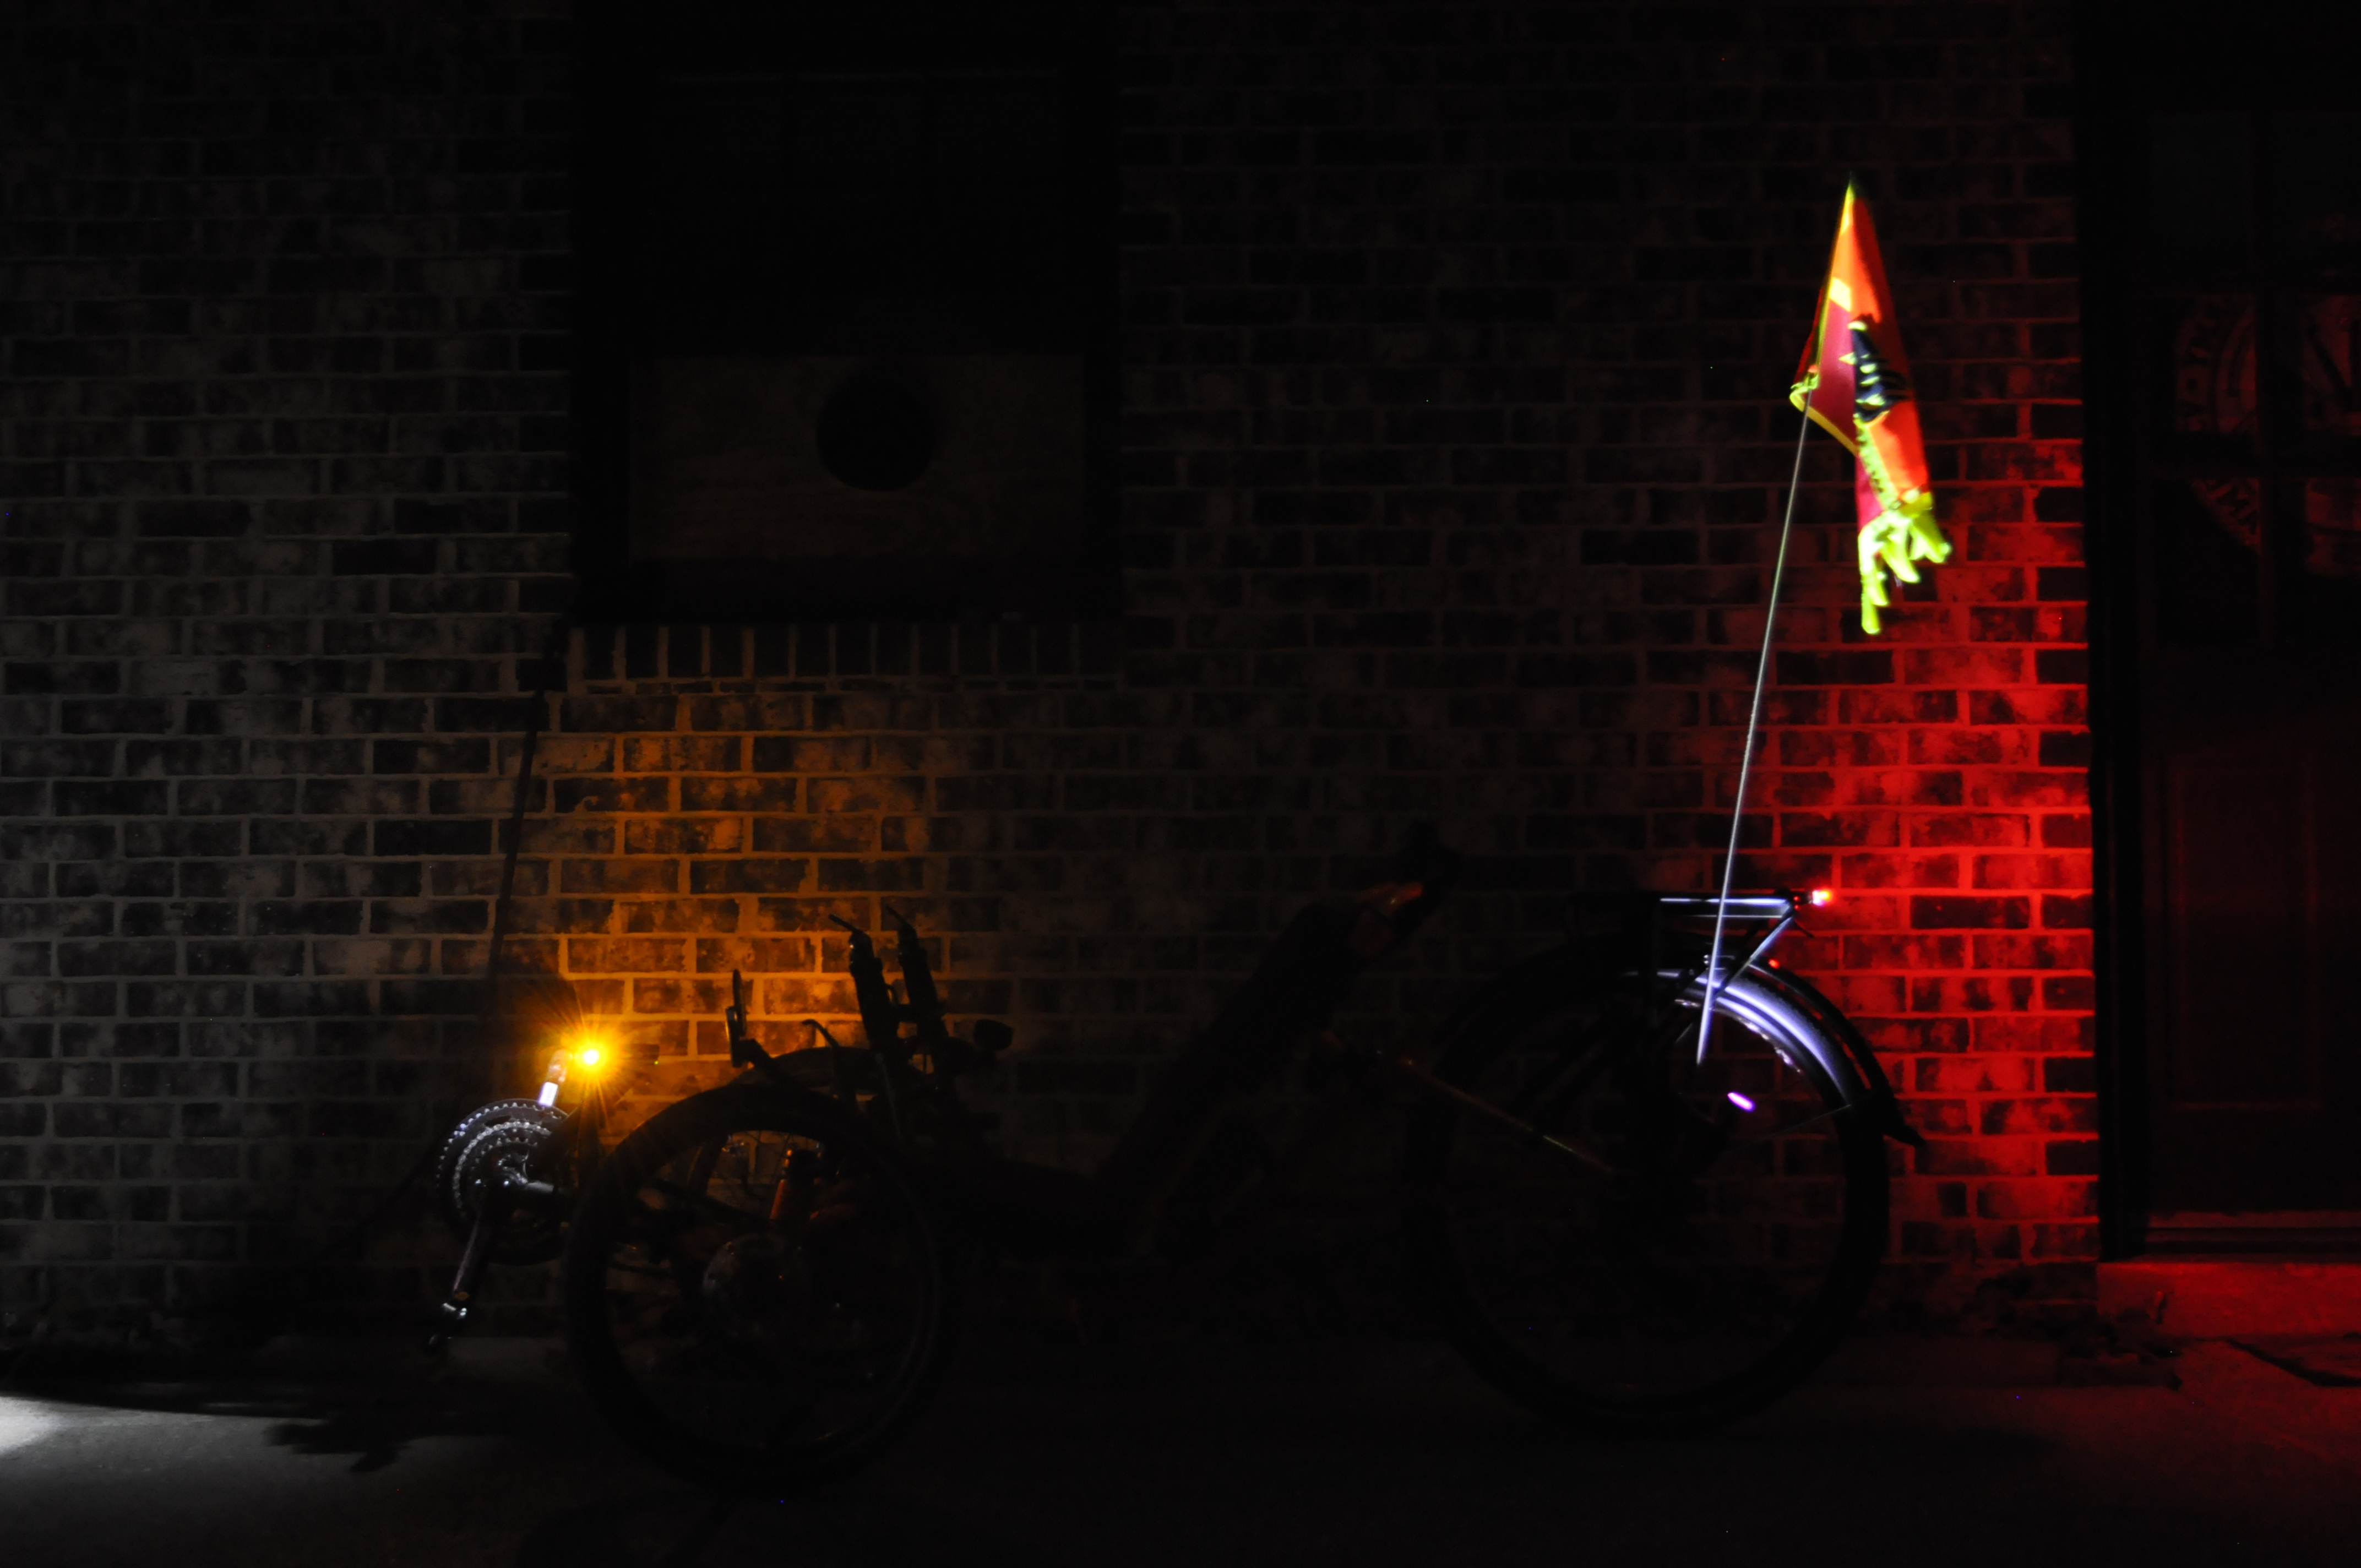
Being seen at night when riding your bike can be a matter of life and death. My wife has a brand new trike she rides to work and back, often in the dark. I have a LOT of lights on it to let her been seen in the dark. The trike sits low to the ground, so we also have a flag on the back to give her some visual height too. Her flag is homemade in neon colors in honor of the Fairy Tail anime.
Since a reflective flag only shows at night when light shines on it, I wanted a way to keep light on it all the time. I decided to put a bright flashlight at the bottom of the flagpole so not to weigh the flag down more. You are welcome to download the stl file and print what I used and enjoy. If you want to create a custom one for yourself, feel free to follow along. The steps and 3D modeling are not hard and by the time your have finished the Instructables 3D Modeling class lesson 4 you know enough to complete this yourself (or lesson 5, if you are going to print it yourself as well). Check out the class here: https://www.instructables.com/class/3D-Printing-Cl...
This project will use a few extra commands in the sketching and extruding options not covered in the class above, but nothing serious. I will share a few obstacles I ran into and how I overcame them. There are likely better work flows, but learning is half the fun. This instructable will be great practice for your skills and give you a product that might save your life!
**This instructable is entered in some contests, and I would appreciate your vote to have it considered for any active contests. --Thank-you and safe riding!
Print and go Materials list:
Bike with a flagpole and flag on it
3D printer or a way to get a 3D print - like Shapeways.com (That is who I used.)
STL file below
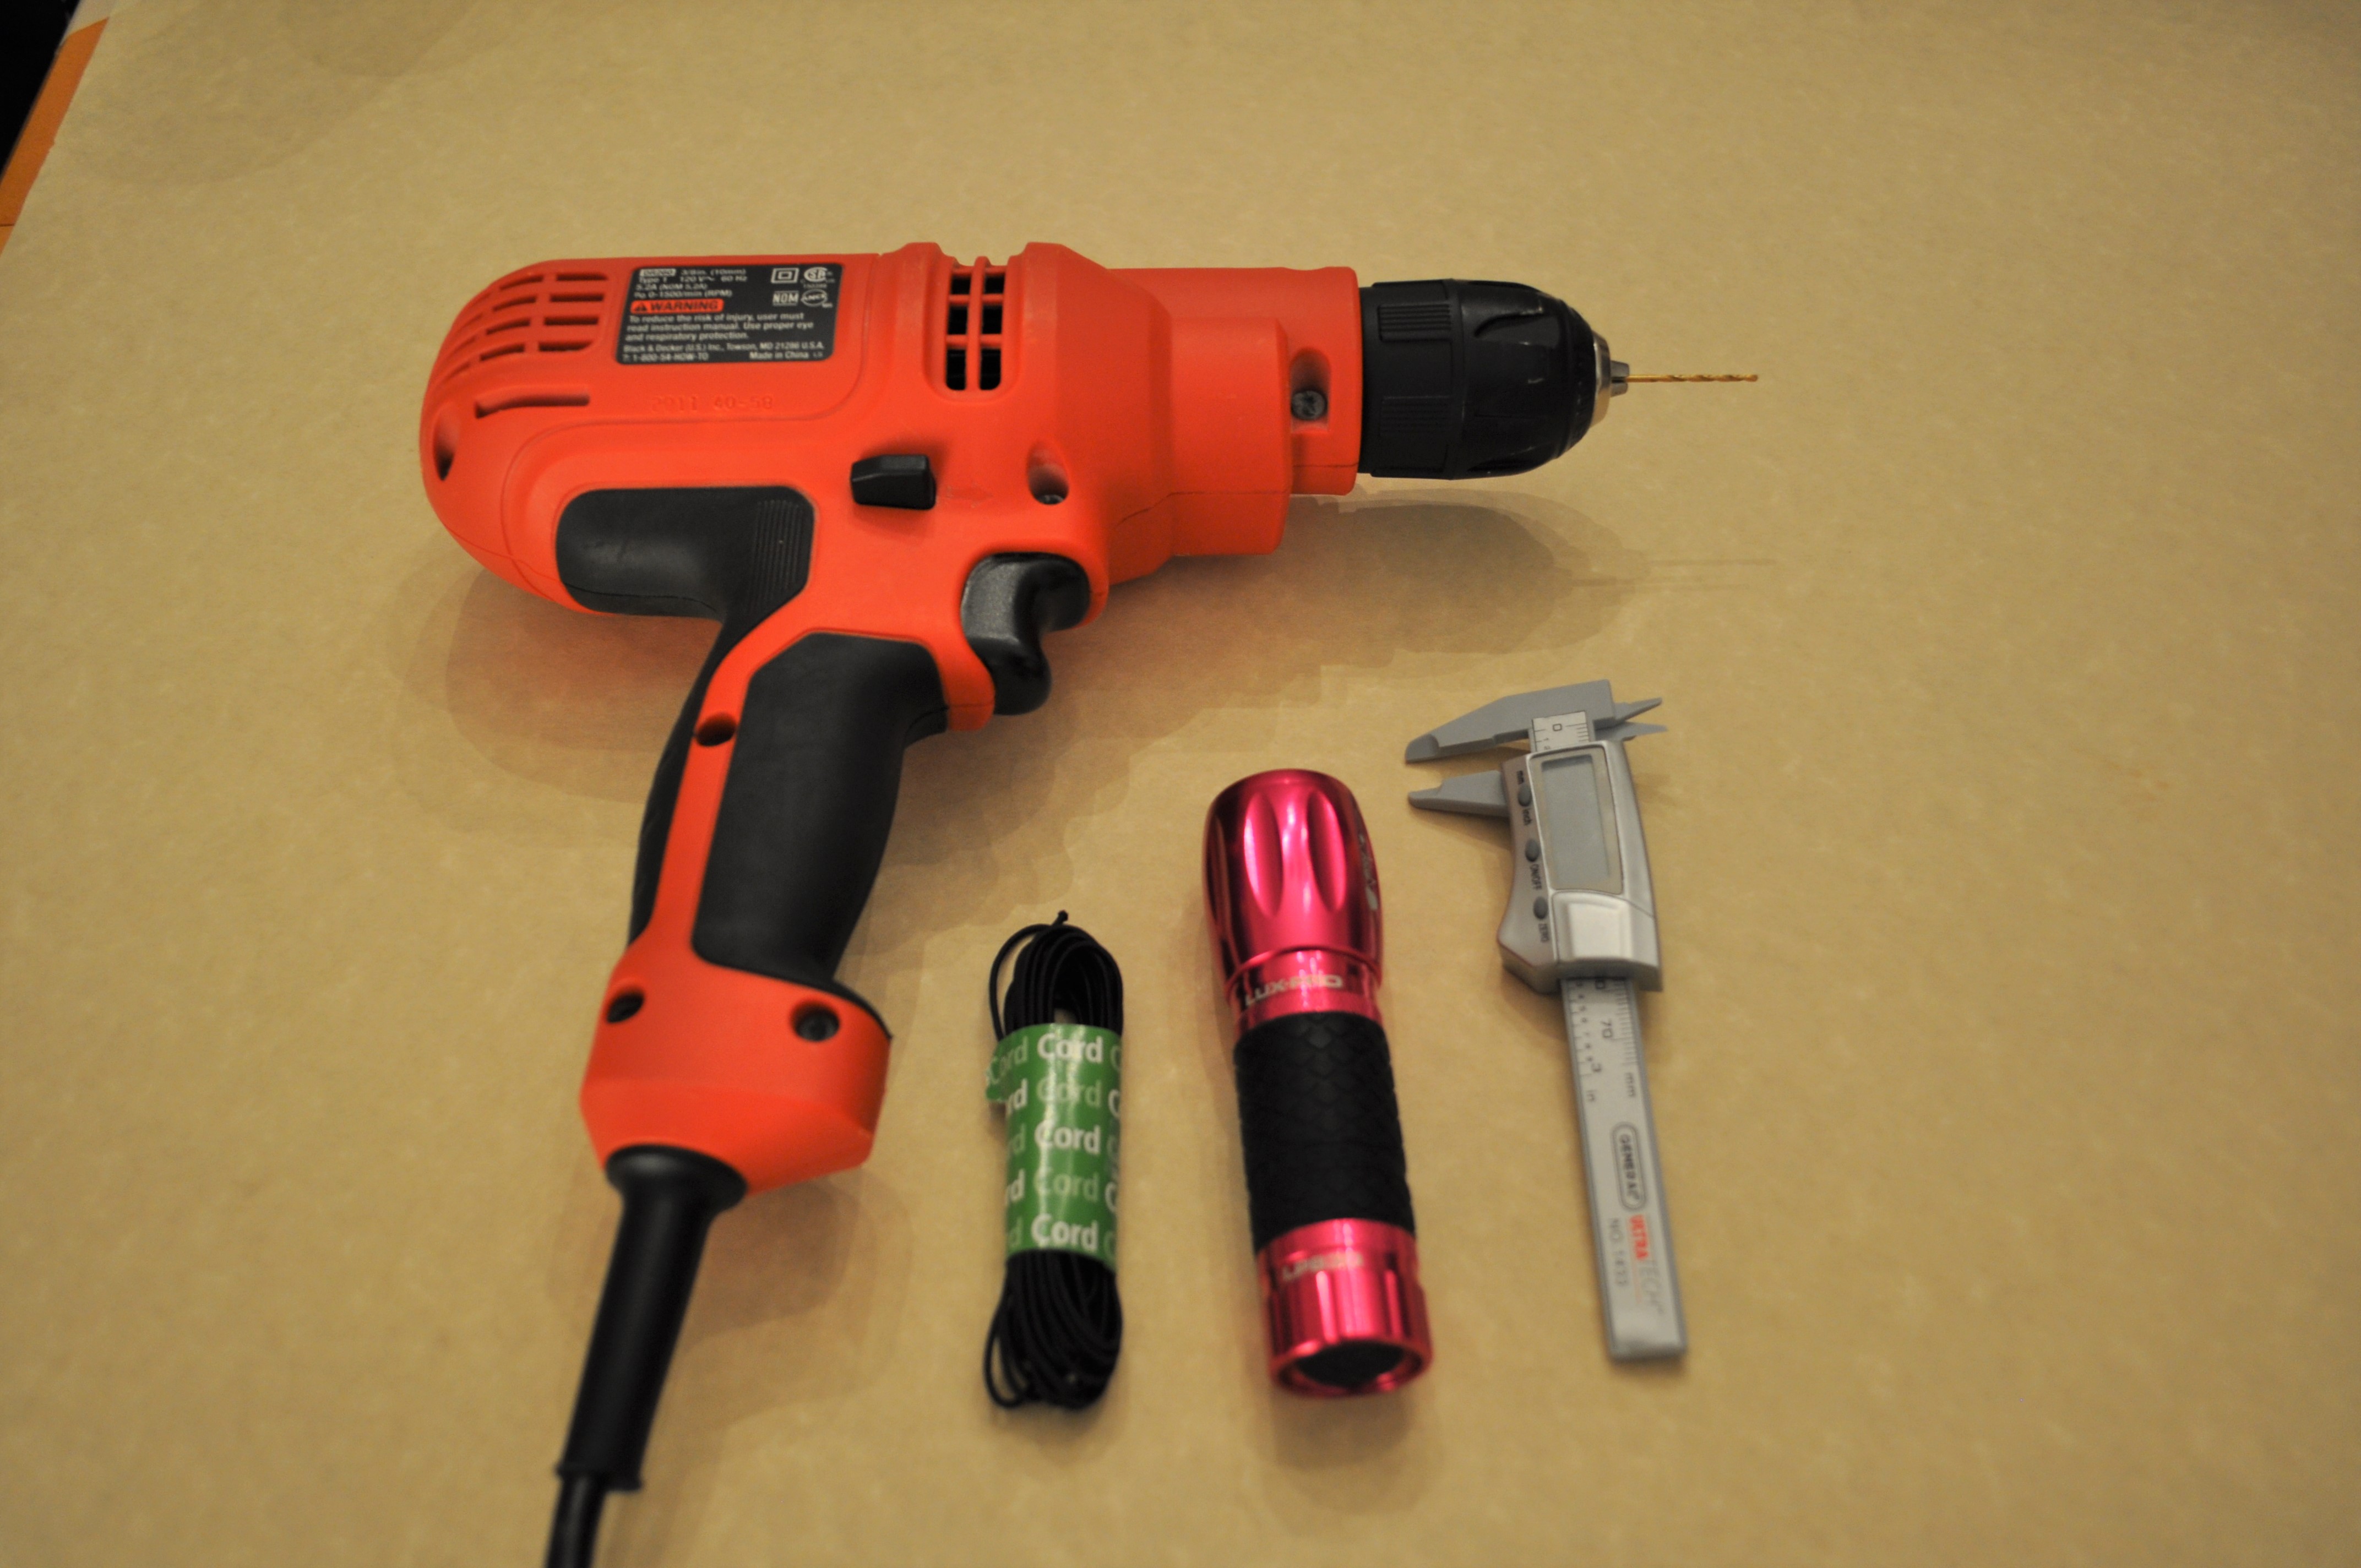
Round elastic cord
Powerful flashlight 28mm in diameter or less (Mine was the most powerful small light I could find at Lowes a Lux-Pro LP830.)
(If you are going to print the one I created, feel free to skip down to the end steps!)
OR
Design and Make your own Materials list:
Bike with a flagpole and flag on it
Camera (Not pictured - since it is taking the picture!)
Computer capable of running Fusion 360 (Also not pictured)
3D printer or a way to get a 3D print - like Shapeways.com (That is who I used.)
Calipers
Round Elastic
Powerful flashlight 28mm in diameter or less (Mine was the most powerful small light I could find at Lowes - Lux-Pro LP830.)
Downloads
Experiment!
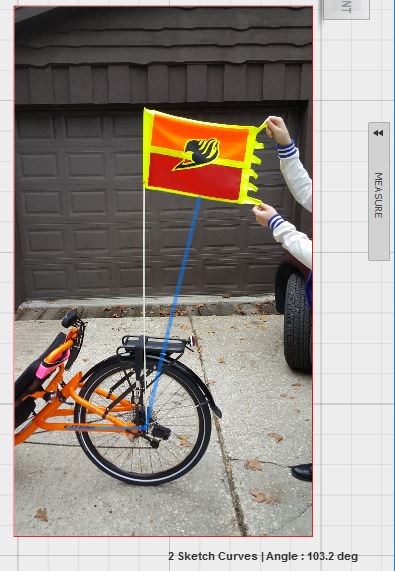
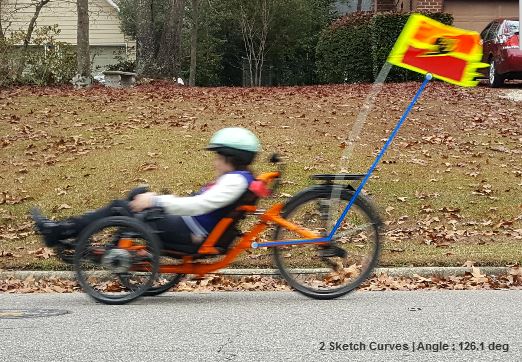
To test the idea I used zip ties to attach a light to the base of the bike's flag. While my daughter rode the bike I observed and took some pictures. The idea was a success - sometimes. The faster she rode, the less of the flag was lit. The light shone straight up but the flag streamed behind, and the problem got worse when she rode more quickly. The pole would bend as the flag fluttered and pulled it further away from the light. Our lighting system needs to tilt to point at the flag!
How much does the light need to be angled to shine on the flag? The only way we can find out is to test it!
1. Get your bike with the flag on it and a volunteer to either ride or take pictures. Make sure your flag is perpendicular to a known piece on your bike so you have a reference point. In my case I set the flag at a 90 degree angle as compared to the bottom frame support.
2. Take a picture of the bike at rest with the flag held out as a baseline.
3. Take a picture of the bike at top speed with the flag flying in the wind to see how far back the pole bends.
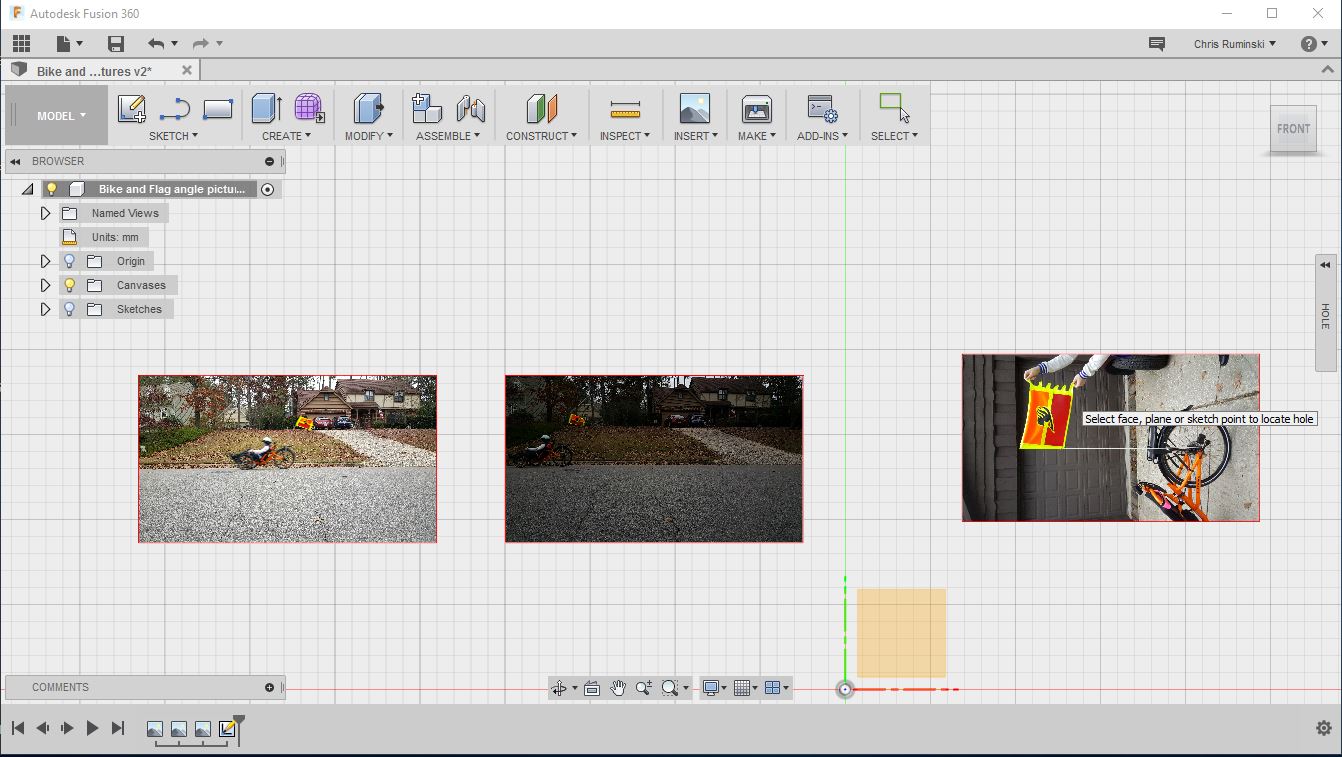
4. Once back to the computer, I start up Fusion 360 and create a new project. I called mine Under Flag Light.
5. Using the initial page import the ‘bike at rest’ picture and the best few ‘bike at top speed’ photos. I would suggest keeping them all in the same plane so it is easy to move back and forth between them.
6. Zoom in on the bike in each picture and use the SKETCH command to draw some lines making an angle so you can tell how far back the light needs to shine. Since I had the flagpole at a right angle to a frame piece I ran one line down the center of the frame piece and the second line up to the center of the flag.
7. Repeat for each picture.
8. Use the Measure command (under the INSPECT heading) and select the two lines that make an angle. To get the two lines instead of two points, either hold Shift and click or just double click each line. In the bottom right corner of the screen you will see the angle the two lines make. (If the pictures are getting in the way of the lines, just click the light bulb next to Canvases to turn them off.)
9. Use a little bit of math and you can find a few angles that your light needs to cover. (I took the measured angle and subtracted 90 degrees to find how much further the light needed to angle out. I found that when the bike is at rest the light needed a 13 degree angle on it, and at top speed the angle is close to 36 degrees!)
10. To get the best of both worlds simply average the two and trust the spread of the flashlight to cover the difference. (13+36)/2 Gave me a 24 degree angle.
**Lesson learned - don’t use a cell phone camera when other options are available. They take OK pictures and will work but a dedicated camera has better shutter control and better picture quality!
Hand Sketch a Plan
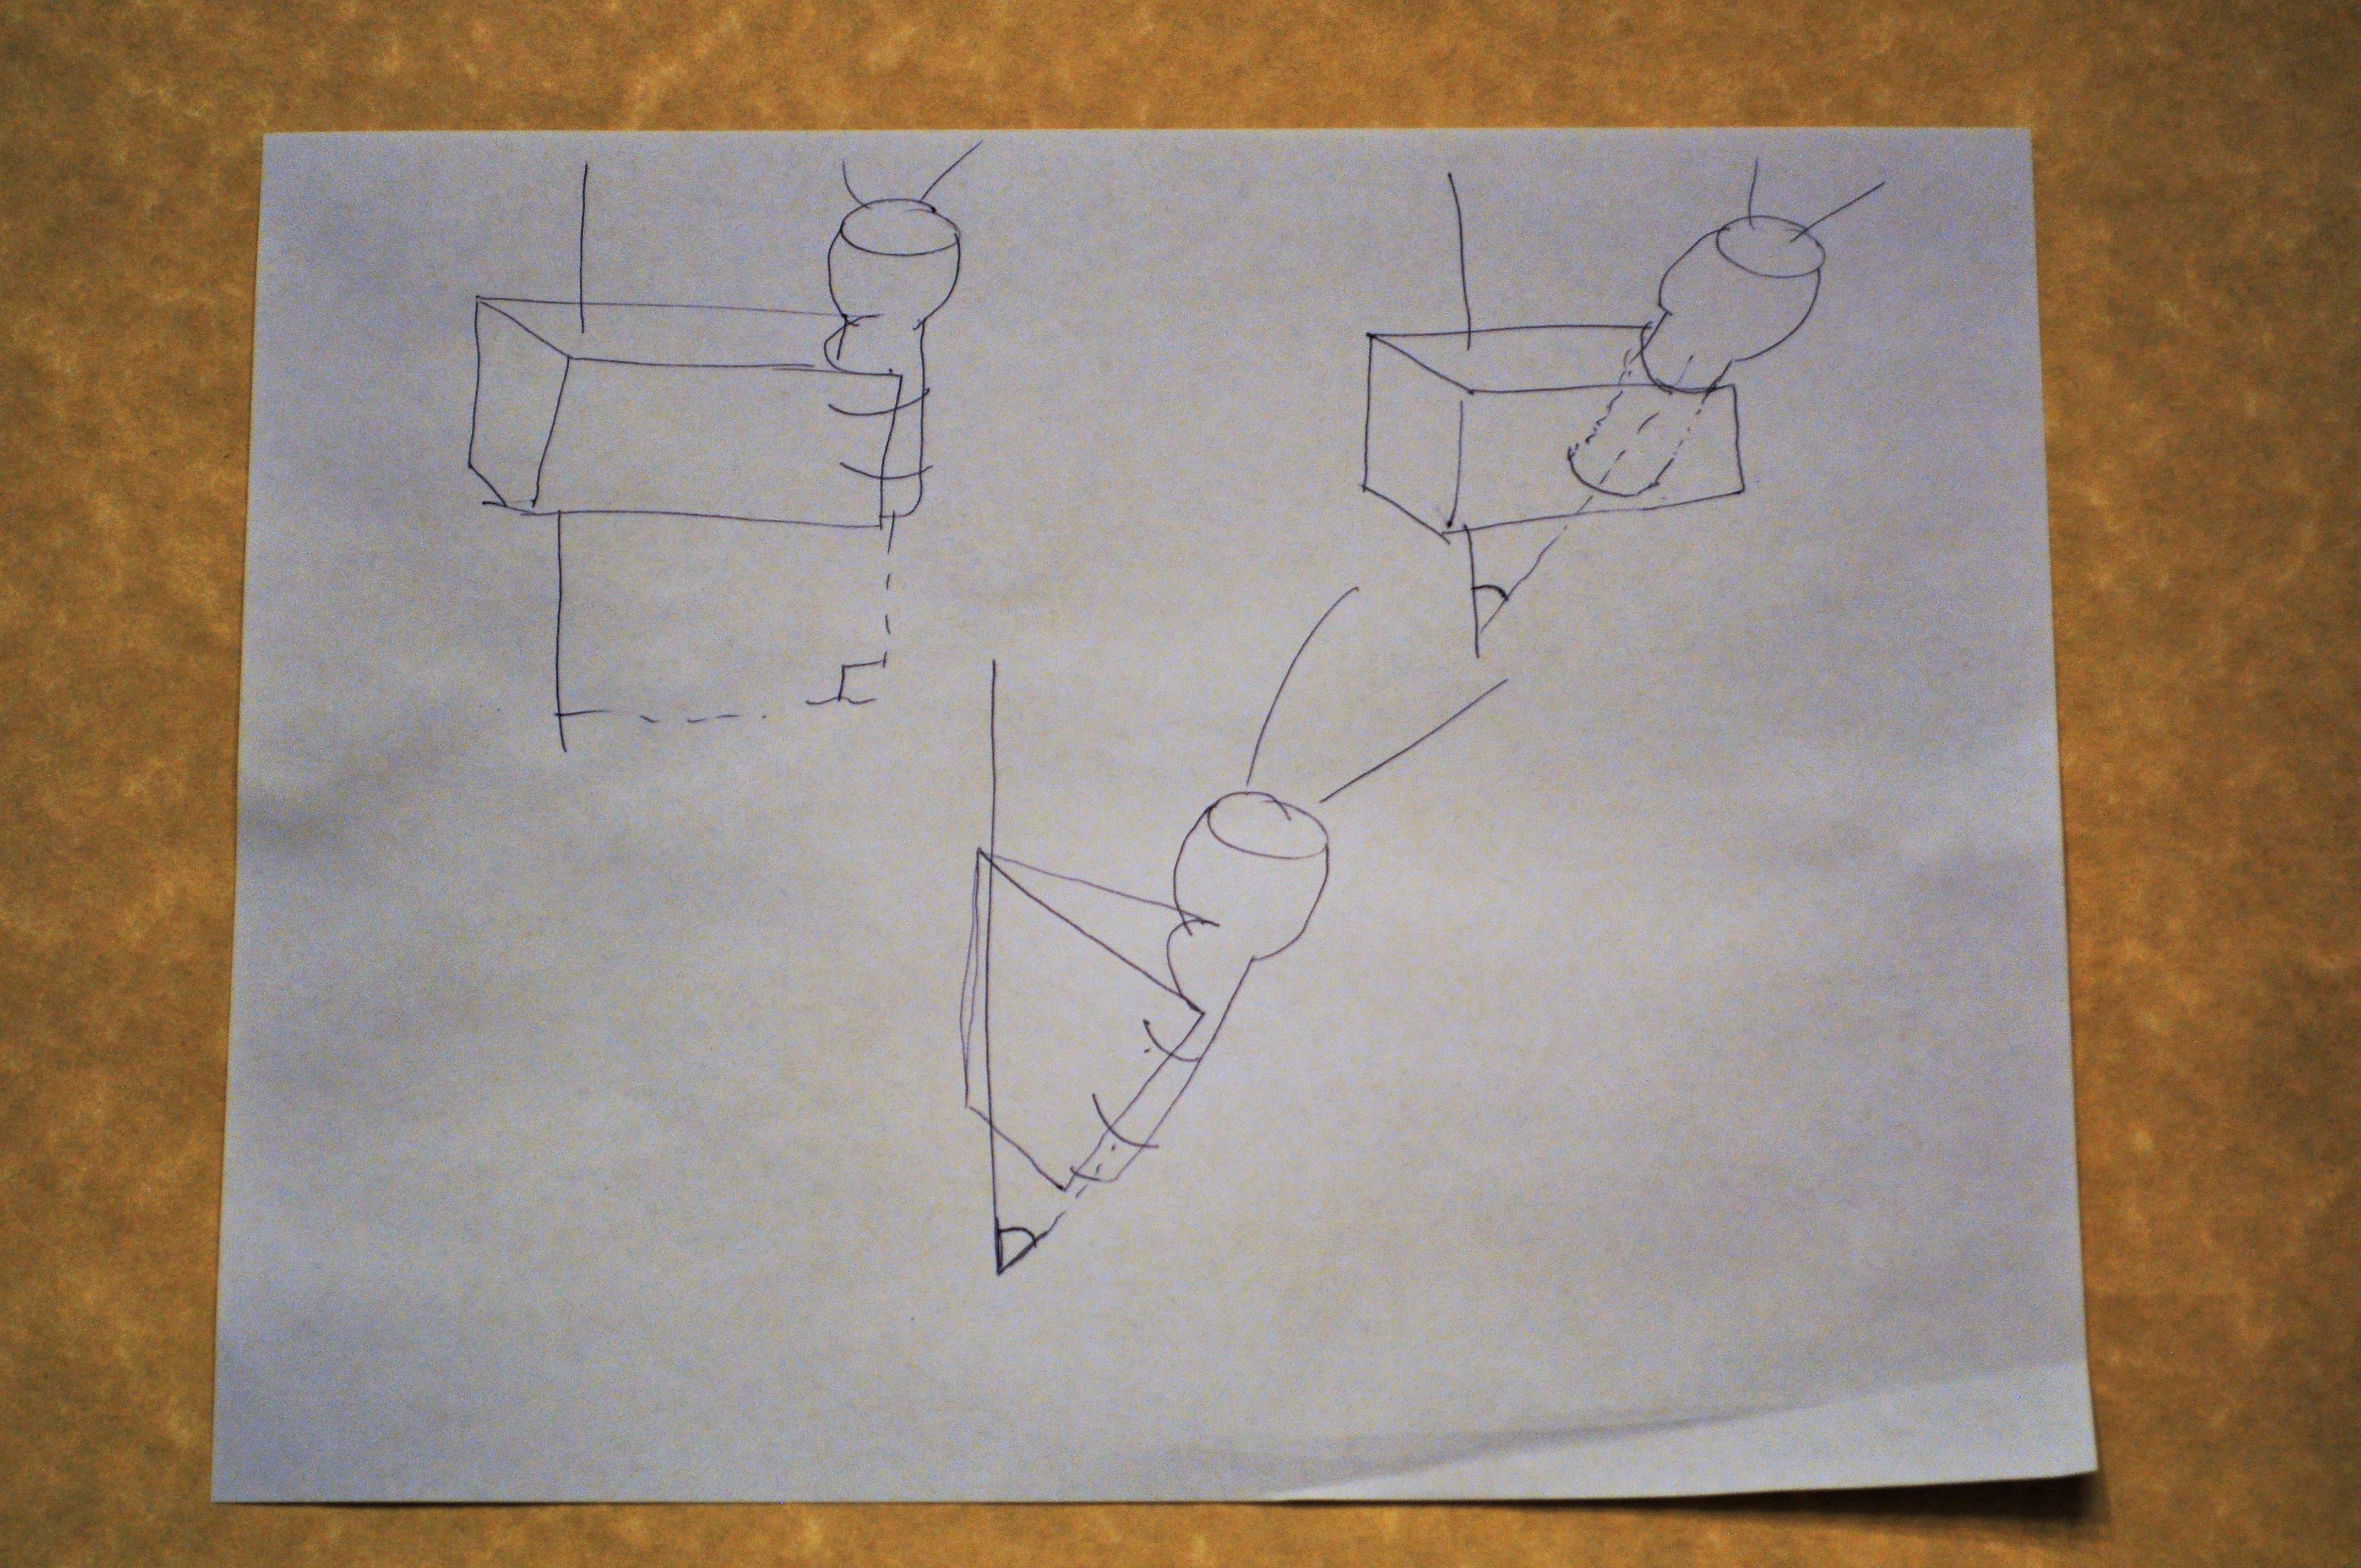
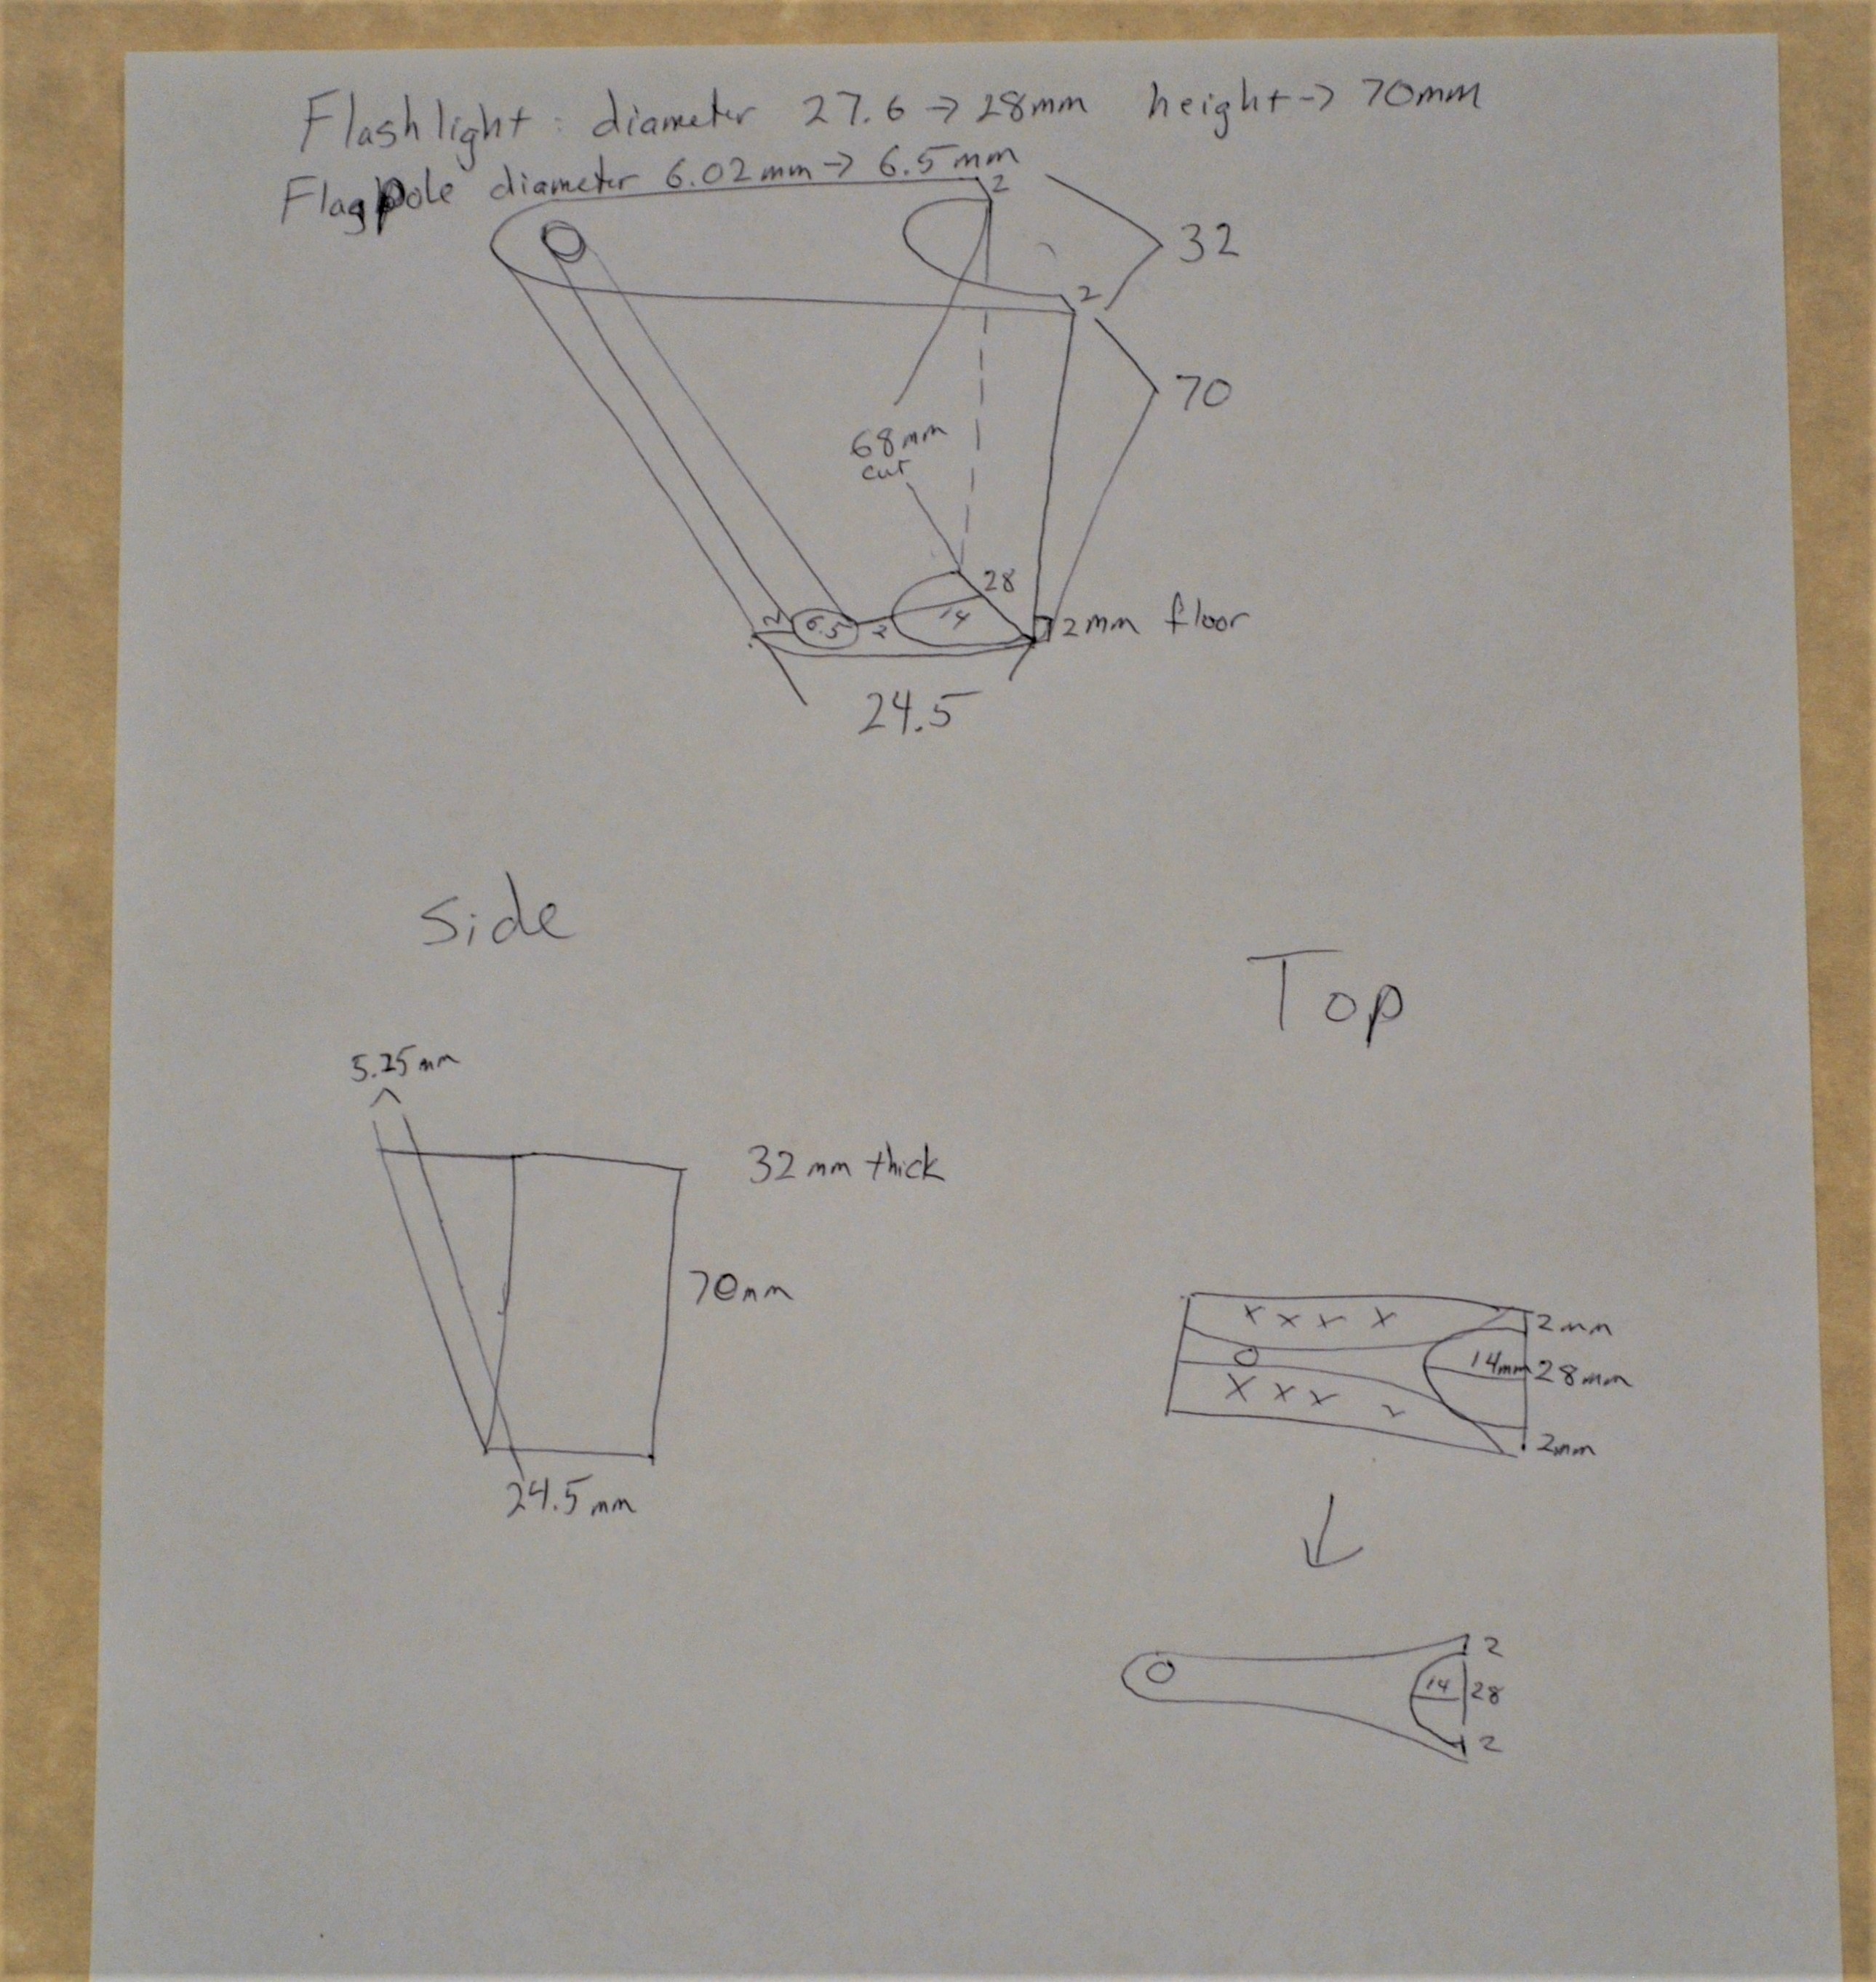
Before we head to the computer lets get an idea of what we are trying to make and some measurements to make it come out easily!
1. Use the calipers to measure the width and height of the flashlight. Mine has a diameter of 27.6 mm (I rounded up to 28 mm), and the handle is 70 mm long.
2. Measure the diameter of the flagpole. Mine came out to 6.09 mm. I rounded mine up to 6.5 to give plenty of room to swing around the pole if needed.
3. When making a new item, I like to sketch it out by hand to try and see what I am doing before going to the computer -- see the picture of the sketches.
4. After you have a sketch you like, add your measurements to it so we do not have to make it up as we go along once on the computer.
5. Notice in my sketch that I filled in the numbers I could and left those I did not know blank. For example I know the dimensions of the base of the holder, but not what the top length will be because of the angle we need to put on the left hand side. I could use some algebra to figure it out, but don’t need to since Fusion 360 will be doing all the heavy lifting for us anyway!
6. Great! Let’s move to the computer and build our 3D model.
3D Modeling: Sketch and First Extrude
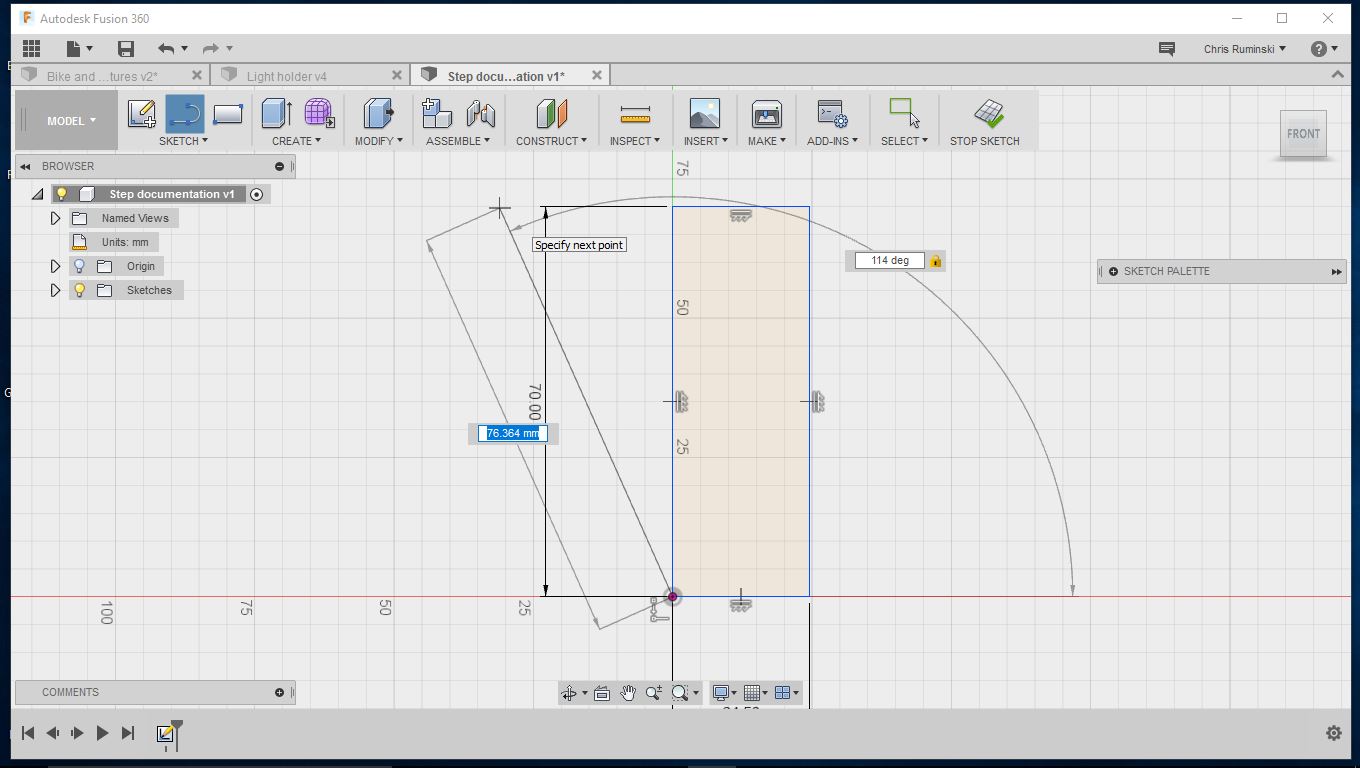
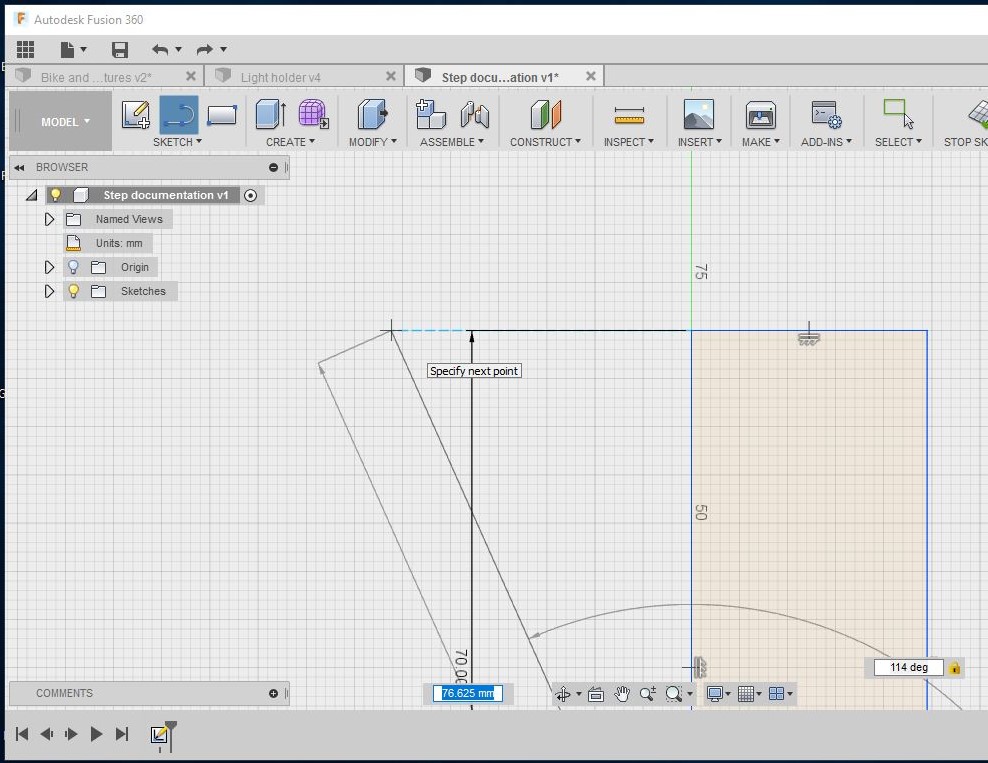
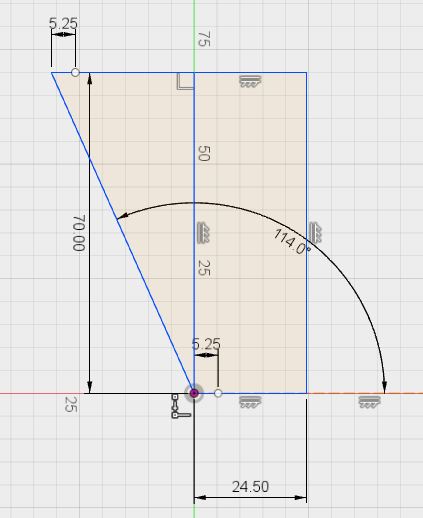
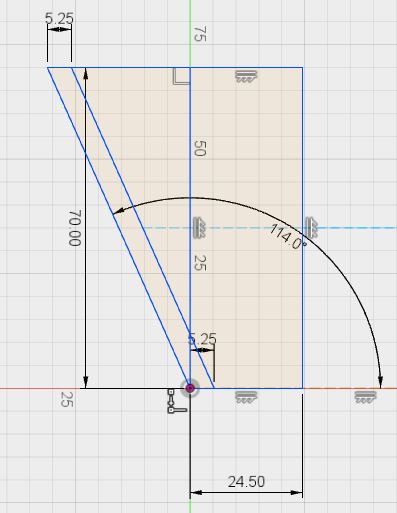
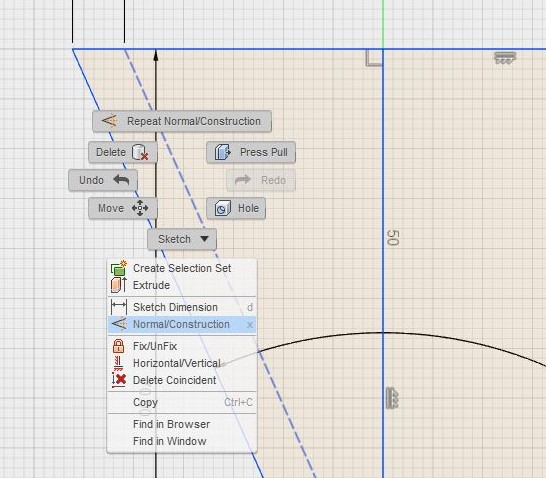
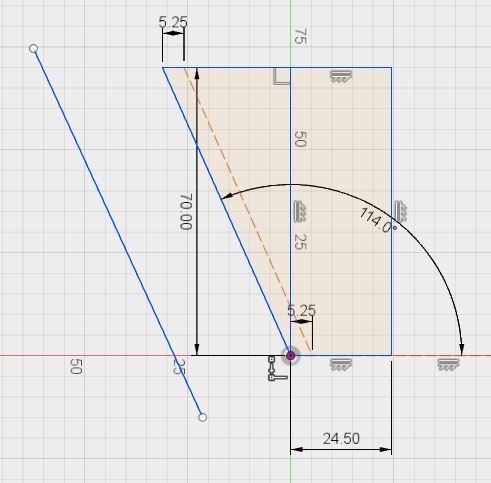
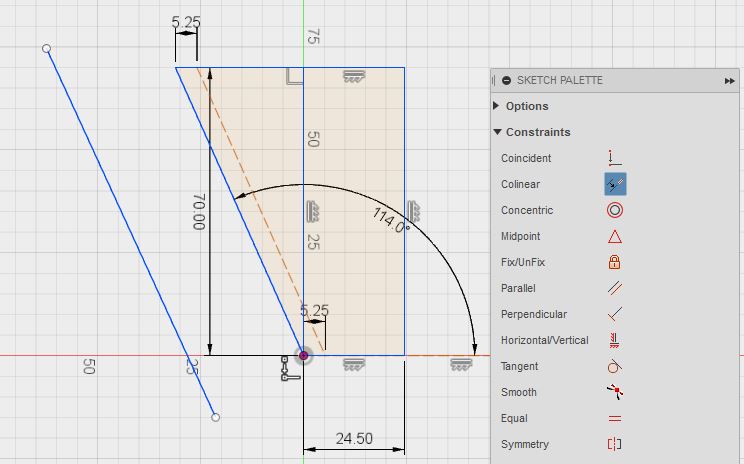
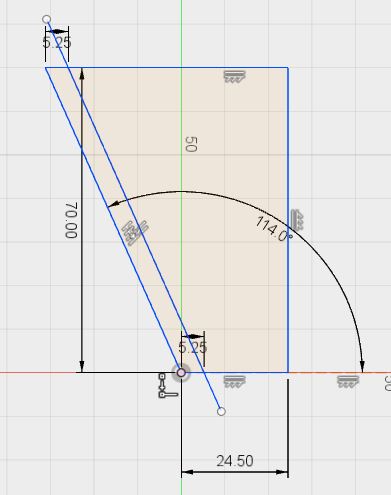
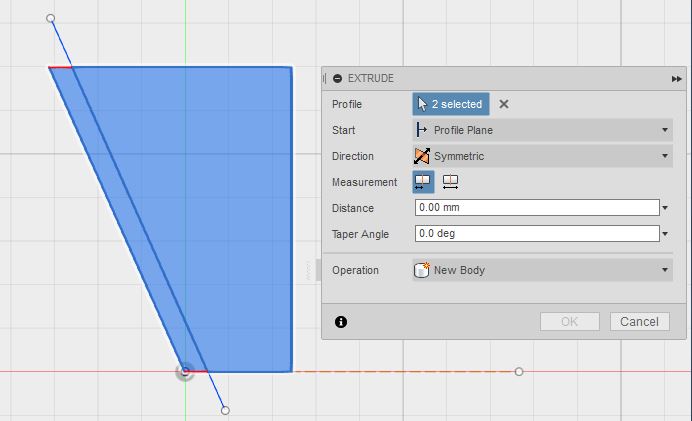
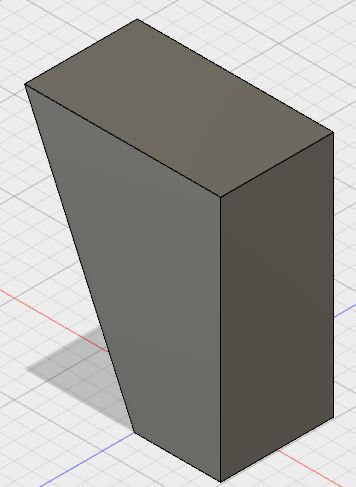
Using Fusion 360, open your Under Flag Light project, and start a new design. This one will be the actual 3D model.
1. Start a SKETCH and choose a plane to work in. I chose the front plane.
2. Make a ‘2 Point Rectangle’, put one point on the origin and use the tab key to enter a length and height equal to the bottom and height of the holder from our sketch. In my case, this was a rectangle with a height of 70 mm, and a width of 24.5 mm.
3. Now we need to put in our angle to make the holder tilt. Draw another line and put the start point on the bottom left corner. When you move your mouse left or right the program will tell you what your angle is from the axis. Since we went straight up initial (90 degrees) and now need to go left to lean away from the rest of the sketch, the angle goes up into an obtuse angle. Taking our needed angle, 24 degrees, and adding it to 90 degrees gives us an angle of 114 degrees. You can enter that angle and it will remain fixed if you use Tab to switch to the other measurement. (You will see a small lock symbol appear on the angle measurement). Even more nicely, you should hover your mouse over the top left corner of the rectangle and then bring it back towards your line. A blue dashed line will help you stay in-line with the top of the rectangle!
4. Draw another line from the top of rectangle across to the top of the angle we just made to create a closed figure. (Hint: If you use the last hint you can simply click again and extend from the top of the angle and go straight over to the top of the rectangle. Click on the top corner of the rectangle. You can be sure you are on it when your cursor has a blue square around it. The new triangle you just added will also turn tan to show it is now part of a closed figure.)
5. The last piece we need in this sketch is a line to put in the hole later! The hole will need to be centered where the pole will come through (6.5 mm wide) so we take the radius of that circle or 6.5/2 = 3.25 mm. We want the edge to be strong so we move the hole in 2 mm from the edge and make a mark. On the sketch we will draw a line in from the left 5.25 mm on the top and bottom, and then draw a line connecting those two end points.
6. Although not absolutely necessary, I like to neaten up my work at this point. To do so, right click on the line we just drew (the interior angled line) and look at the drop down menu. Choose the normal/construction option to make it a construction line. This turns it into a dotted line. You can also right click on the left side of the original rectangle and delete that line just to get it out of the way.
** Lesson Learned: We will use the CREATE - Pipe command in a few steps to create our hole for us. It will follow where that construction line runs. However, since it is on an angle Fusion 360 leaves some overhang. We need to make a line that runs above and below the figure so the ‘Pipe’ command will cut all the way through!
7. To prepare for the issue mentioned in step 6, draw a line to the left of our figure. The length is not critical. It just need to go from above the top to below the bottom at about the same angle as the left hand side of the figure.
8. With no line selected, go the right and open the SKETCH PALETTE. In the constraints section click on the symbol next to the ‘Colinear’ label, just be aware that clicking the word does nothing. Then click on the construction line first and then on the newest line we just drew. This should move the longer line onto the construction line with more line sticking out of both top and bottom of the quadrilateral.
9. Now to Extrude it. First, 'Stop Sketch', then 'Extrude' both sides of the sketch. Under the extrude menu on the right, choose the ‘Direction’ option and change it to Symmetric. The distance we will extrude will be half of what we want since it will extrude that much in each direction. For mine I wanted a piece 32 mm wide, so I made the extrude command for 16 mm.
Adding the Hole for the Flag Pole
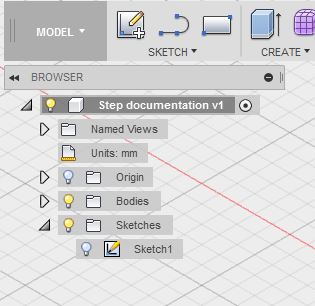
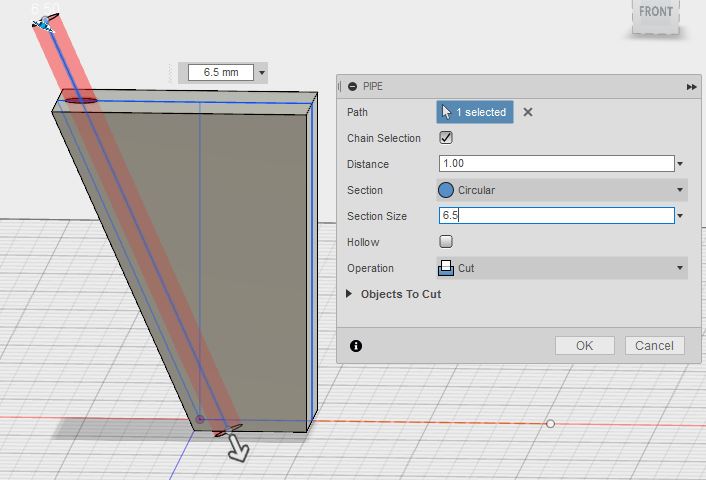
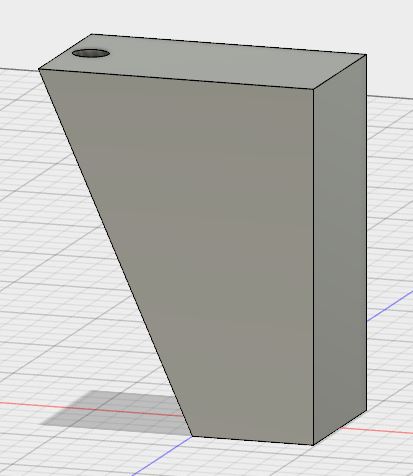
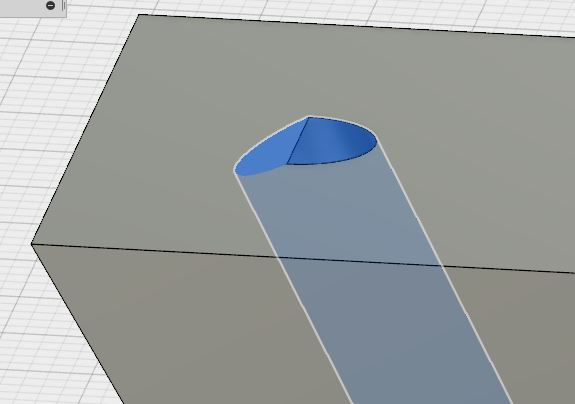
We already did most of the work in the sketch, so this one is easy!
1. Since we used the ‘Symmetric’ choice when extruding, the line we drew for the hole to follow stayed in the middle of the light holder. All we have to do is use a command to cut it out!
2. Before we can use that line, we have to be able to see it. When you extrude, Fusion 360 turns off your sketch. To turn it back on, use the small arrow next to the light bulb, folder, and Sketches choice on the left side of the screen. Click the light bulb next to Sketch 1, turning it back on.
3. You should be able to see your sketch again!
4. Under CREATE, choose the Pipe option and click on the long line sticking out of our sketch. Using the Pipe options on the right side of the screen, change the width to match your measurement for your flag pole. (I have 6.5 mm for mine.)
5. Double check the top and bottom of your holder to make sure the cut goes all the way through. Sometimes I have to lengthen a side of that line back in the sketch. The good news is that if you have to lengthen the line back in the sketch, once you STOP SKETCH the changes will follow through automatically lengthening the Pipe cut.
Sketch 2 to Hold the Flashlight and Improve Aesthetics
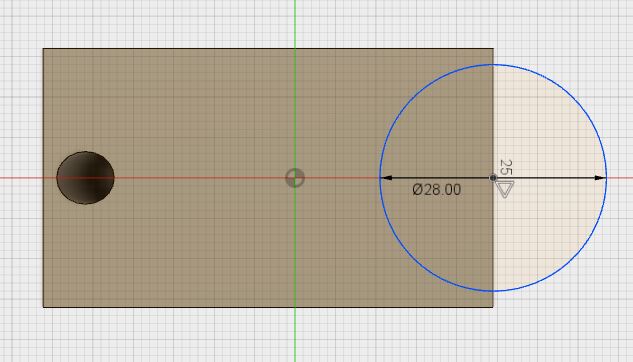
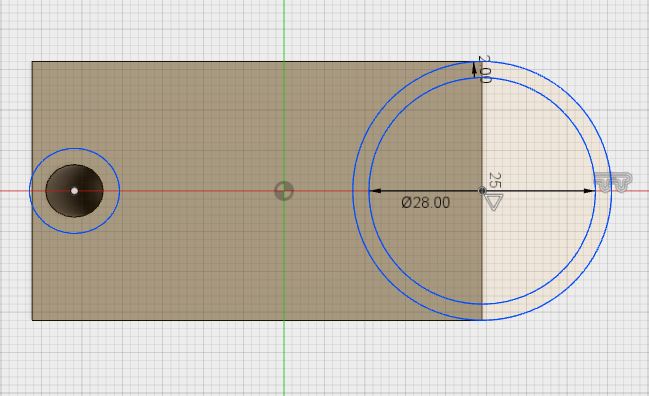
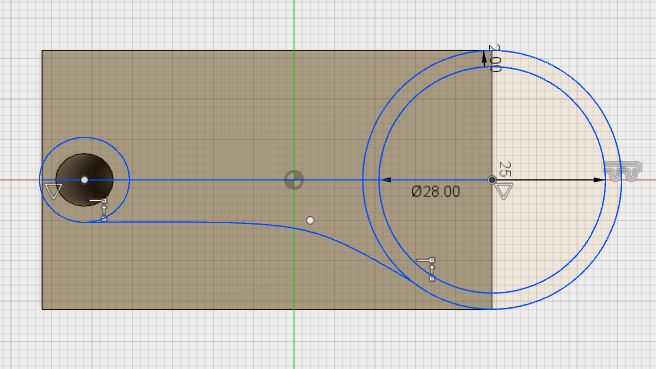
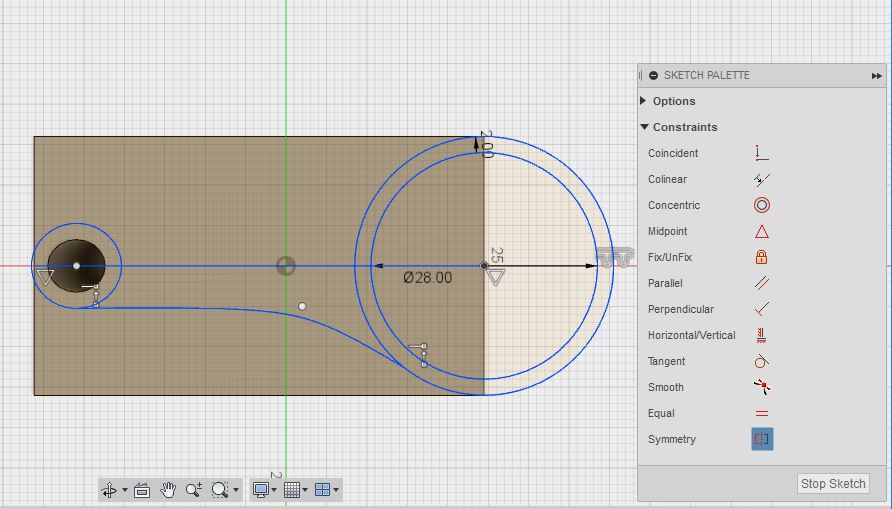
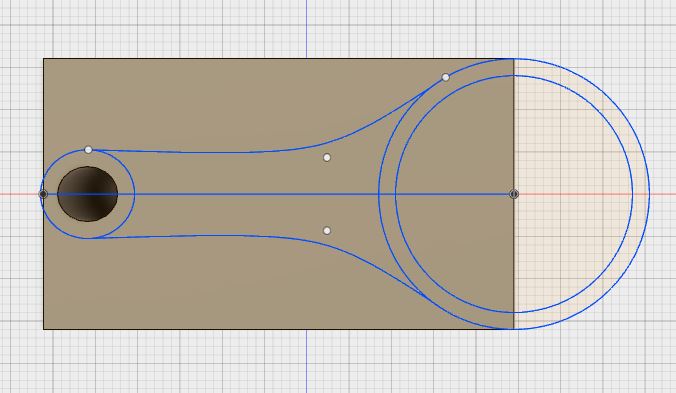
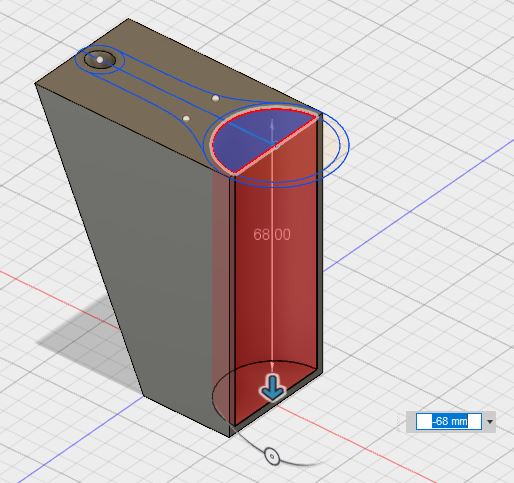
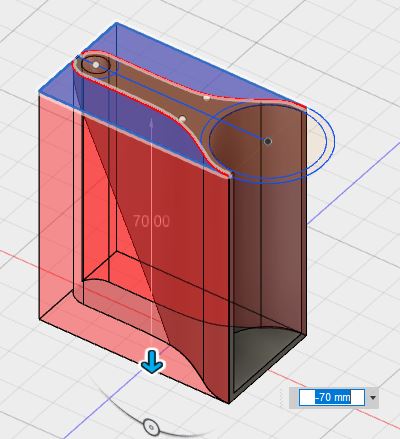
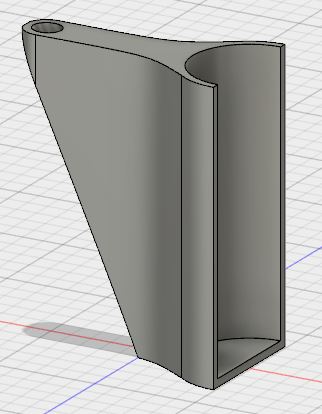
In this step we will create another sketch to cut out a place for the flashlight to sit securely, and to carve away a lot of the excess material that is not needed!
1. Start another Sketch, and choose the top of the light holder (the longer side that has a hole coming out of it) as the plane for the sketch.
2. To make a resting place for the flashlight, choose a ‘Center Diameter Circle’ in the ‘Circle’ choices.
3. Place the center on the right hand edge (the one the furthest from the hole we just put in).
4. Type in the diameter of the flashlight. This should make a circle half in the holder and half off, with a 2 mm edge at the above and below the circle in your current view.
5. Select both the Circle just created for the flashlight and the top circle for the flagpole. Use the ‘Offset’ command under the SKETCH menu and put in a value of 2 mm to make strong wall around both of these areas. This should also take both circles to the outside edges of the walls closest to them.
6. Next use the ‘Conic Curve’ command in the SKETCH choices. Put an endpoint on the side of each circle and then bend the curve until it is pleasing. Try not to cut into your 2 mm safety margin on either side.
7. To prevent stress in trying to replicate your work, make sure you have a line running down the center, and use the Constraint called ‘Symmetry’. Choose the Conic Curve first and then the center line to reflect it to the other side making a perfect match.
8. Use STOP SKETCH.
9. Go ahead and Extrude the half circle. We will push it down cutting into the holder. In this case, make the distance -68 mm. (The negative makes it move down.) This will leave a 2 mm ledge for the flashlight to sit on.
10. You will have to go back to Sketches of the left side of the screen and turn Sketch 2 back on again.
11. Extrude the two outer sections and cut all the way through the holder trimming the excess off the holder.
12. Make sure you turn your light holder all around to double check that nothing important got cut off!
Sketch 3 - Holes for the Elastic Bands
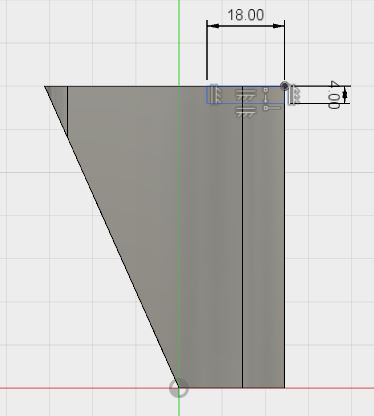
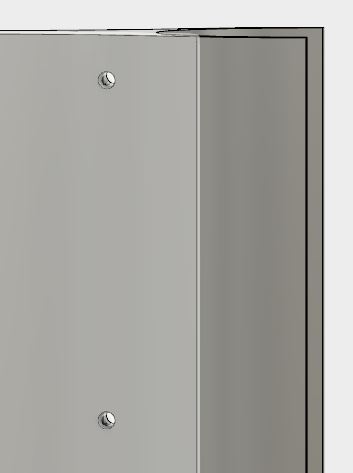
Ooops! Because I did not put the holes for the elastic cord to go through in all of my drawings I almost forgot to put the into the model. These circles we are going to extrude could have been put in the first sketch. (In truth, I did forget, and had to cancel my first order to Shapeways and cost myself the 20% discount because I remembered I needed to put them on about 3 minutes after I pushed submit on the payment!)
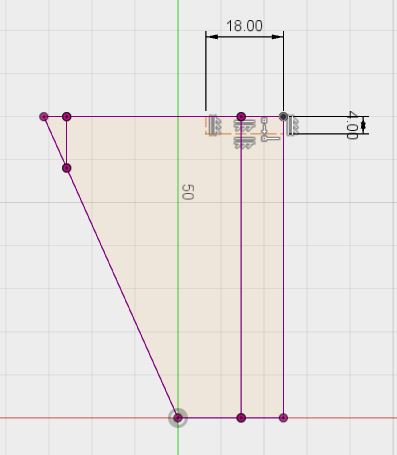
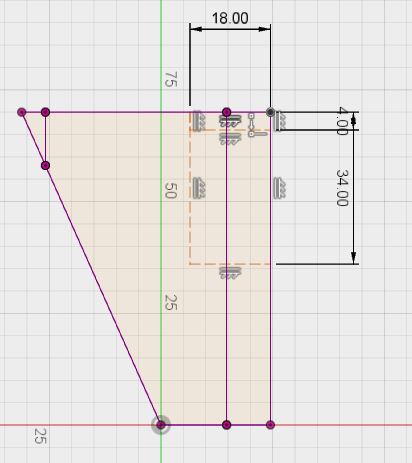
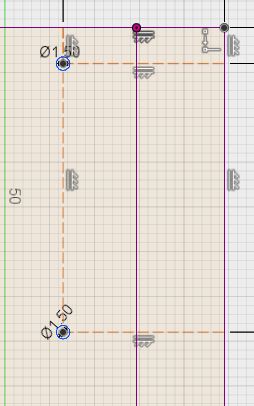
1. To give room for the elastic the holes should be 1.5 mm wide and we want them to be in the solid structure so we need to put them in deeper than depth of the flashlight half circle and down from the top edge. To give enough room, I decided to put my holes 18 mm in from the right side. The upper hole I put 4 mm from the top to make sure it has enough space to stay strong. The second hole, I decided to put halfway down the flashlight (68 mm / 2 = 34 mm).
2. Start a sketch and choose the same plane we used initially, so we are looking at the side of our light holder.
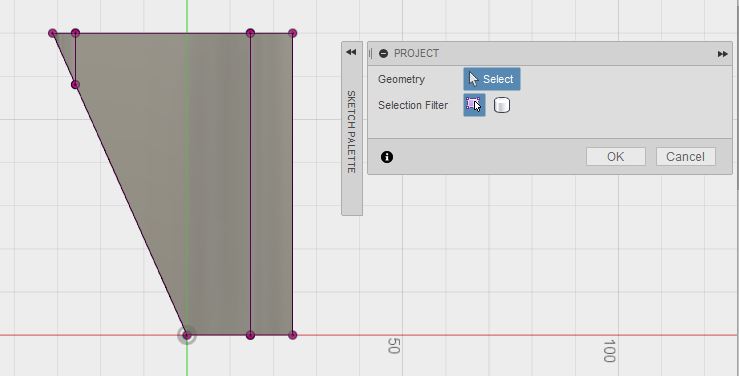
**Quick hint: if it is hard to see while looking halfway through the holder, you can go to the 'Project/Include' command under the 'SKETCH' menu and choose the first option. Then select the sections of the holder, and they will be outlined in purple. You can then turn off the light bulb next to 'Bodies' to get the holder out of the way and still leave the lines behind.
3. Starting from the upper right corner use a 2-Point Rectangle and set the dimensions to 4 mm x 18 mm. I recommend taking a quick moment and right clicking on the two new lines to set them them to construction lines to keep the sketch from getting cluttered.
4. Starting from the same corner, make a second 2-Point Rectangle. Set its dimensions to 34 mm x 18 mm. Set those lines to construction lines also.
5. Put a Center Diameter Circle on each of those two corners. Set the diameter of the circles to make sure the elastic cord will fit through. I used 1.5 mm for mine.
6. You can STOP SKETCH, and then Extrude the two circles. Make sure your turn the holder back on, if you turned off the holder to be able to draw more easily! If you put your sketch on the plane running down the center plane of the holder, also remember to set the Extrude Direction to Symmetrical so it cuts out both sides.
7. Lastly, check to make sure the holes are cut where you want them and not cutting through anything else.
Final Clean-up and Preparing the File
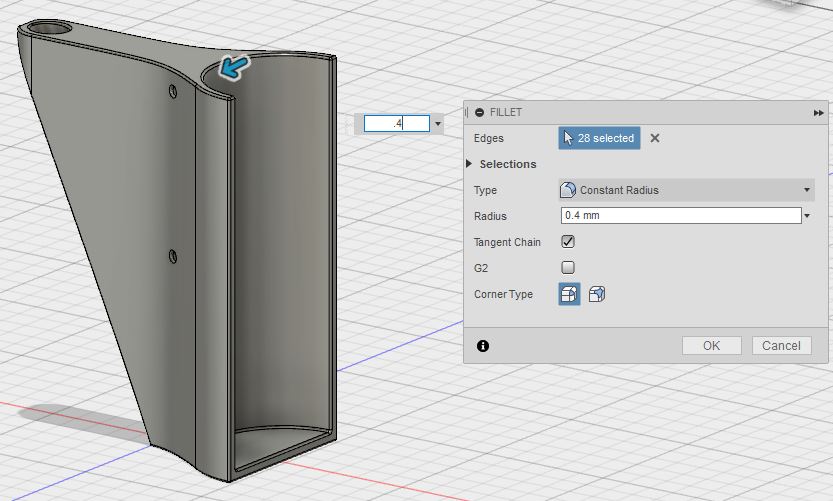
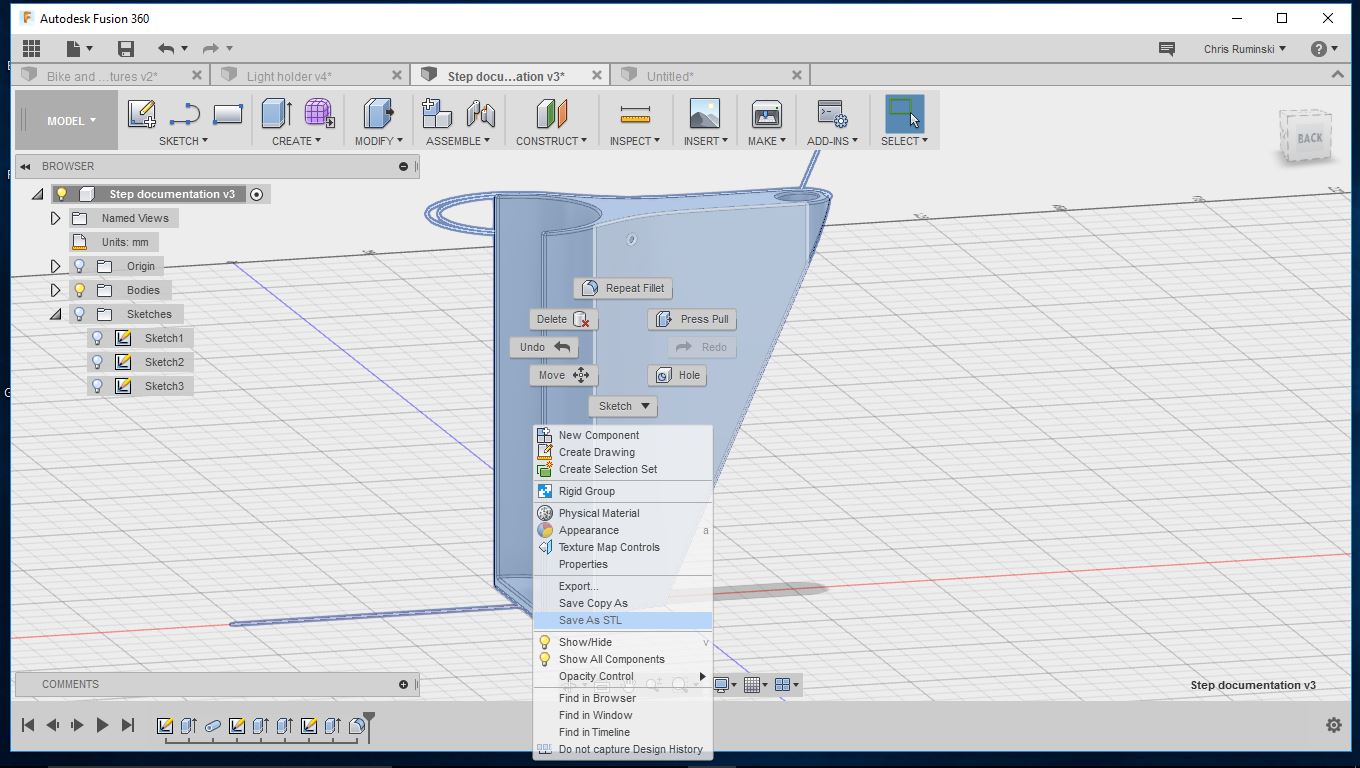
To finish up the 3D model, all we need to do is clean up the edges and then we are ready to use it!
1. We need to smooth the edges. This keeps them from chipping and breaking, makes the printing easier, and makes it feel nicer in your hands too!
2. Select all the edges on light holder. You can do this by left clicking with the mouse on an edge. If you are holding down ‘shift’ while you do it, Fusion 360 will add the edge to your selection instead of just switching to that edge.
3. Once the edges are highlighted, look under the MODIFY menu and choose Fillet. For the the Fillet amount try .4 mm and see if that looks right.
4. Turn your model around and make sure that you caught all the edges and did not leave any sharp.
5. If you are printing the holder yourself, go at it.
6. If you are going to send it off to someone else, it is time to download the stl file. Simply double click the piece to highlight the whole piece. Right click the highlighted piece and a little over halfway down there is a ‘Save as STL’ option. Choose this and then go find a print service to use.
**(I had mine printed by Shapeways.com. They did an excellent job.)
Preparing the Light Holder and Installation
.JPG)
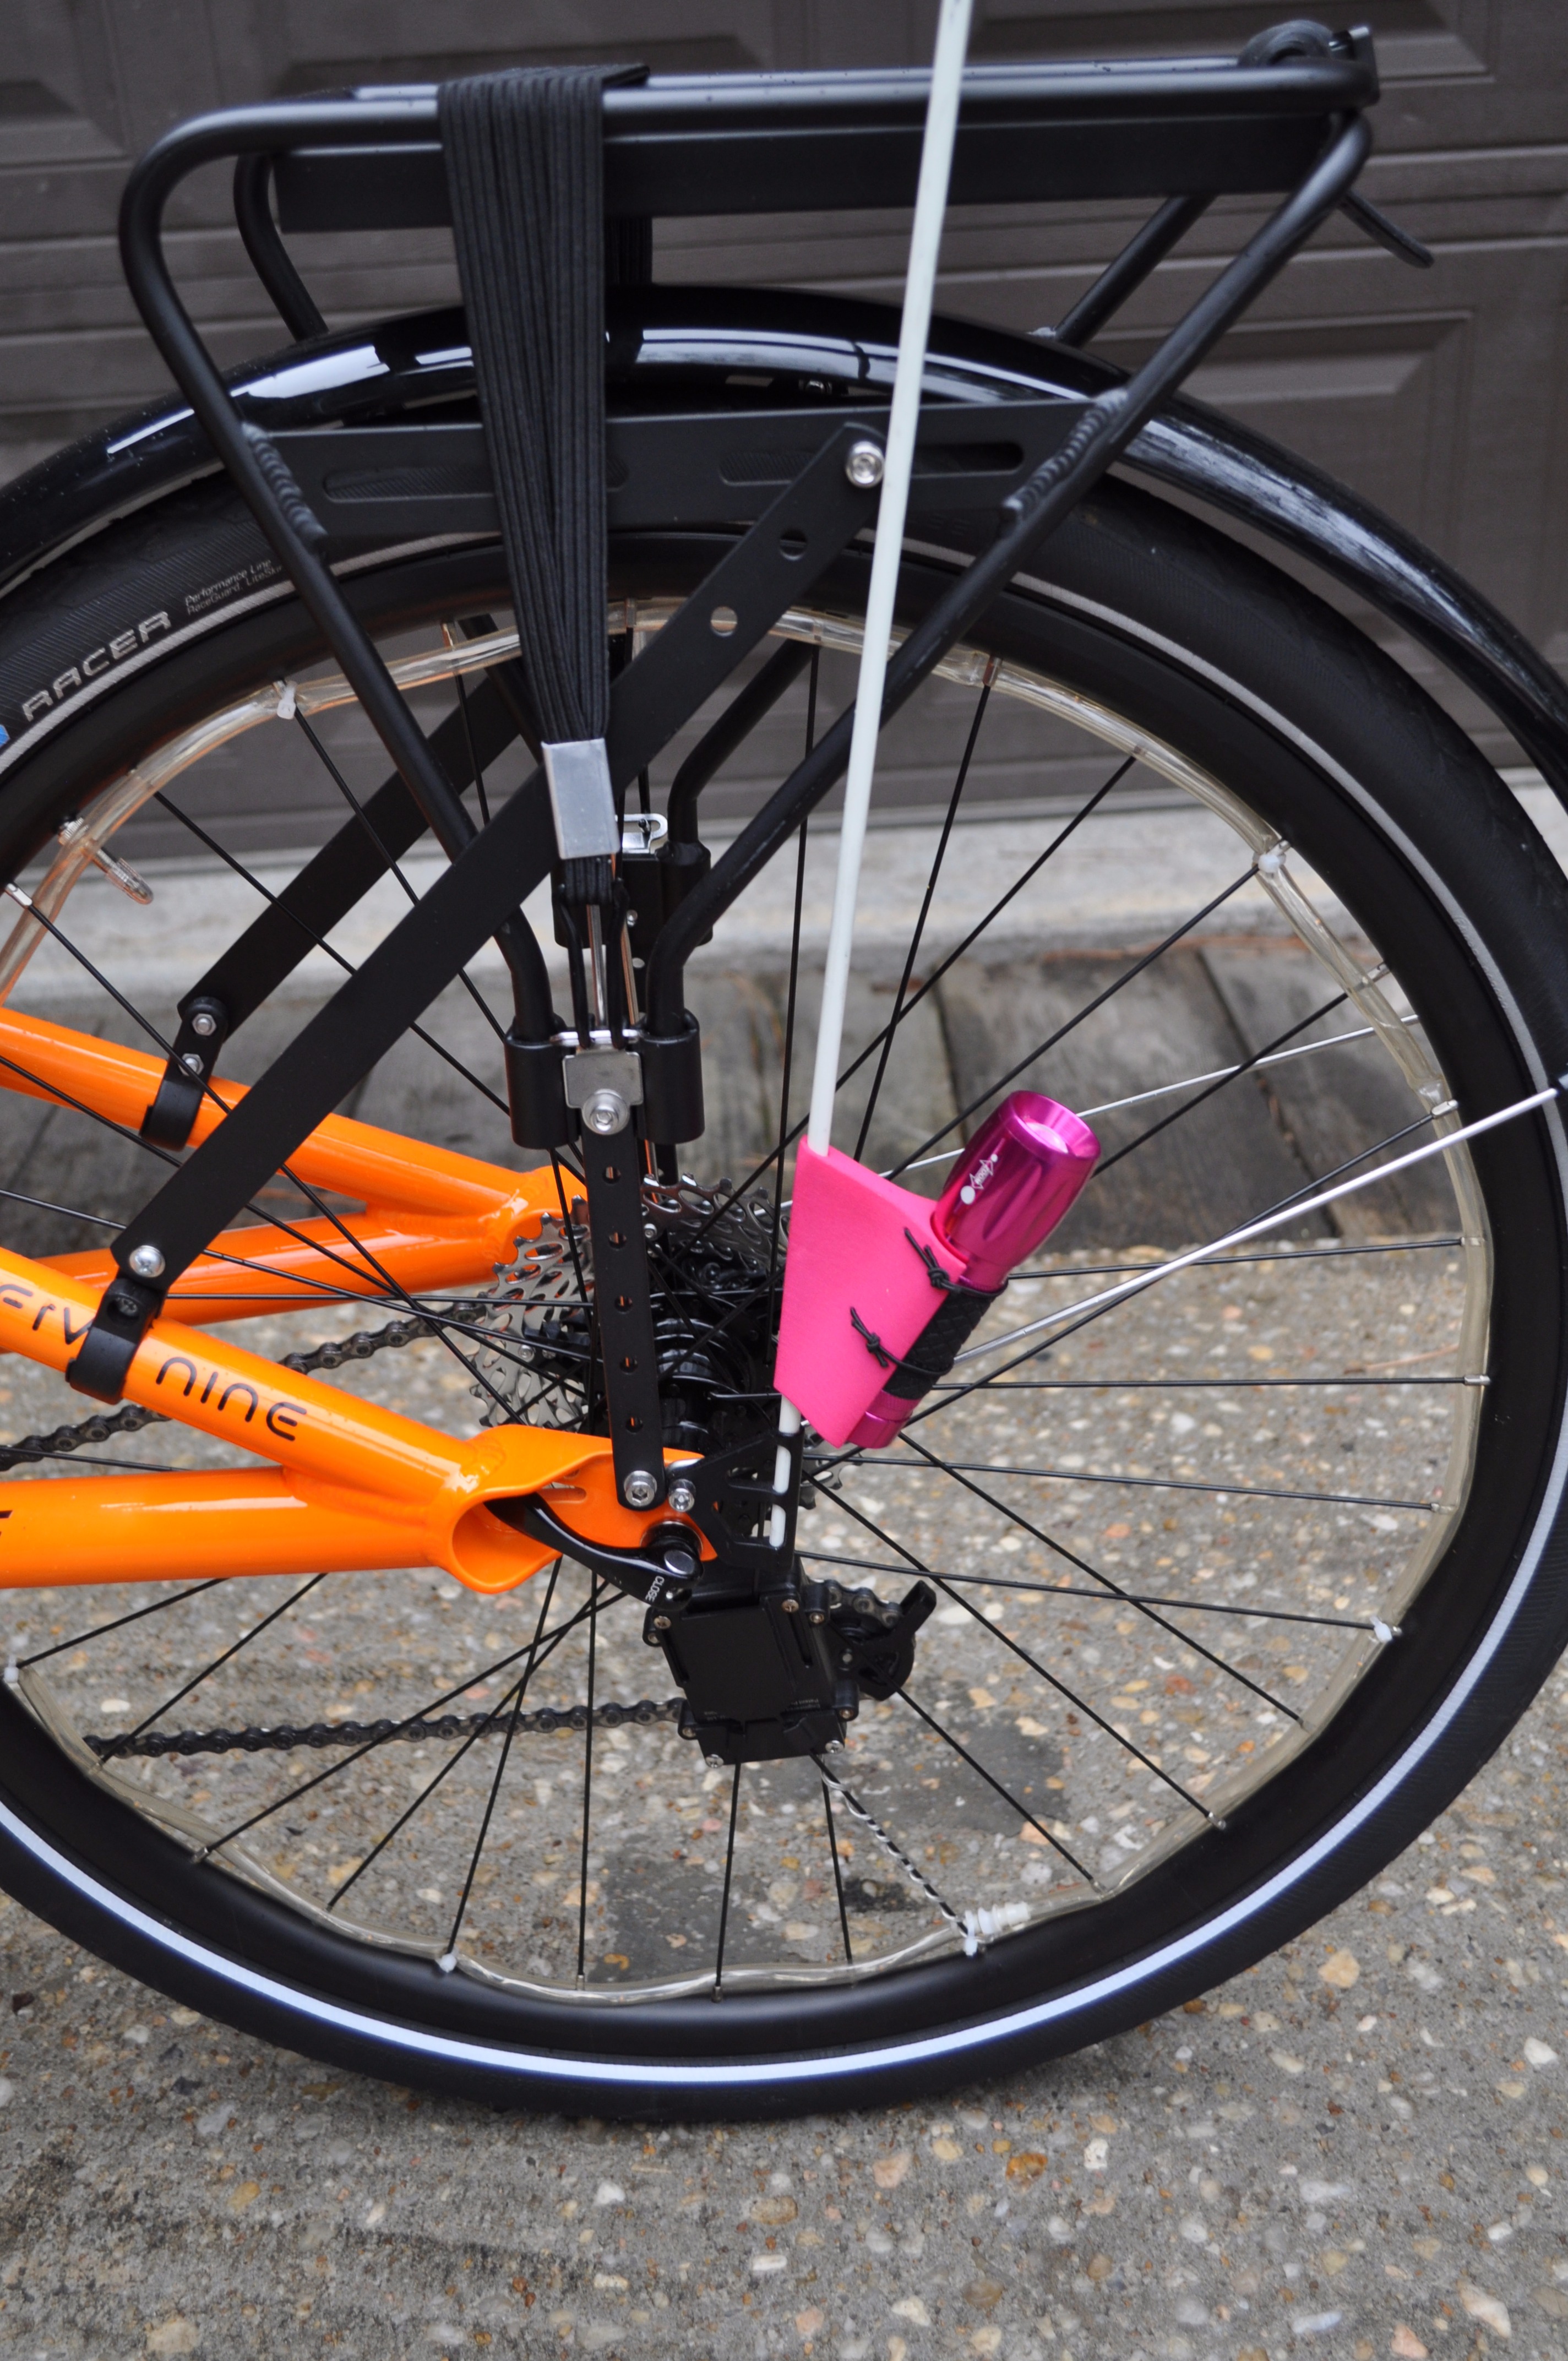
Once your light holder is printed, there is just a little bit of prep and you are ready to ride!
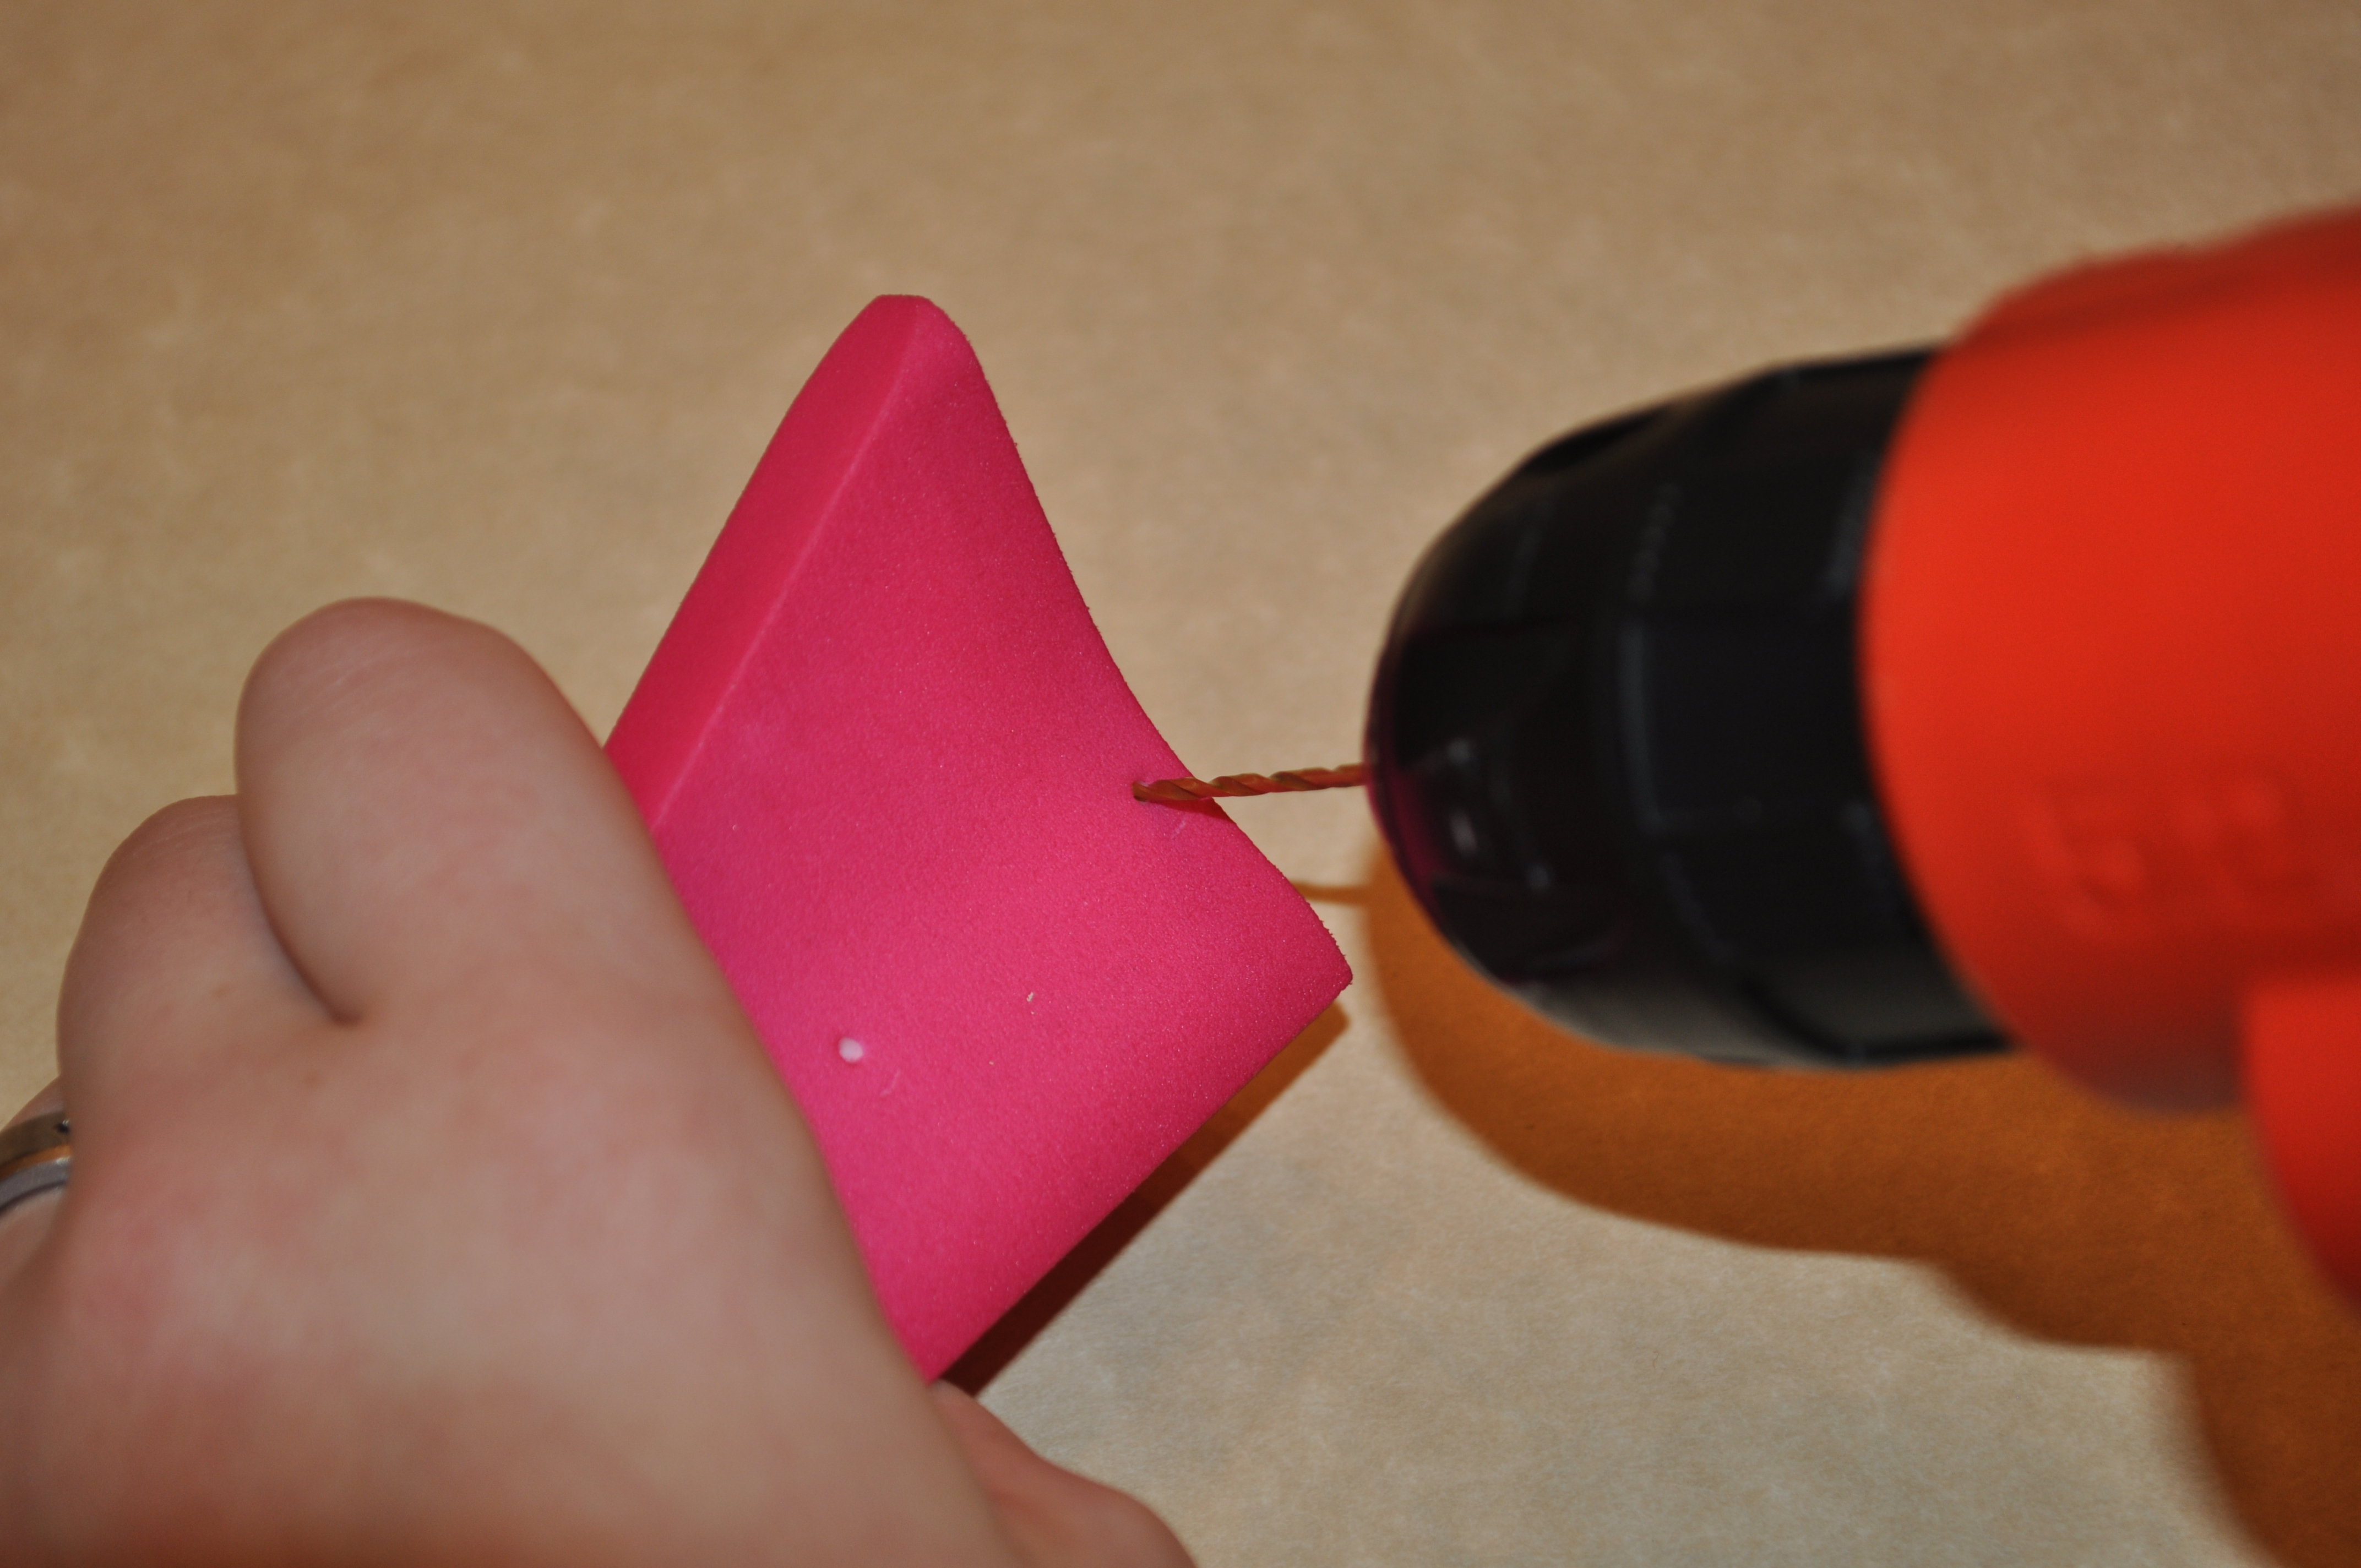
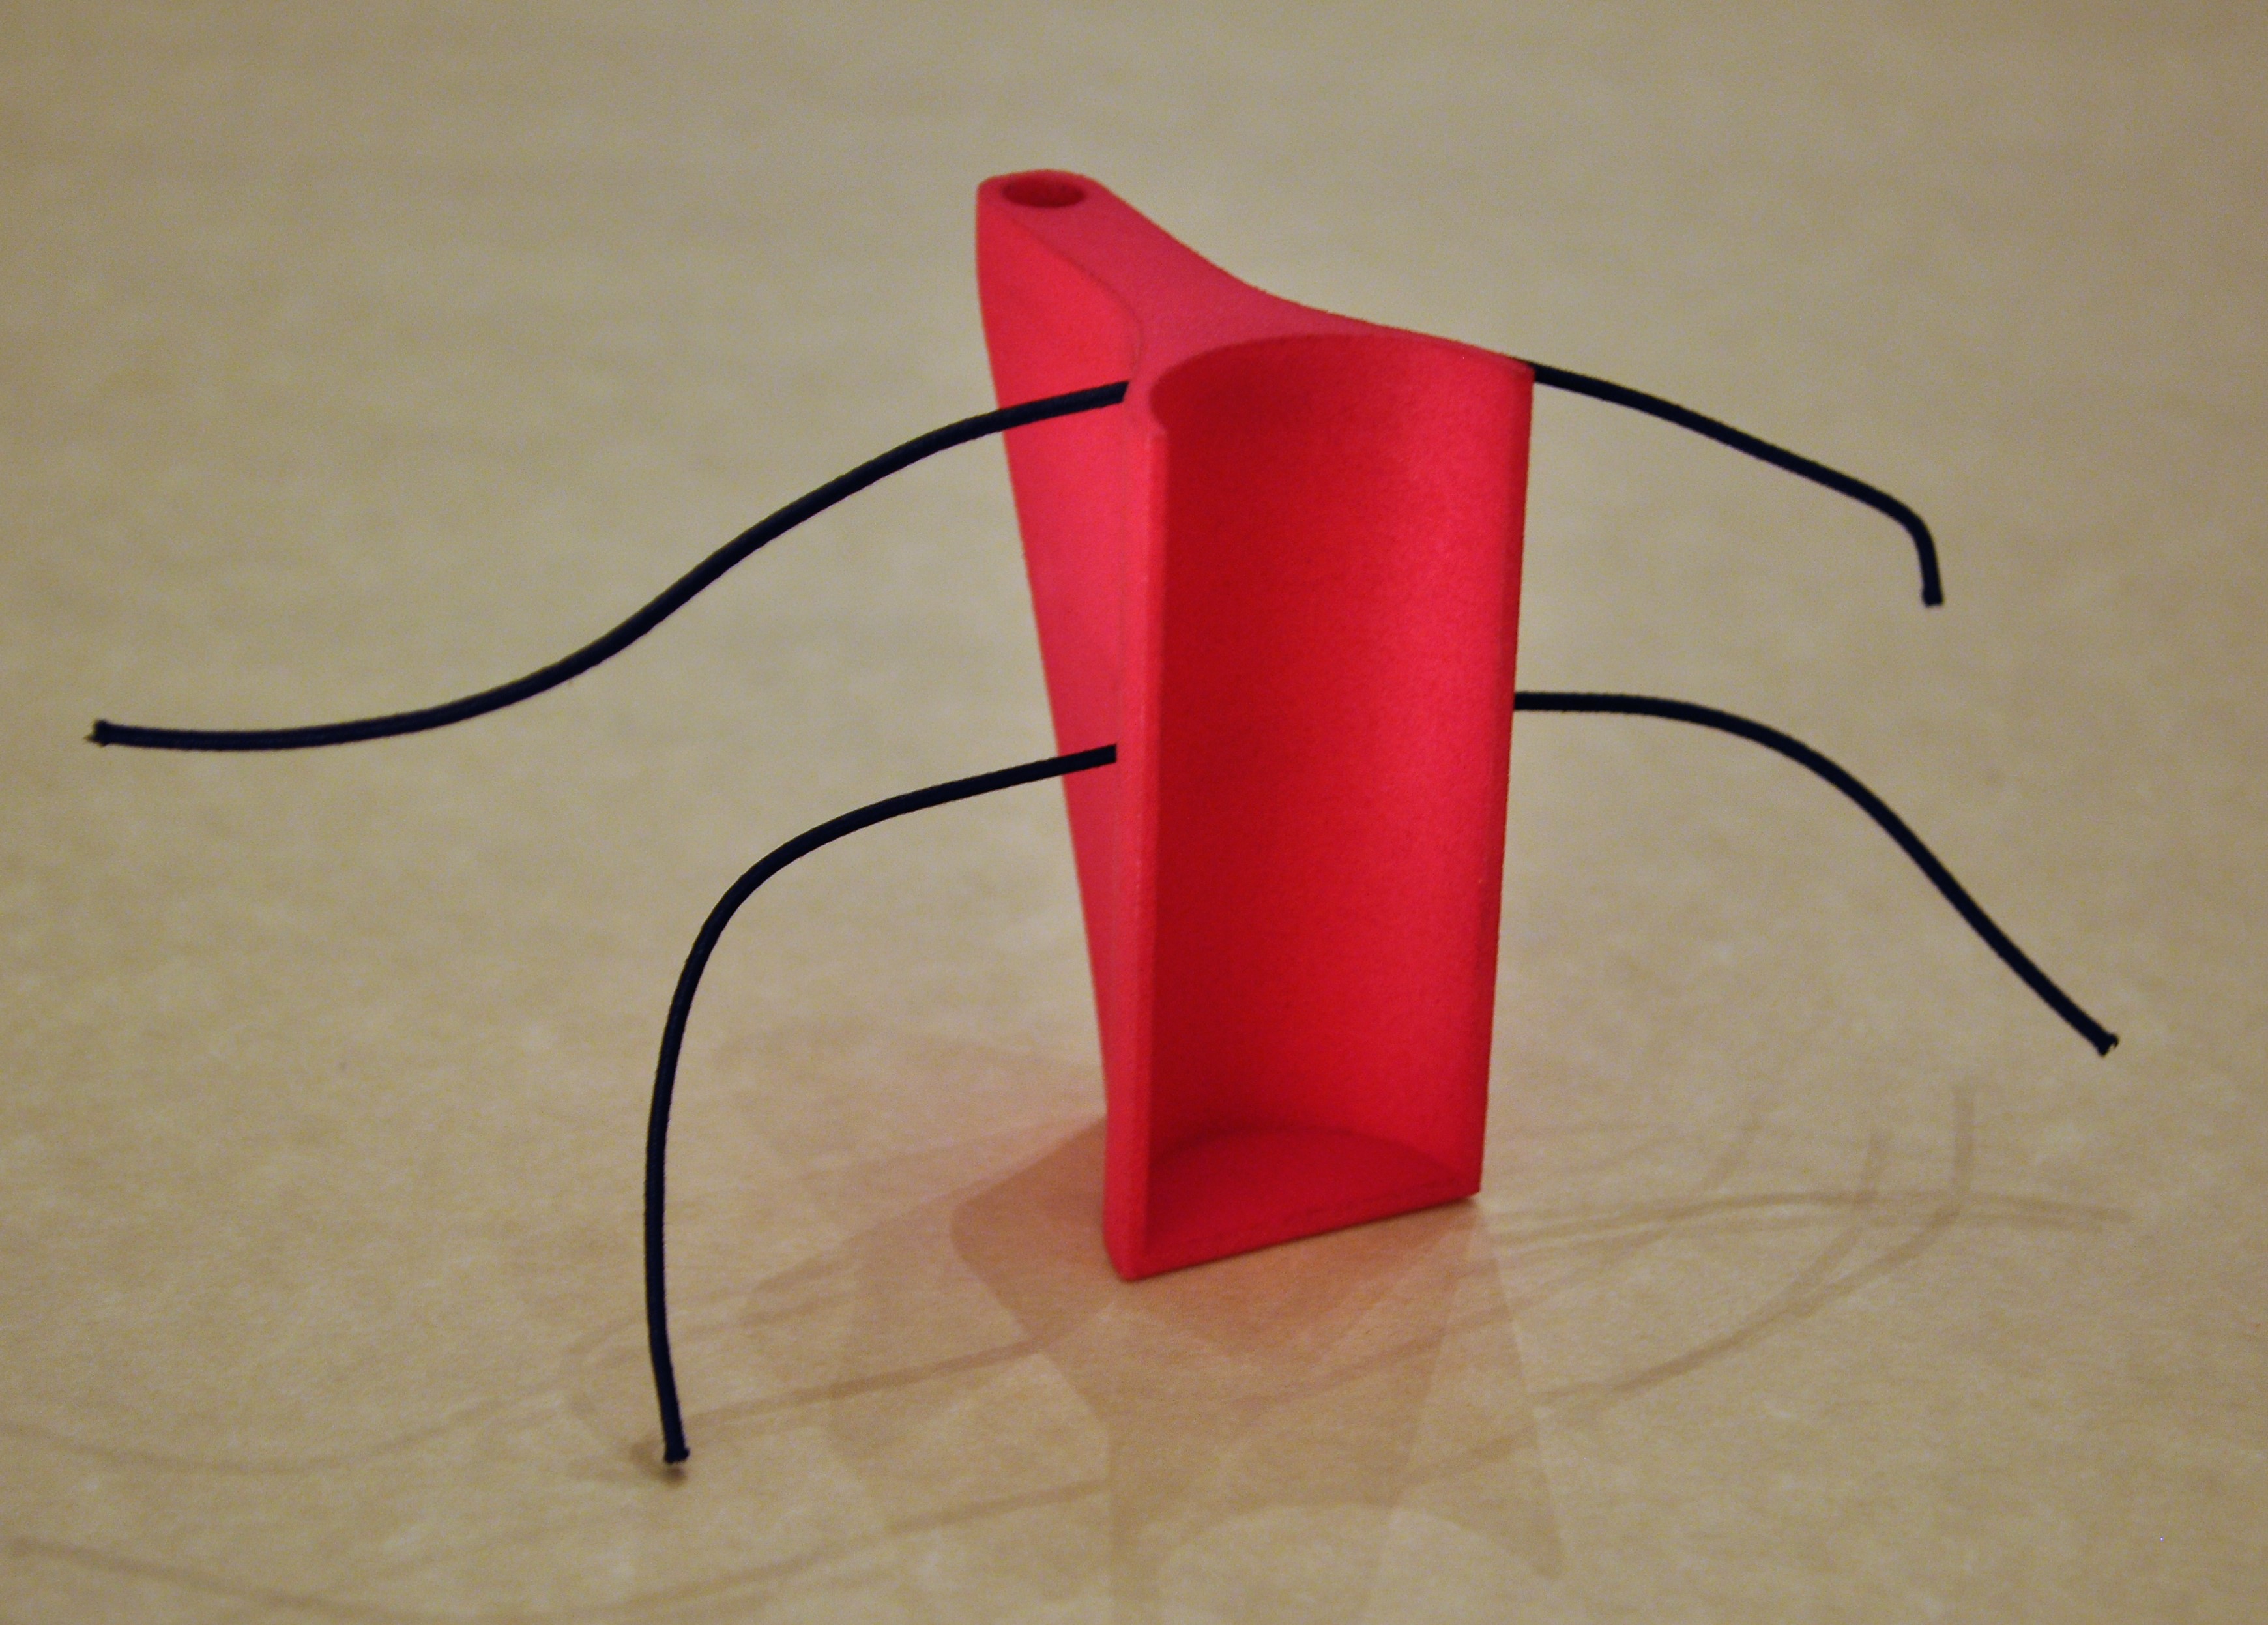
1. Inspect your printed light holder to make sure everything printed correctly. The only problem I had in my print (in 'Strong Flexible Plastic' by Shapeways.com) was that the small holes for the elastic closed up a little, either from being too small, the plastic expanding after a print, or support material. The drill cleaned it out very quickly and nicely.
2. If you have a similar problem use a drill and a 1/16” drill bit (I did not have a metric set on me) to clean it out.
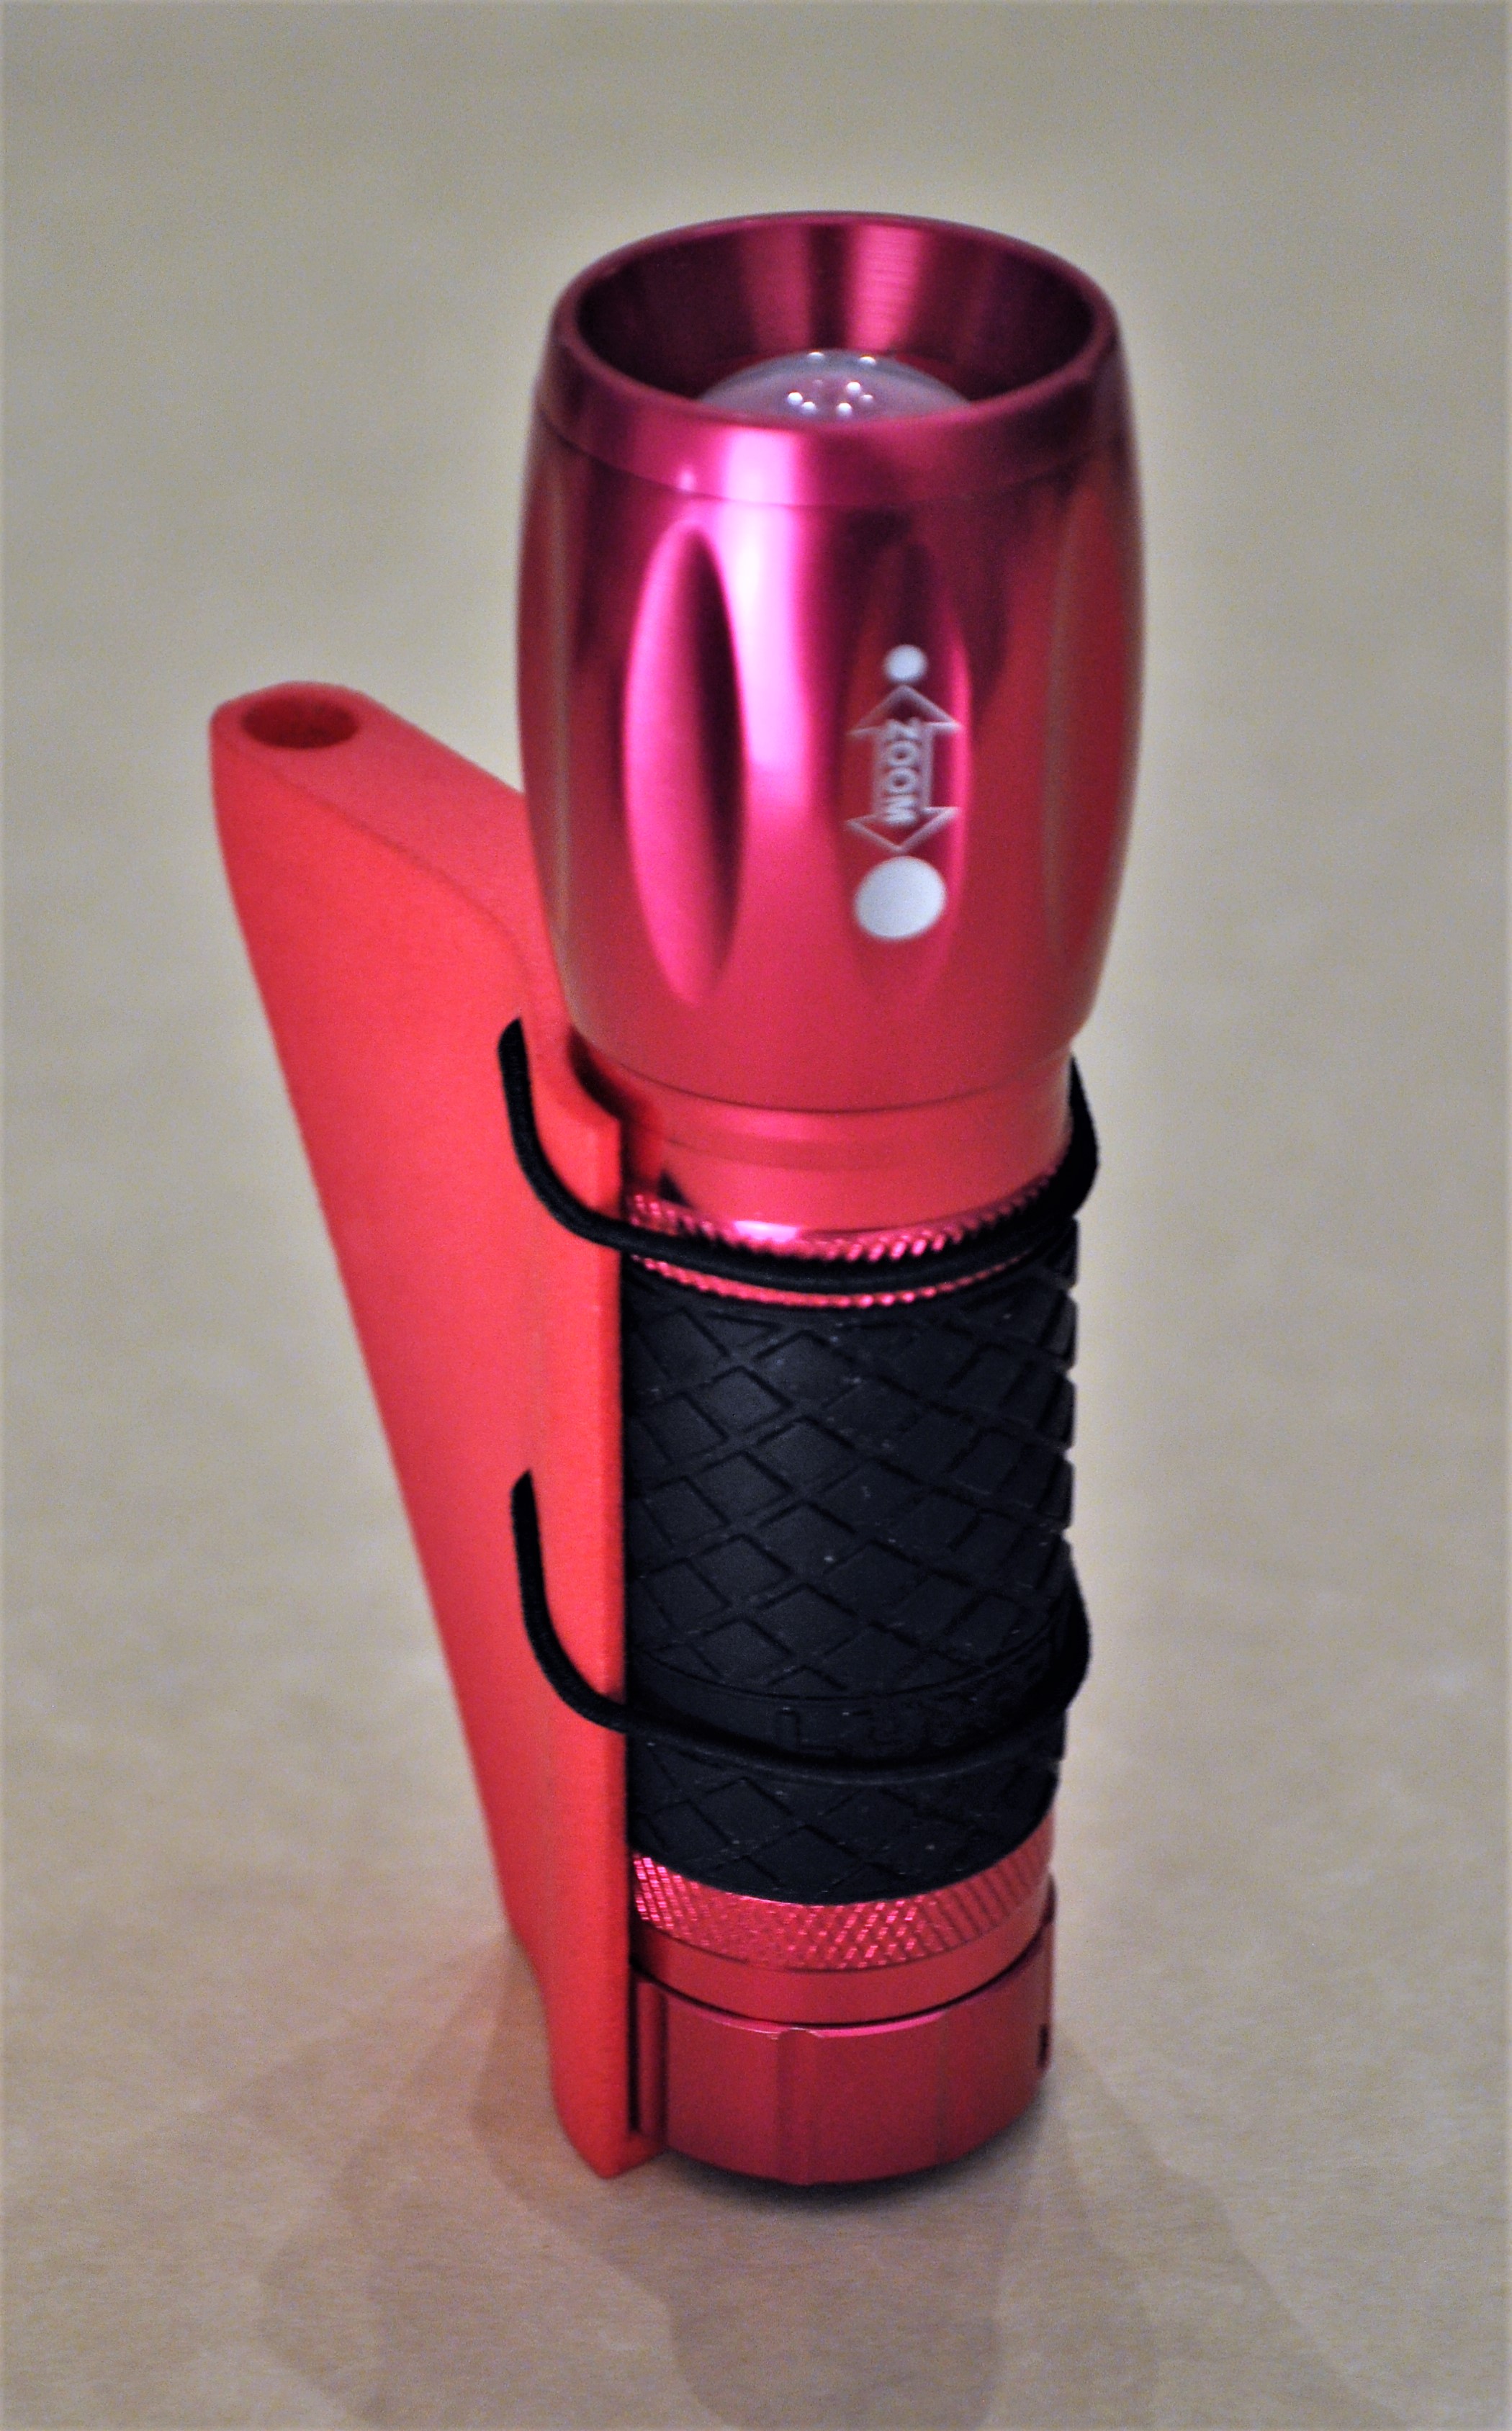
3. Install the the two round elastic cord pieces by sliding them through the holes. You might have to snip the end with a sharp pair of scissors if the fit is close.
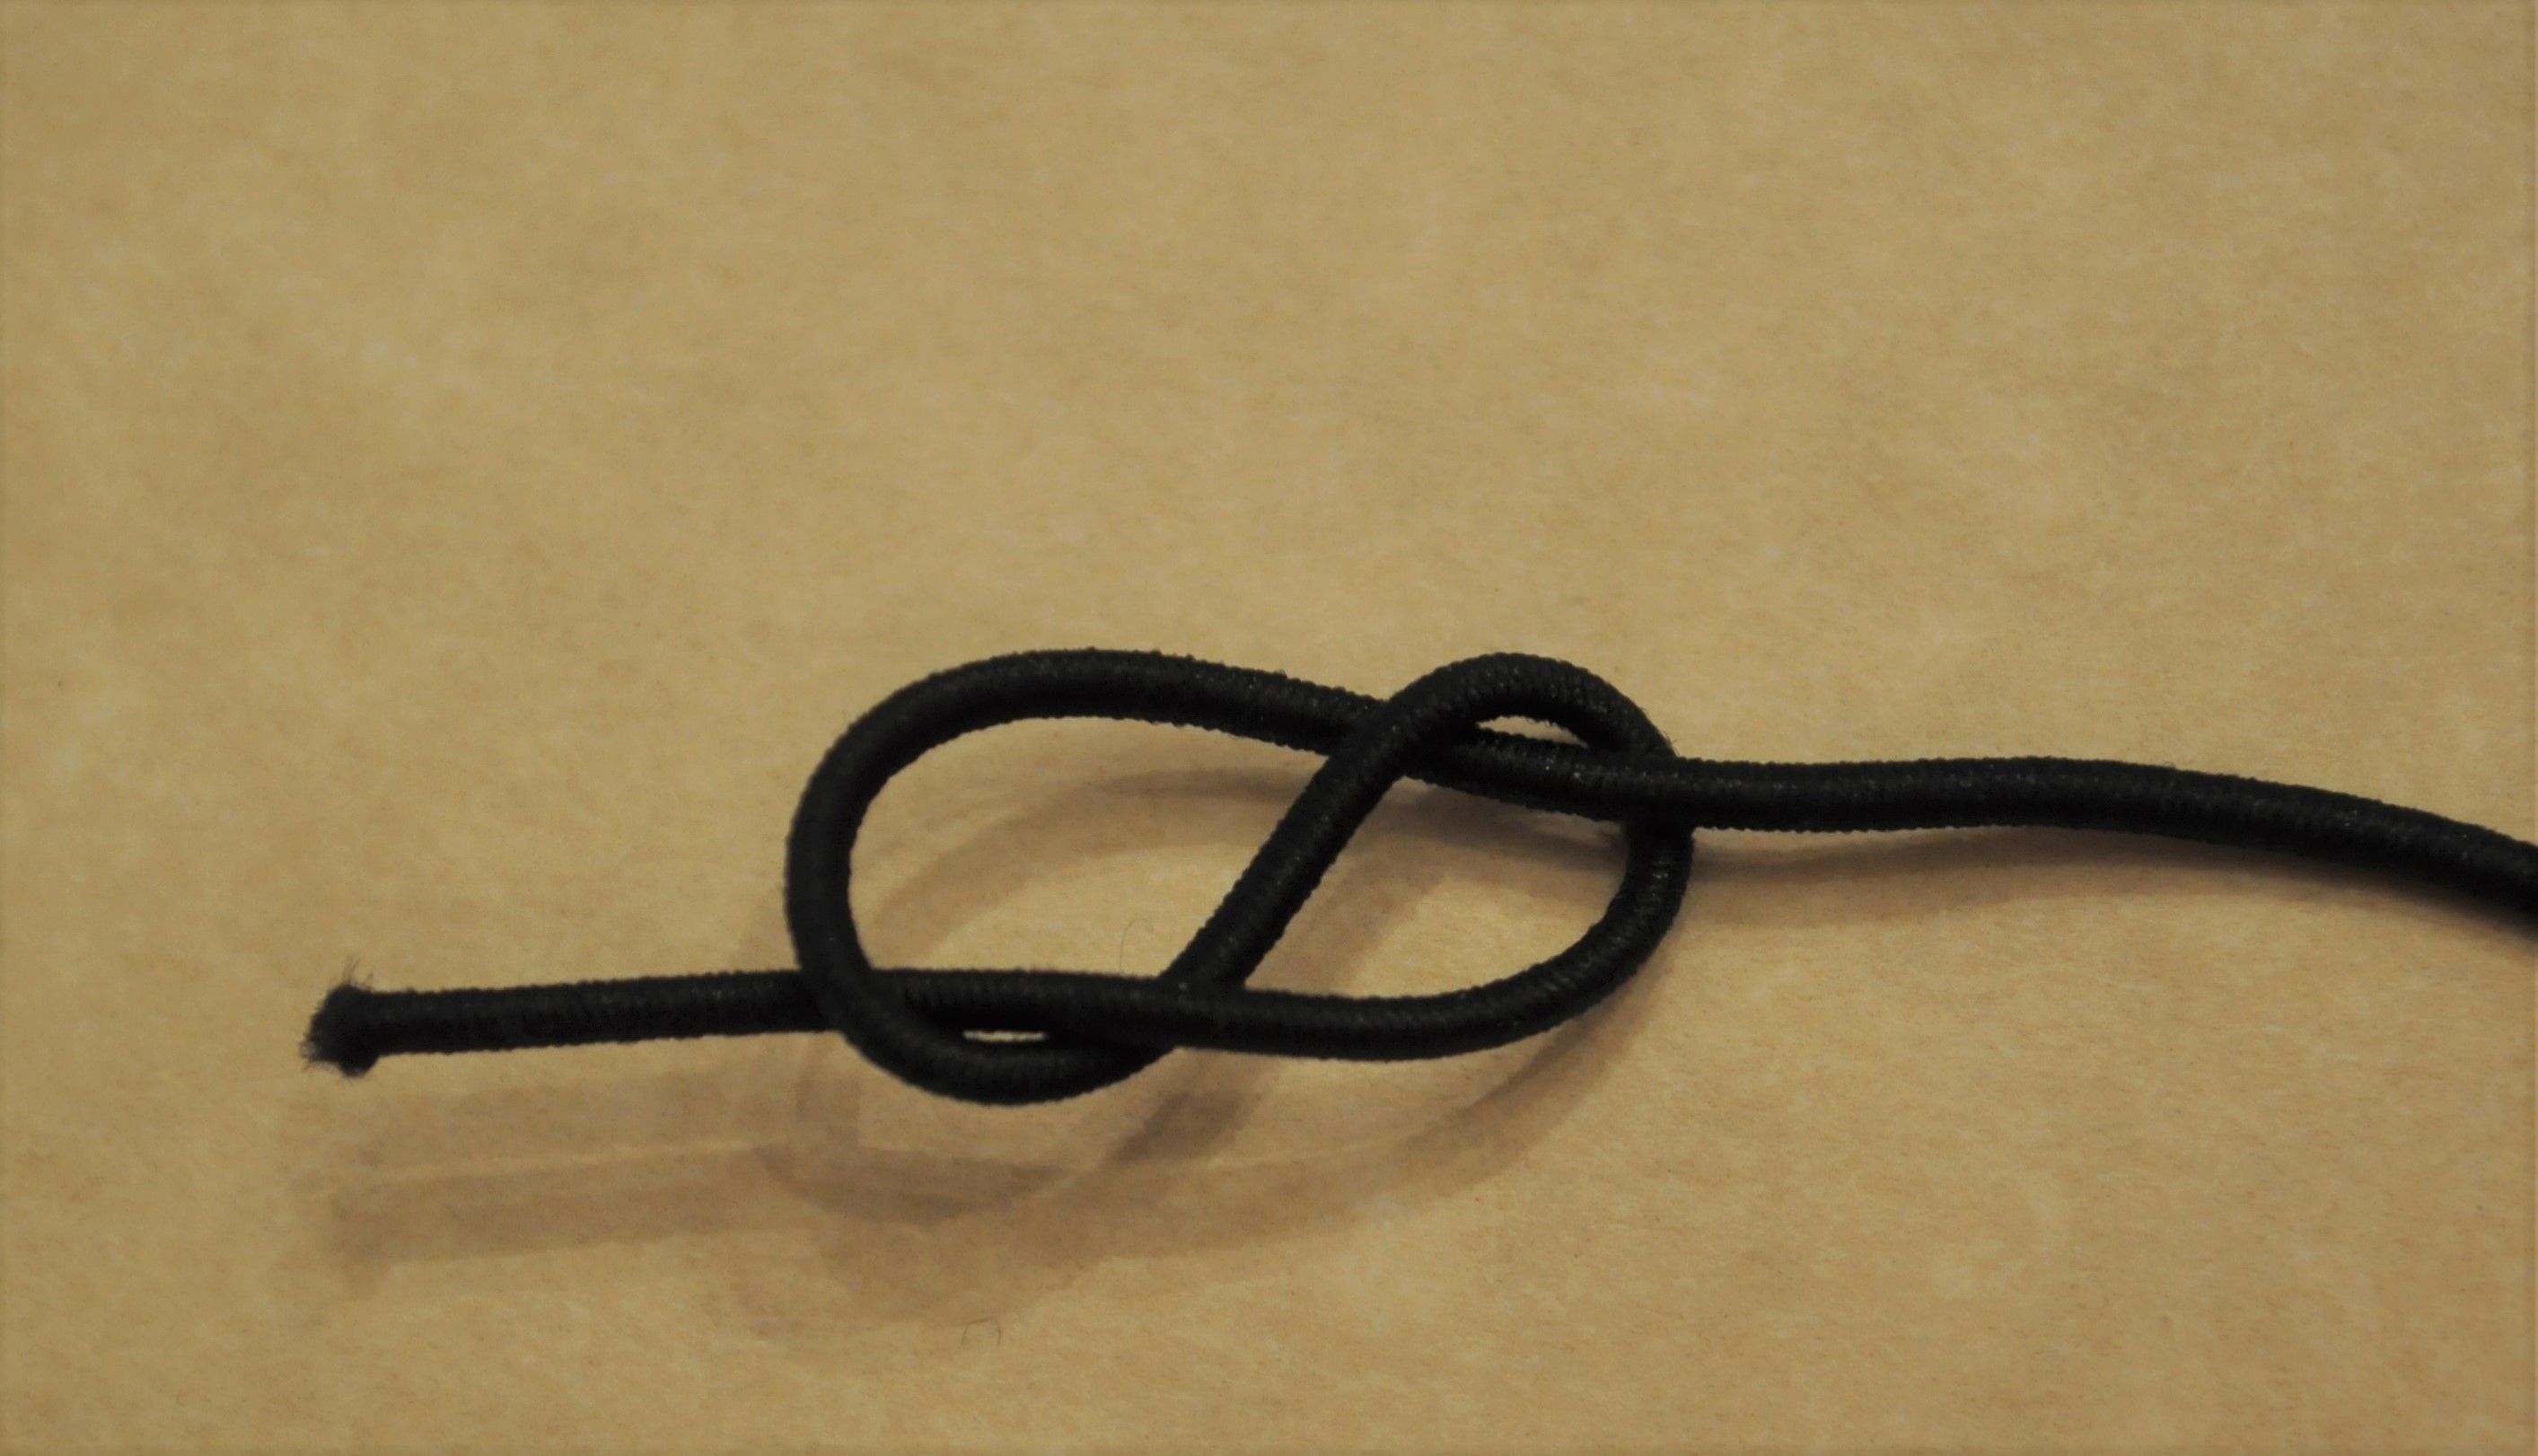
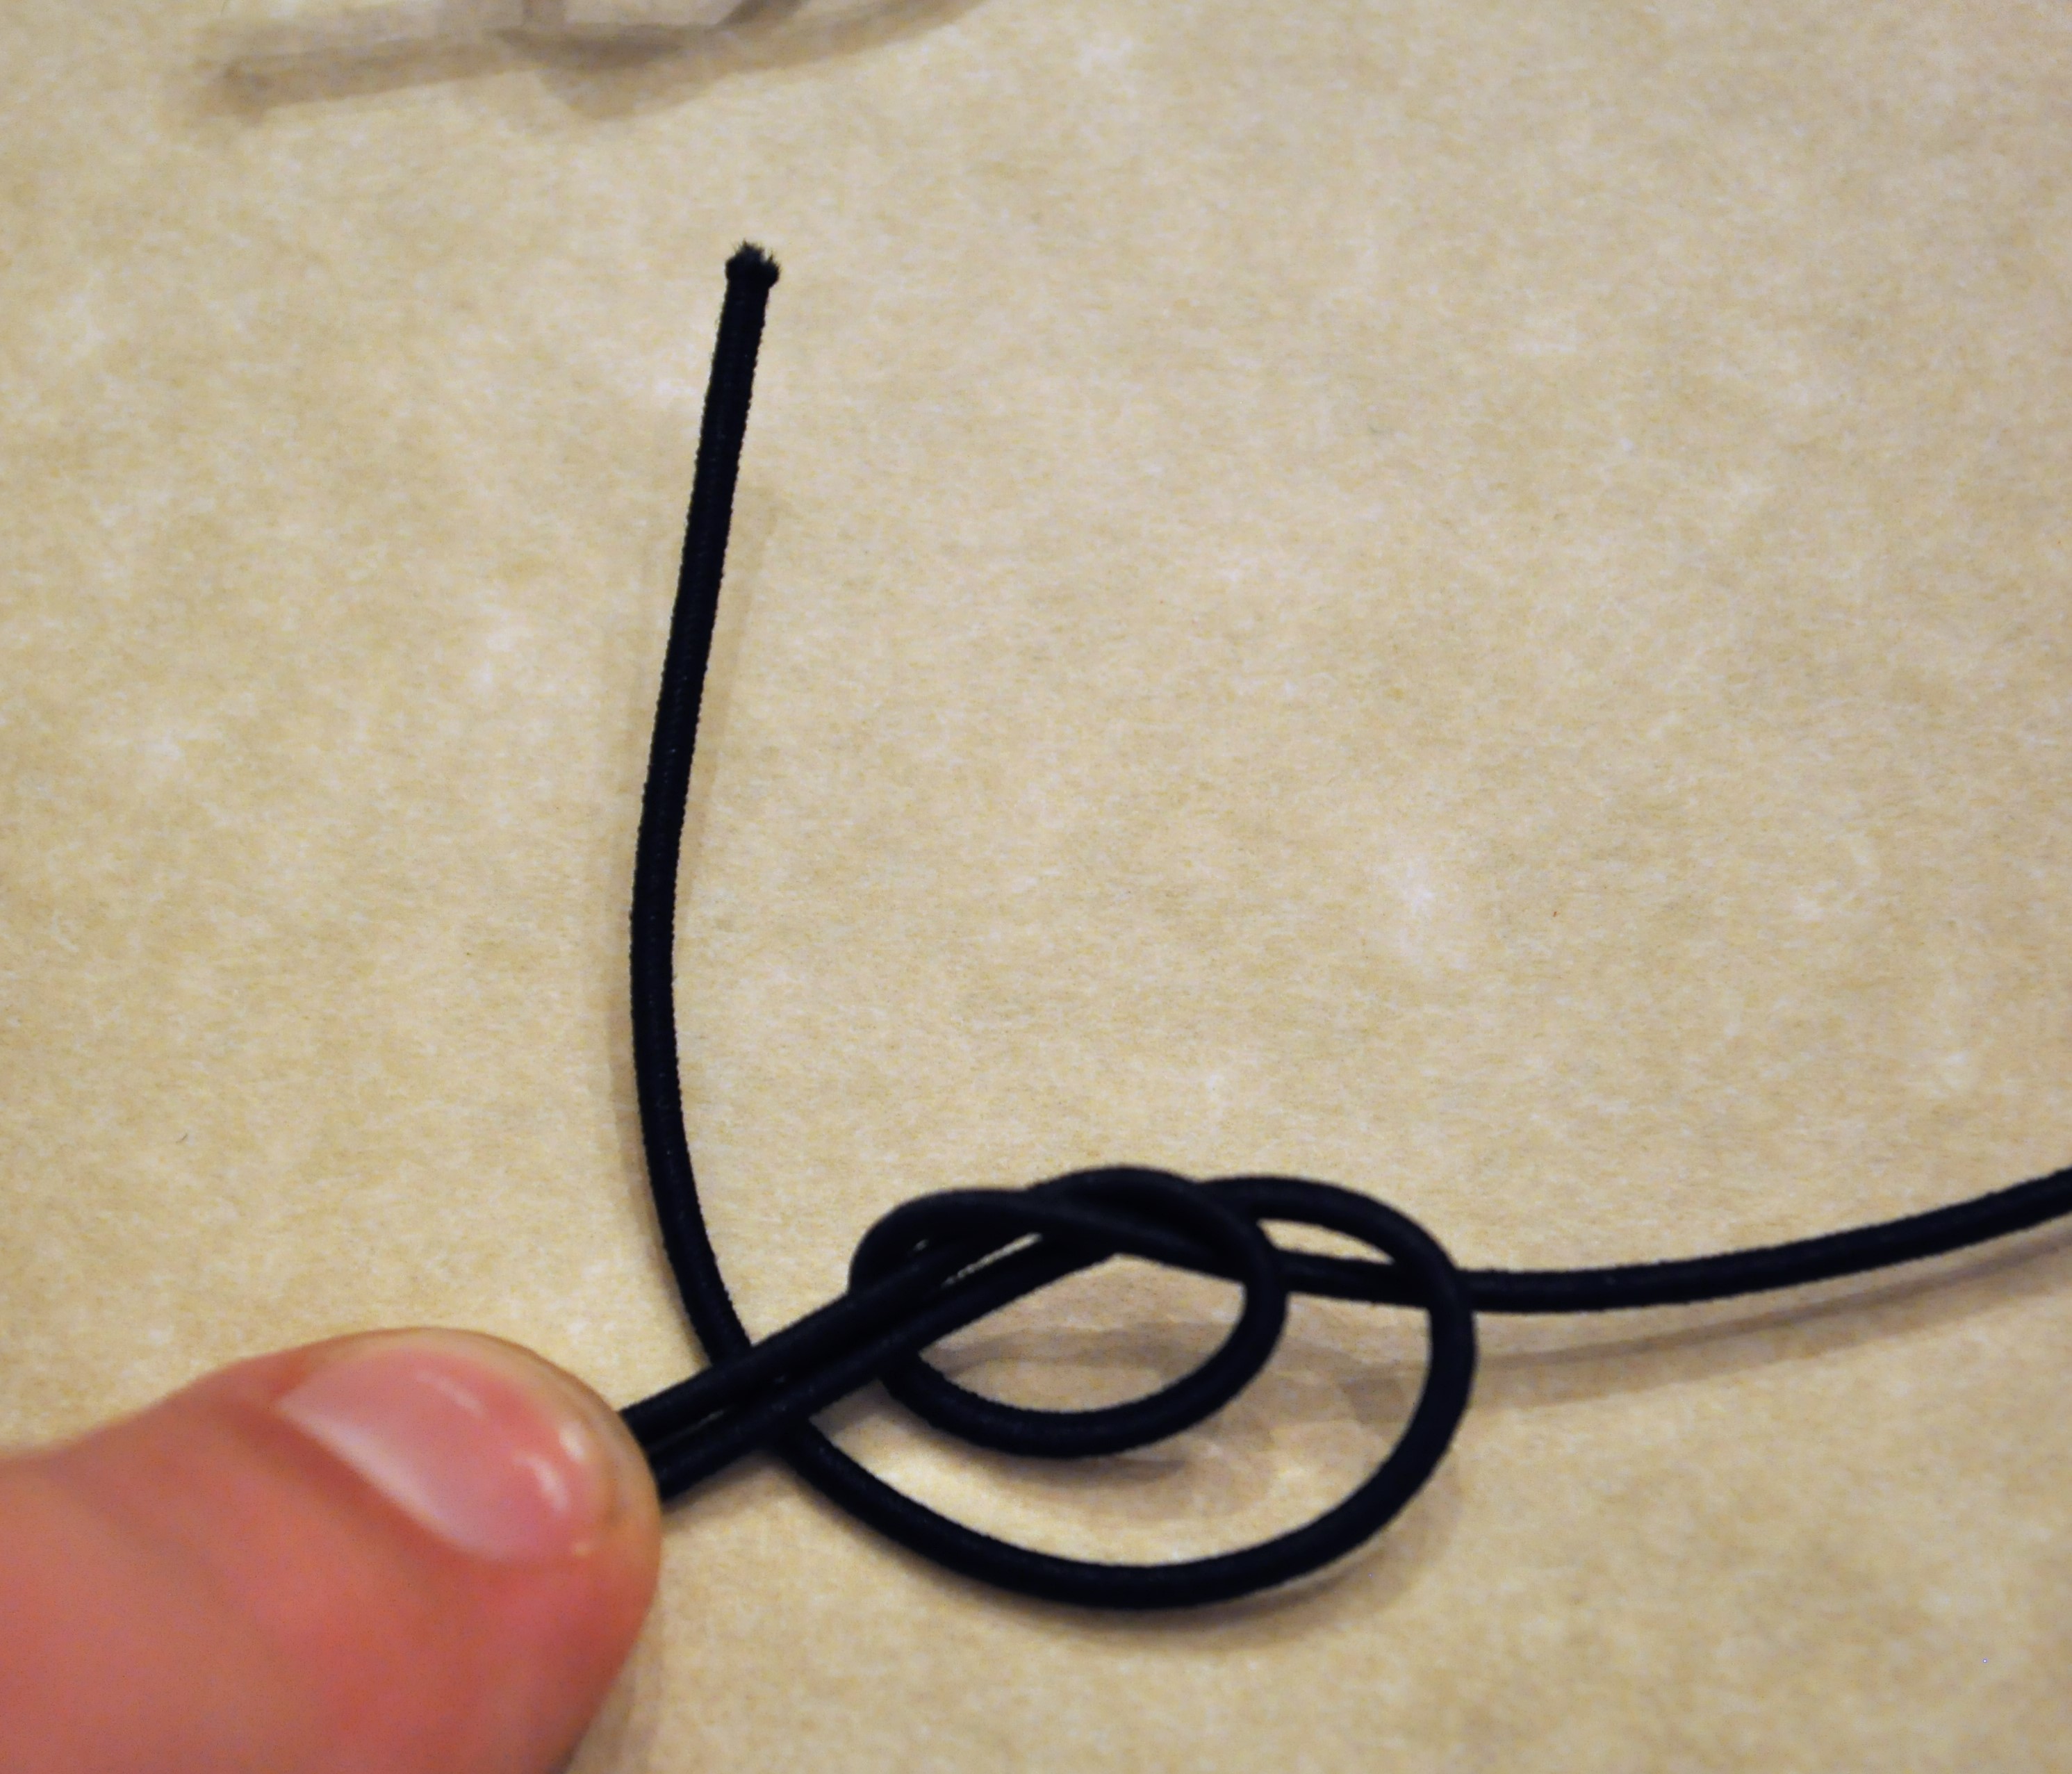
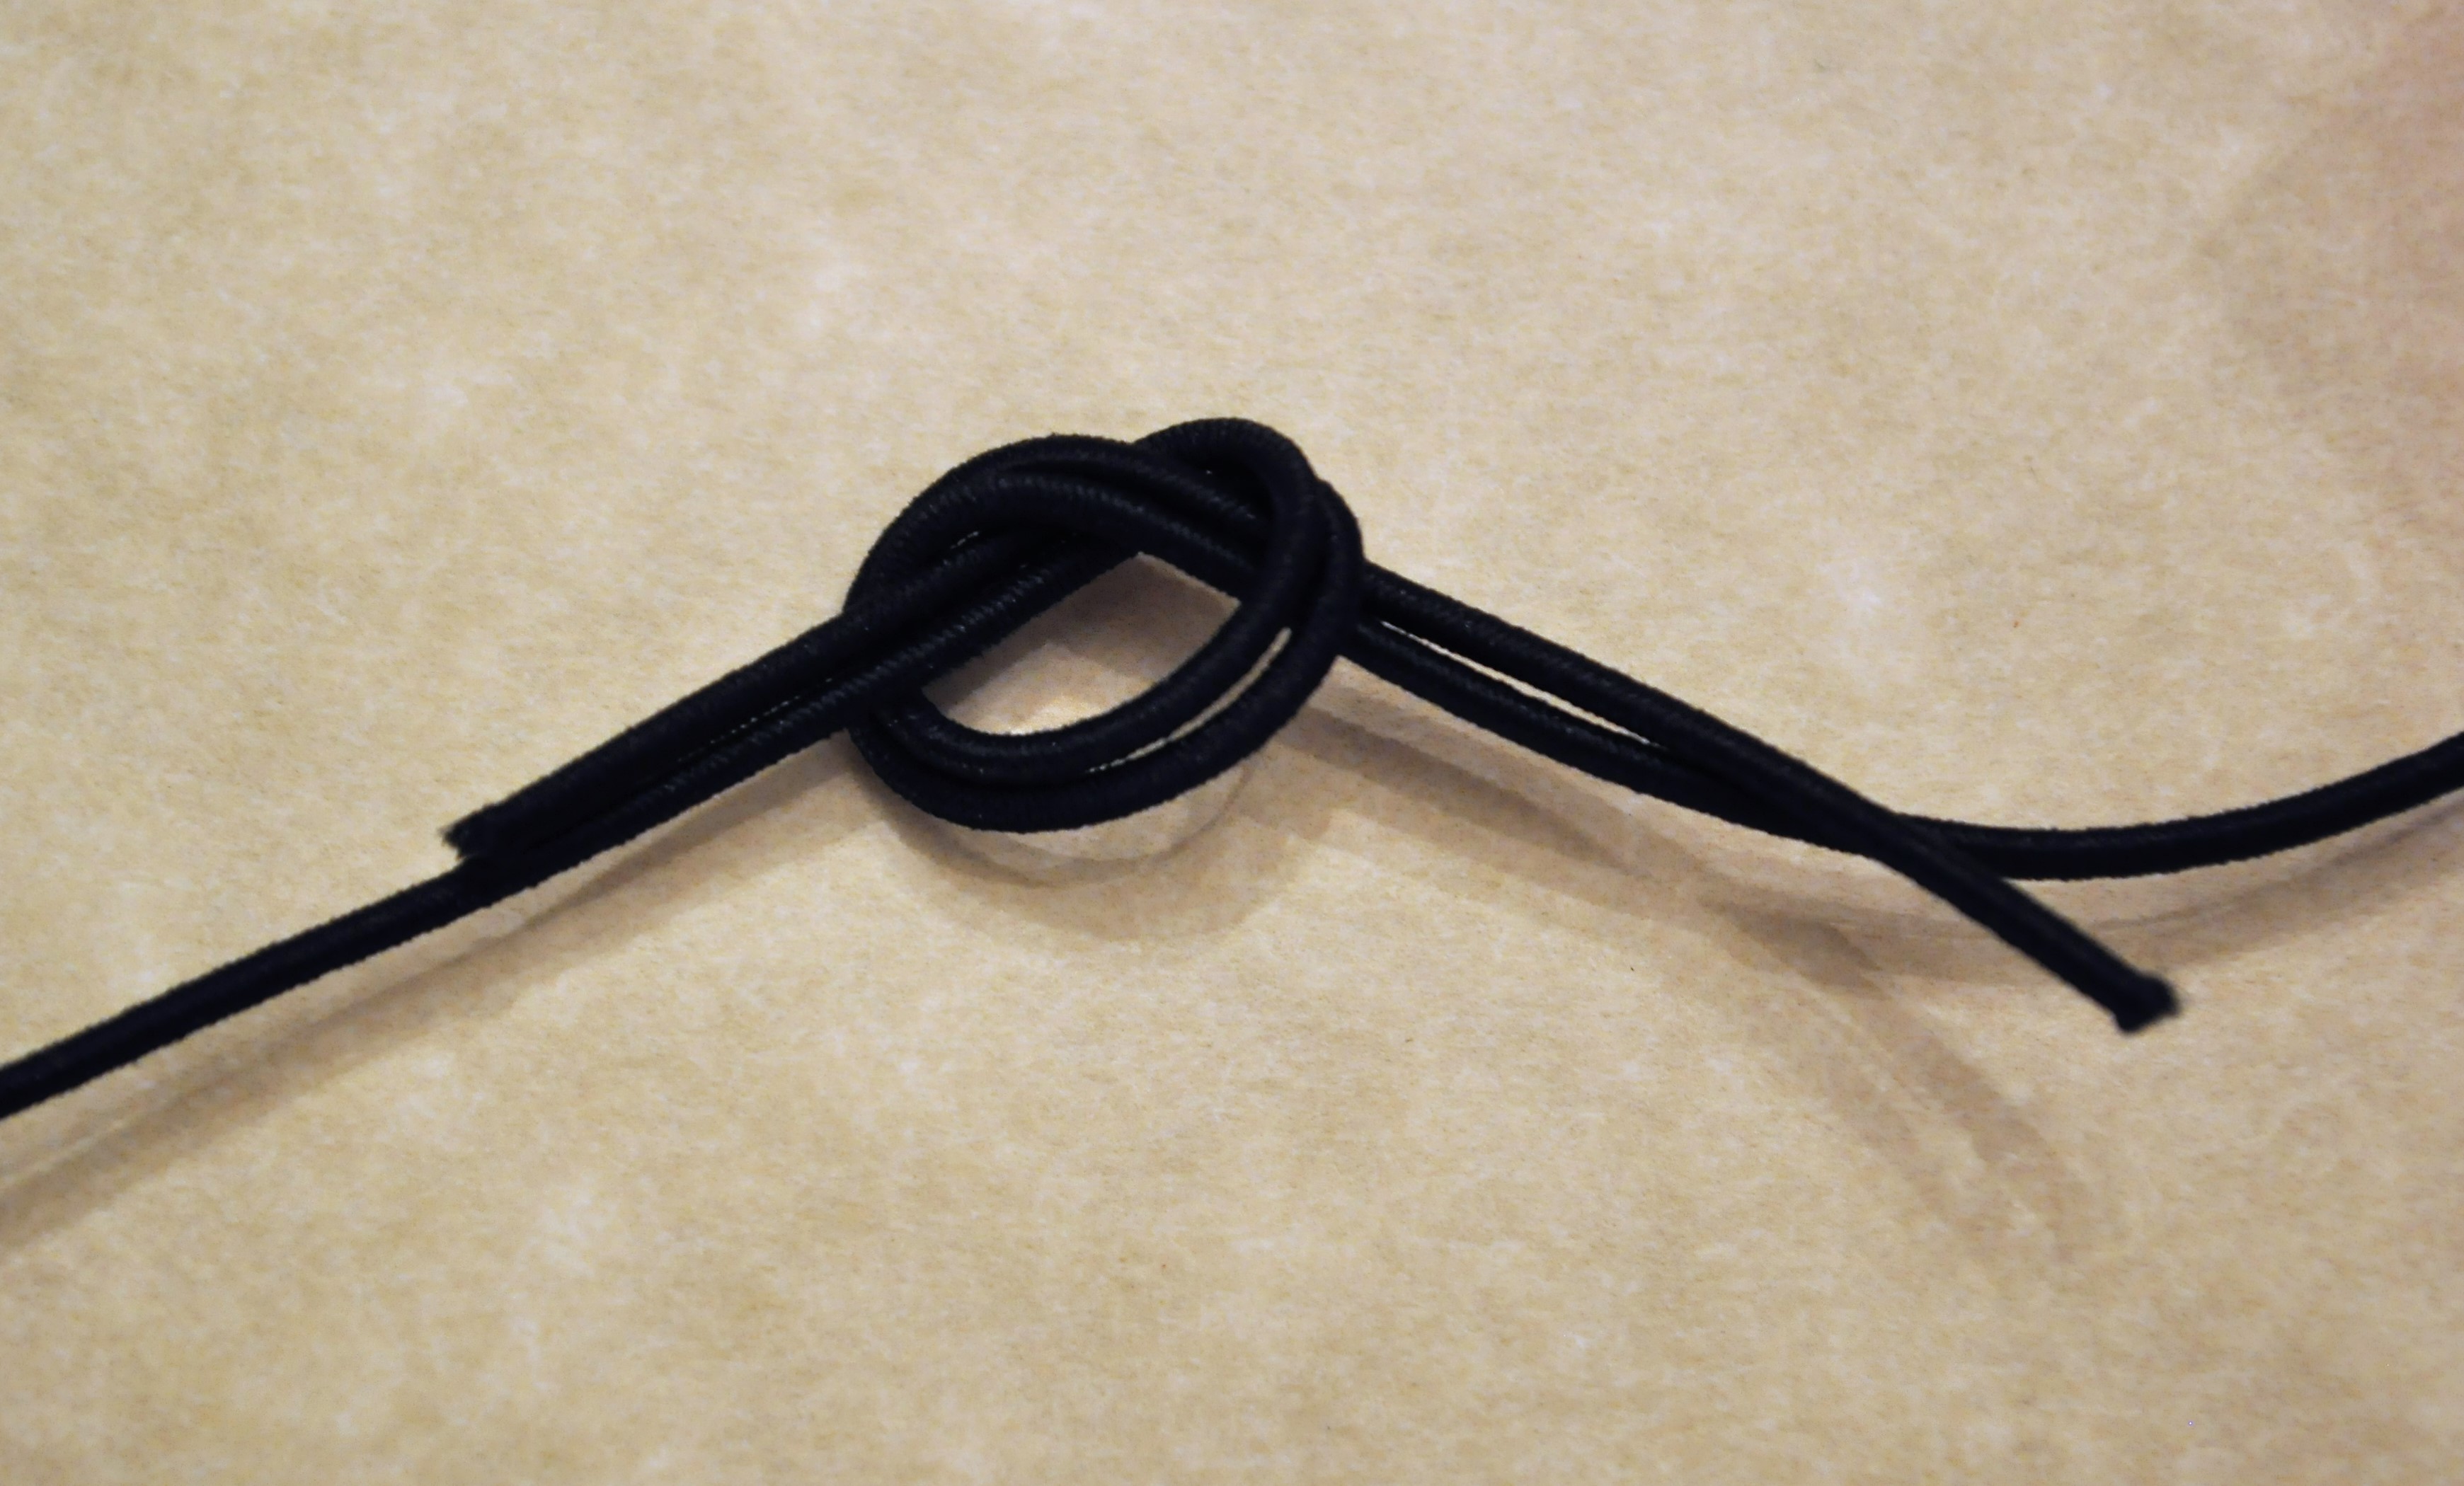
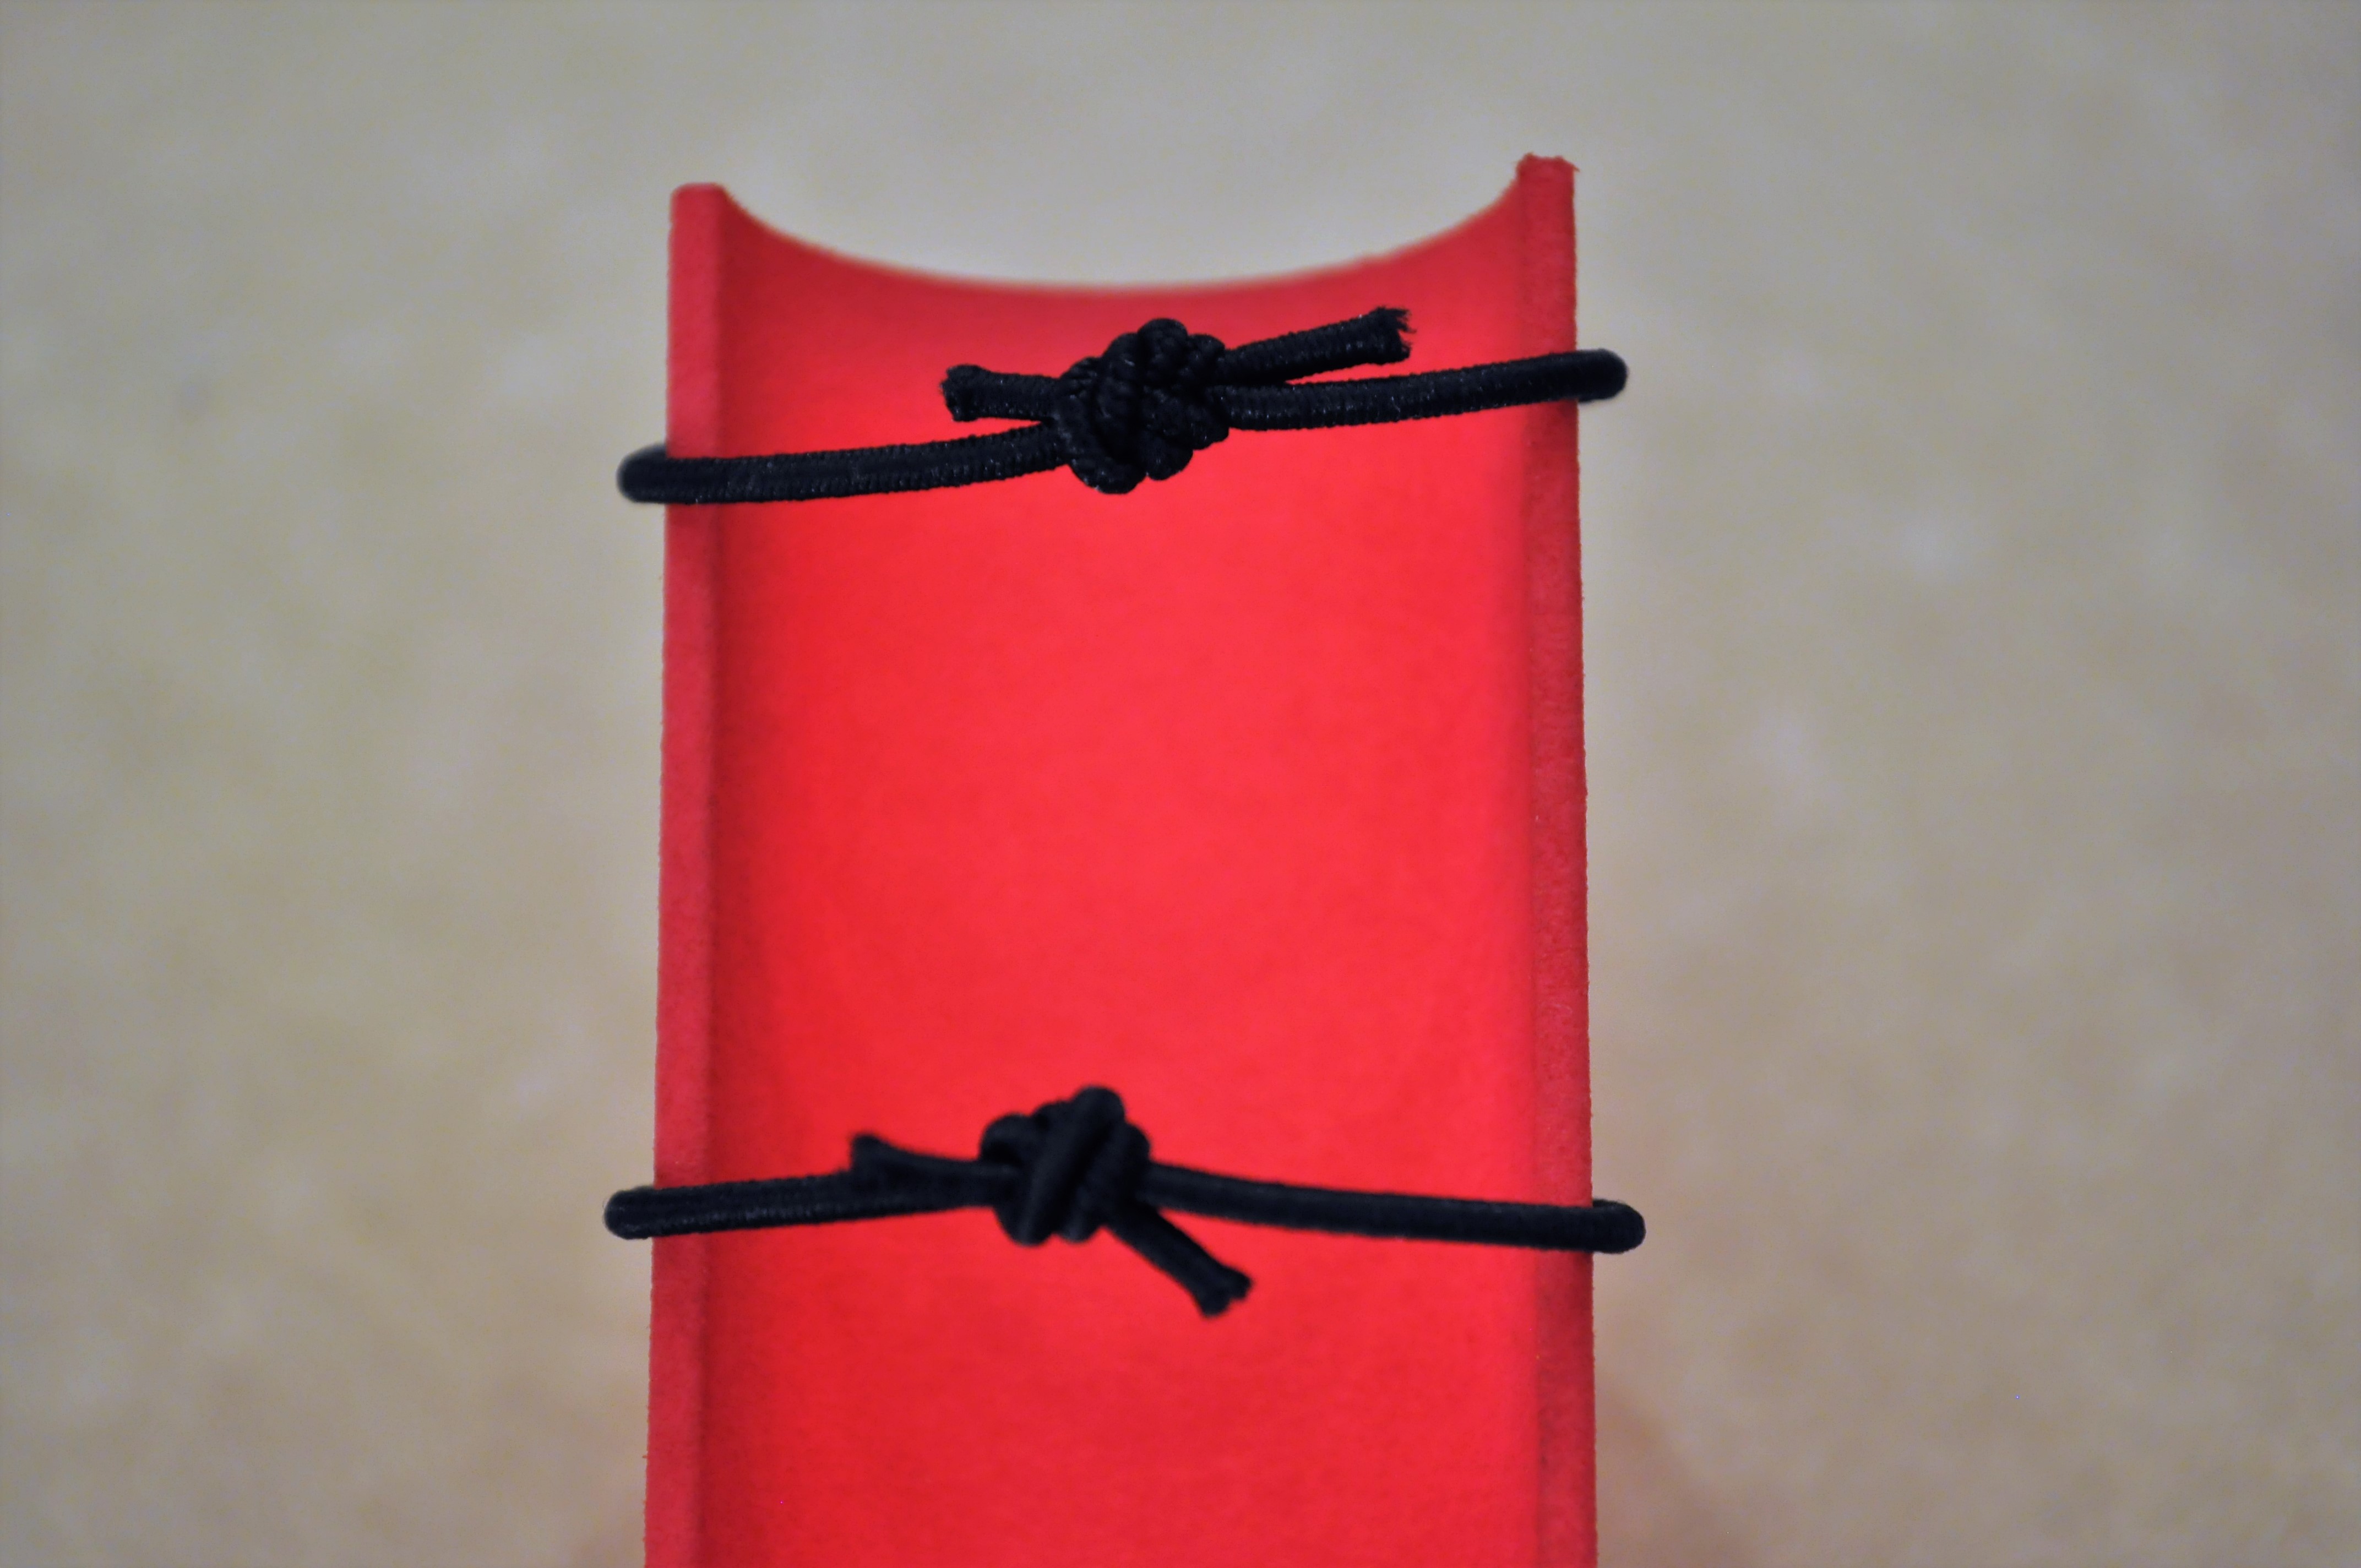
4. Use a strong stopper knot to tie the ends together. I suggest either a figure 8 knot or a water knot, with the other side of the elastic threaded back through. Each knot is tied the same way.
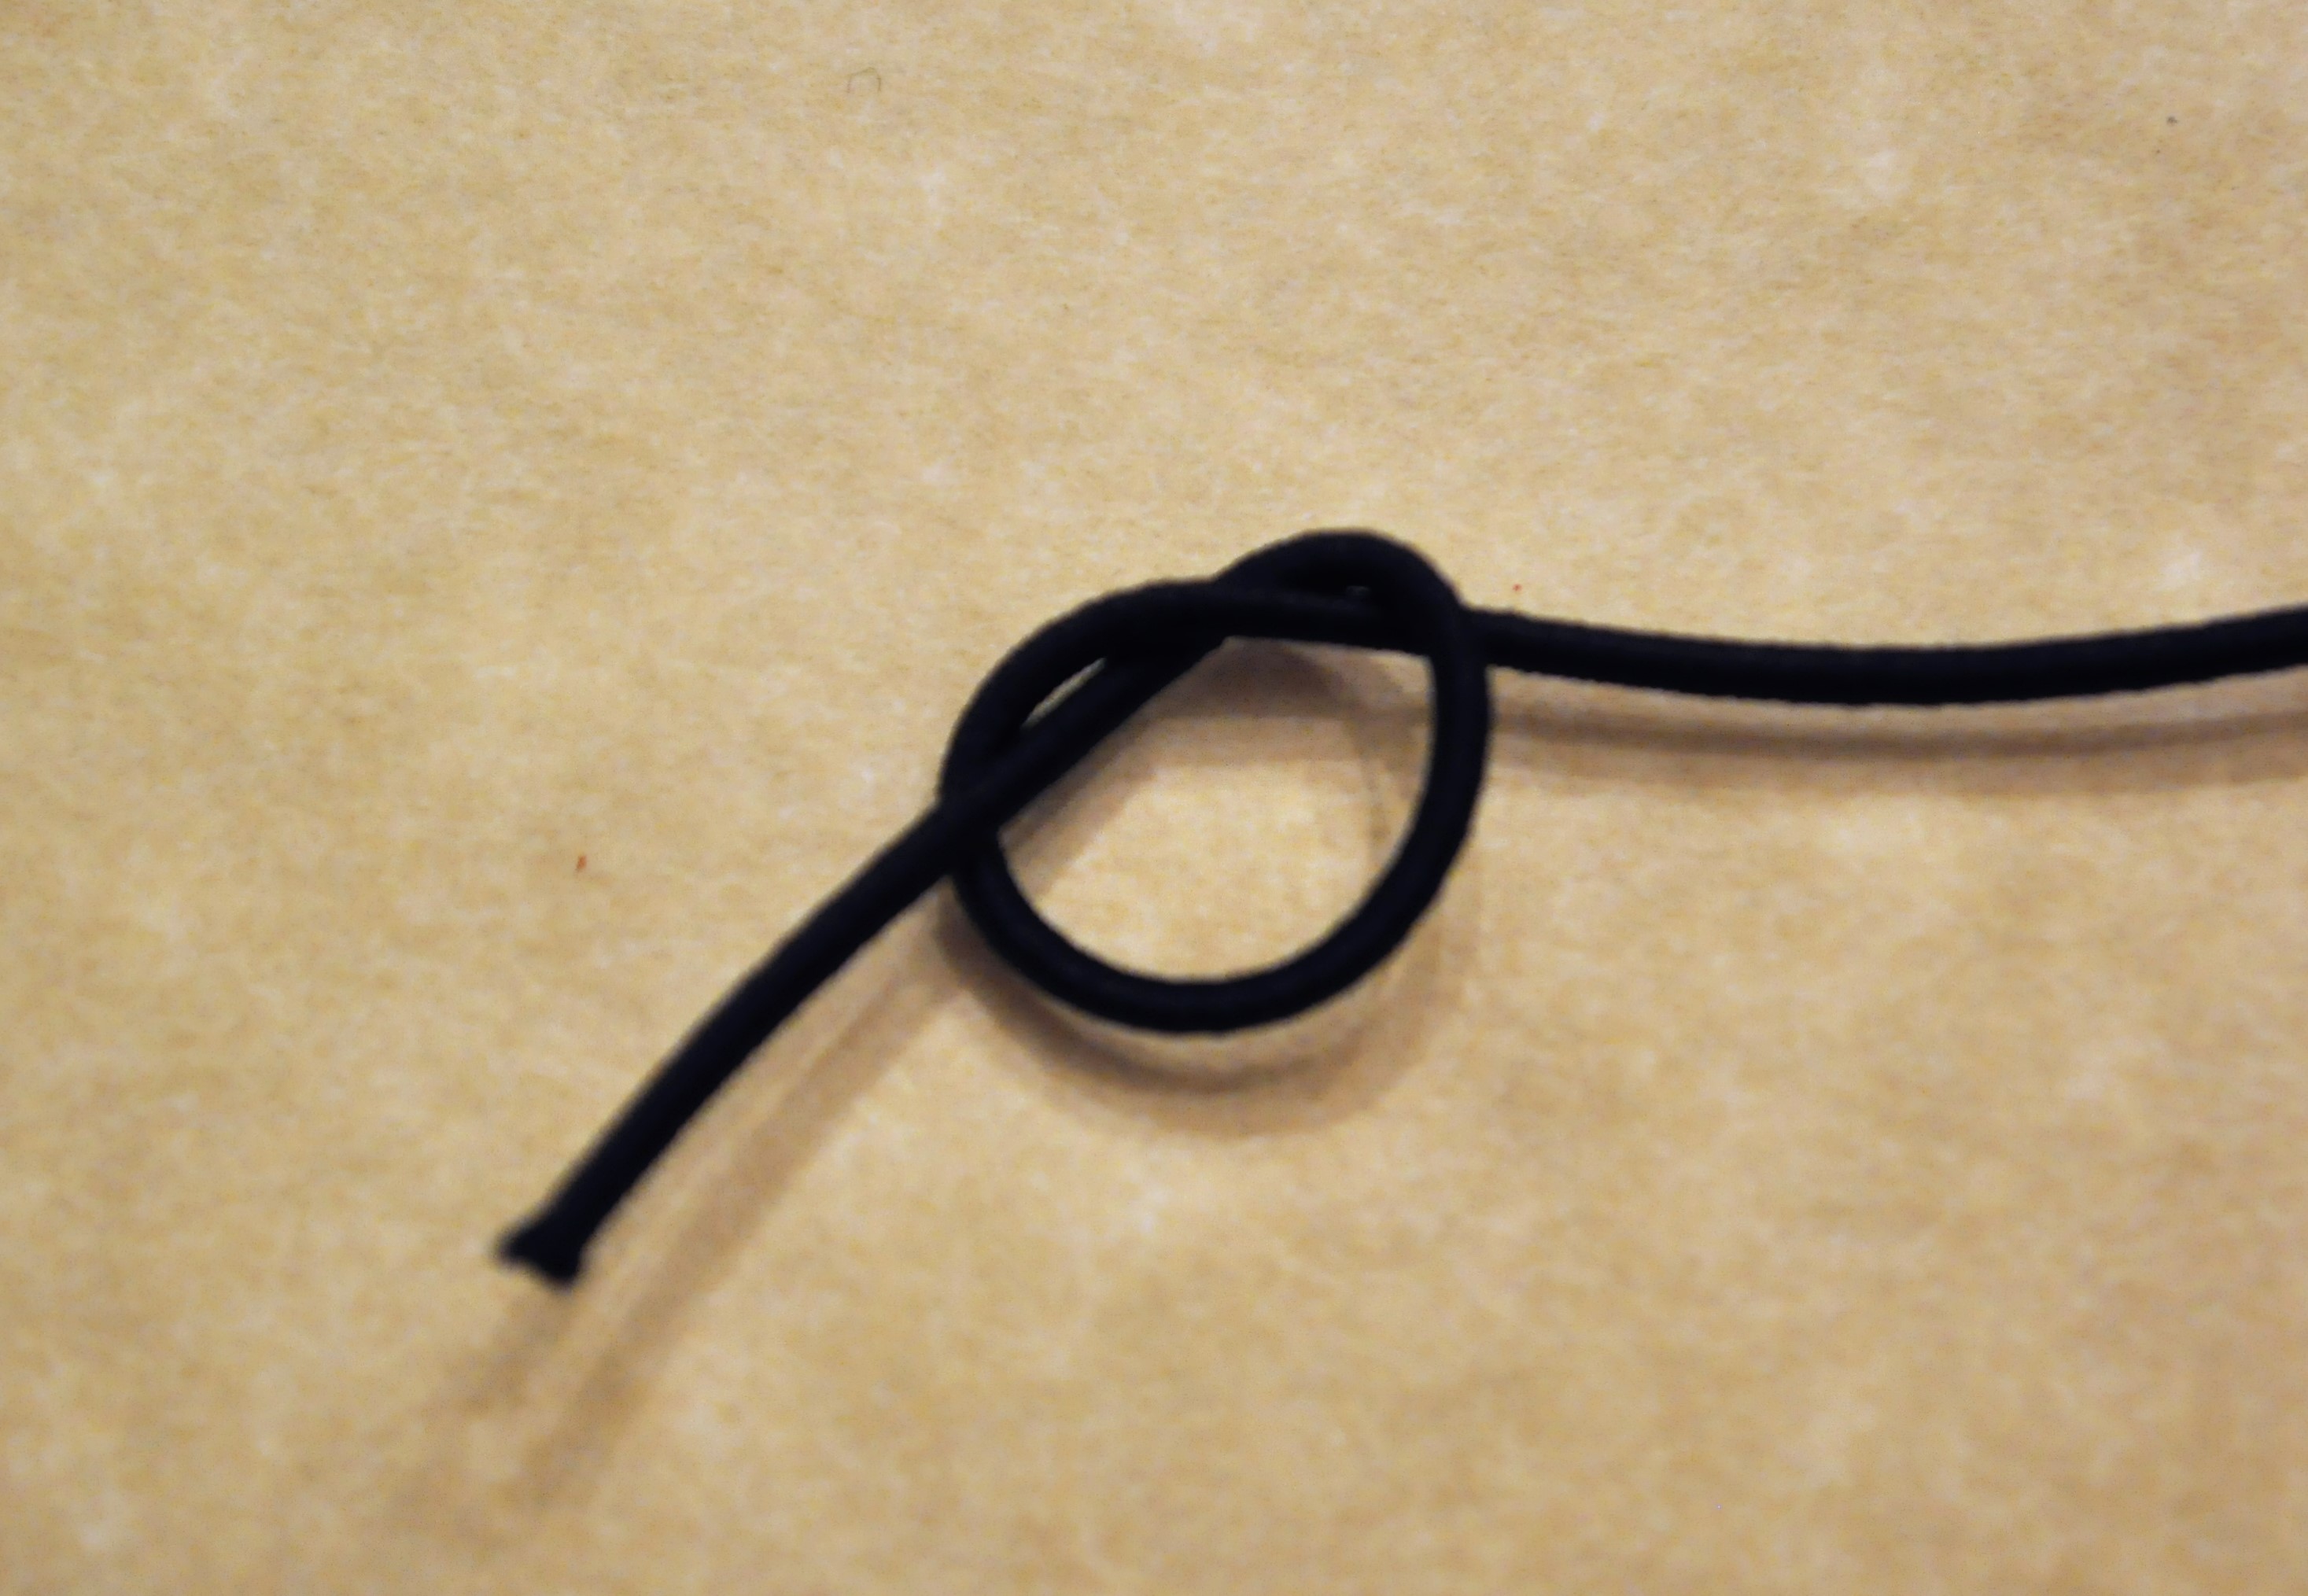
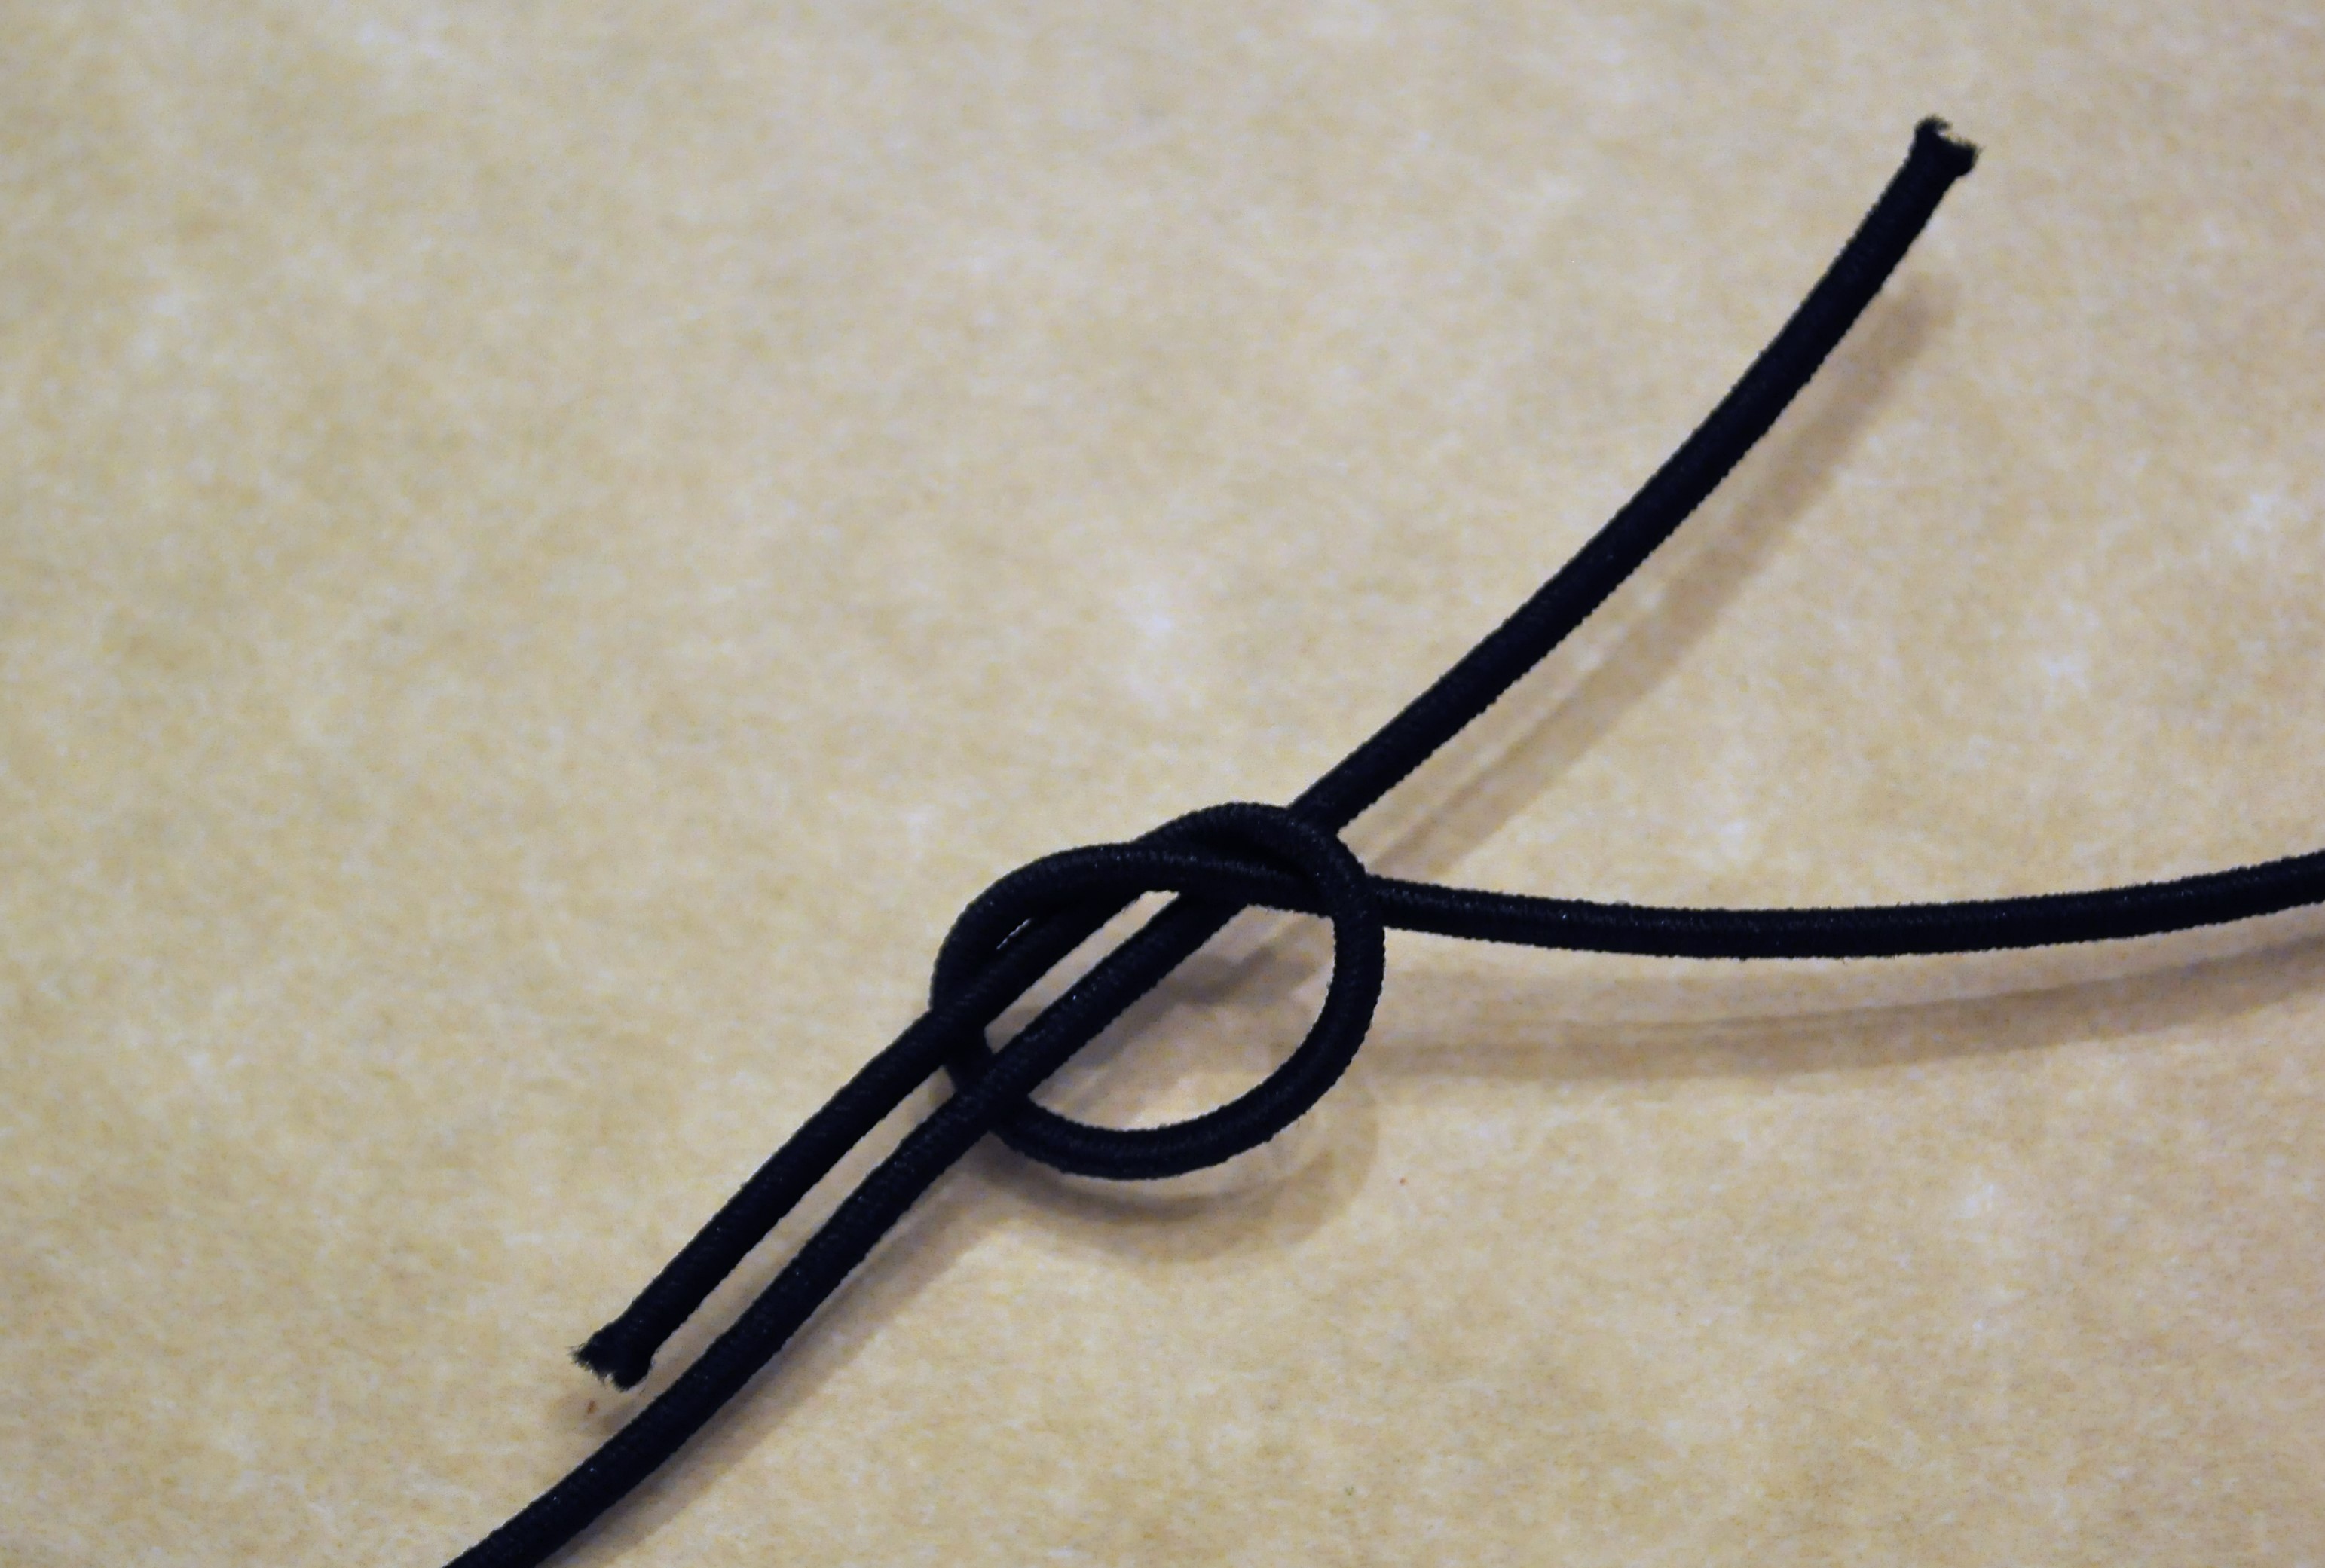
5. Tie either a figure 8 knot (see the picture) or an overhand knot loosely in one end.
6. Take the other end of the elastic and just follow the knot all the way back through the knot. Work as much slack as you can out of the loop you have formed, and pull tight. (There are pictures for an example using the overhand knot, also called a water knot when doubled this way). The cord does not need to be tight against the light holder, but should have pressure against the flashlight when it is in the holder.
7. After both elastic cords loops are installed, cut excess to get it out of the way and slide your flashlight into the holder.
8. Take your flagpole out of its bracket on the bike, slide the light holder on the pole and reinstall your flagpole.
9. Turn on your light and go biking! Show off your flag for style and safety!