3D Print Your Macro Photography (part #2) the Reverse Lens Adaptor
by peterc591 in Workshop > 3D Printing
2618 Views, 18 Favorites, 0 Comments
3D Print Your Macro Photography (part #2) the Reverse Lens Adaptor


The series: 3D Print Your Macro Photography
This Instructable is the second in a series of four. If you are already familiar with cameras, macro photography and 3D printing, you can jump right in, this is the first project. To learn more about macro photography and this series, go here.
This lesson: Reverse Lens Adaptor
- Learn how a reverse lens works
- Print a reverse lens adaptor and a reversed lens hood. Also, if you wish, there is a light diffuser that fits the reversed lens hood.
- Set up camera and lenses with these devices
- Take our first macro photos
Why Reverse Your Lens?

Regular camera lenses are designed to reduce and project human-scale subjects onto your camera’s sensor. However, they are not good with small subjects. These need to be enlarged. If you turn the lens around (reverse it), it will. Enlargement depends on the focal length you choose. There is a deeper discussion on this topic here.
Introduction to the Reverse Lens Adaptor


How does the adaptor work?
The adaptor lets you attach (mount) your 'reversed' lens to your camera. One side fits into the camera’s lens mount system (See top left). The other side screws into the front of the lens using the thread provided for filters. (See top right.)
What lens can I use?
The lense must have a Canon EF or EFs mount. It can be a zoom or a prime anywhere between 28 and 50mm. I used a kit 18-55mm zoom to develop the adaptor*.
Warning: I designed these adaptors for the light kit lenses that came with the camera. Heavier lenses may need support.
Magnification
- 50mm reversed 5 cm away from the sensor will give 1:1
- 28mm 7.5 cm away from the sensor will give approximately 3:1.
To learn more about magnification and to use a calculator to work out magnification go here.
* Since I only have a Canon system, I can only develop and test Canon mounts. Sorry to those with other systems. You may be able to find other mounts on Thingiverse and use software like Fusion 360 or Meshmixer to slice off the bits you don't want and join the models together.
What Results Can I Expect?


The image on the left uses no adaptor, the one on the right used the adaptor. Since the frame is 4.8mm high, it is technically a macro shot. The magnification ratio is about 3:1.
The spoon
I recently found this spoon while cleaning out the family home. My family bought it over fifty years ago from the Currumbin Bird Sanctuary on Queensland's Goldcoast. If you don’t know this 1960’s Australian cultural icon, then follow this link.
I was glad to see the sanctuary is still going, though the name has changed slightly, and the colours are no longer faded Kodachrome.
Warning, You Will Lose Automatic Functions When You Use a Reversed Lens

Warning, you will lose automatic functions when you use a reversed lens
If you look at your lens where it connects to the camera, you will see a line of gold dots. (See above). These electrical connections send information back and forth. When the lens is the wrong way around, there is no connection. So Autofocus and auto aperture won’t work. We have to set these manually.
BTW: You can still set the shutter speed because that is in the camera.
You Must Set the Aperture Before You Reverse the Lens.
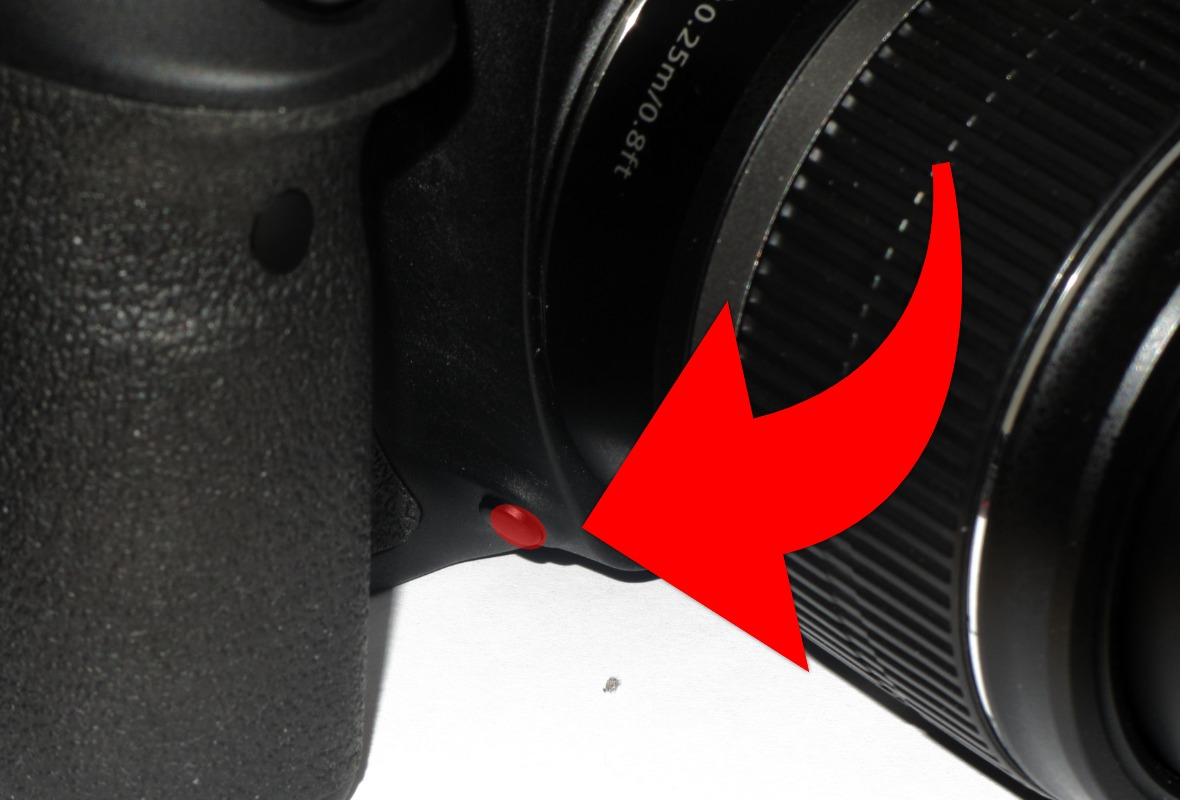
Usually, when you remove a lens, the aperture is wide open. (The aperture only closes down when we take the shot.) However, we can also close the aperture by pressing the ‘Depth of Field’ button. (See above for location). When we press this button, the aperture closes to the value we set on the camera. (Normally, this is used to preview the depth of field.)
If we remove the camera while the ‘Depth of Field’ button is pressed, the aperture stays on its setting.
- Set the aperture to say F16
- Find where the ‘Depth of field’ button is. It should be next to the lens barrel. (Mine is bottom left as you face the camera, see image above)
- With the button pressed, press the lens lock button, twist and remove the lens. (This can be a little tricky)
The aperture will stay at F16. You can’t change this unless you put the lens back on the camera and repeat the procedure.
Exposure Control
.jpg)
- Shutter speed: In fractions of a second
- Aperture: 'Foo' means the camera does not know what it is.
- Exposure: The white square indicates exposure. Each number represents a 'stop'.
- Exp.Sim: the camera is showing you what the final image will look like. You may have to turn this on
- ISO:
The first thing you should do is set your camera to 'manual' mode.
Even with the lens disconnected, the camera's meters will still measure the light falling on the sensor. . When the ideal amount of light fall on the sensor, the small white indicator under the scale will be in the middle. Too much light and it will move right towards the plus sign. Too little tight, it will move left towards the minus sign. The numbers represent 'stops'. Each whole number to the right doubles the amount of light hitting the sensor. To the left, it halves.
How to use shutter speed to get the best exposure
Increase shutter speed to move indicated to the left. (Darken image). Decrease the shutter speed to move the indicator to the right (lighten the image).
High shutter speed is better when handholding. Shutter speed below 1/60th sec will suffer from motion blur. Shutter speed above 1/250 may cause problems with your flash.
How to use ISO to get the best exposure
Increase ISO to move the indicator to the right (lighten the image.) Decrease ISO to move the indicator to the left (darken the image)
Low ISO is better. ISO above 800 'grain' becomes noticeable.
The advice above is a simplification to get you started
Appropriate exposure, grain and blur level will depend on factors including your equipment, the subject, the environment, post-production, your aims technically and aesthetically. You can learn much about this from others, but you'll learn most from experience.
Lighting, the Trick Up Your Sleeve

(Above) The diffuser directs light onto the subject. You'll find the .stl file later in this chapter. It's a cheap, portable, effective solution. Suppose you don't have the translucent filament to print it. You can easily make one out of paper and tape it on.. You can also angle white foam-core from above the lens to reflect light onto the subject. You can do this by hand.
When ASA and shutter speed aren't enough
If you have reached the acceptable limits of ISO and shutter speed, all is not lost. You can increase the amount of light hitting your subject. There are two main ways to do this.
1. Make better use of the available light.
- Move or turn your subject so it catches the light better
- Remove anything blocking light
- Use reflectors to 'bounce' light onto your subject.
2. You can use artificial light.
If available, you can use a continuous light source like a light bulb, but a flash is usually easier to use and provides much more light. (If you are starting out, you don't need an expensive brand name flash. AUD 30 to 60 will get you a basic flash for macro and regular photography.)
If you already use artificial light and need more light, you have more options than turning up the light's brightness or adding more lights. You can:
- Use a reflector to bounce the spill light back onto the subject. This has a secondary effect of filling in shadows on that side.
- Bring the light source closer to the subject. This can be very effective because halving the distance between the light and the subject will quadruple the amount of light falling on your subject!
Focal Length and Focus With a Reversed Lens
.jpg)
Focal Length
When a zoom lens is reversed, the greatest magnification is when the focal length is the shortest, though this also makes focusing harder. So start with the zoom as wide as you can. In my case, this is 18mm.
Focus
The easiest way to focus with a reverse lens is to move the camera back and forth. I found that you got a slightly larger (10% larger) image if you set the focus to a minimum. You can tell it's minimum because the barrel is the longest. (see above)
Files for 3D Printing


My reverse lens adaptor comes as a kit: the adaptor itself, a lens hood and a diffuser. The only essential part, though, is the adaptor. The purpose of the lens hood and diffuser are explained below.
Files available through Thingiverse
Reverse lens adaptor 58mm - MMU.stl
Reverse lens adaptor 52mm - MMU.stl
Reverse Adaptor locking knob.stl
The Adaptor File
 | To choose the correct file, you'll need to know the lenses filter size. You can find the filter size printed on the inside of the front of your lens. The diameter symbol, 'ø', precedes the number you need, which is followed by "mm." |
Use the file that matches your lens. Filenames
The Lens Hood Files
The lens hood has several functions that make it useful.
- Stops stray light from entering the lens
- Protects the delicate rear element
- Allows you to attach filters
- Allows you to attach a diffuser
- With the reflective material added, it reflects light onto your subject
The reverse lens hood attaches to via the camera mount on your lens. There is a locking nut that helps secure it in place.
Filename:
- ‘lens_hood.stl’
- Lock_nut_knob.stl
The Diffuser File
It can be difficult to get light to your subject in macro photography because your lens is so close that it is in the way. The diffuser is designed to bend light down onto your subject. This means that you can even use your pop-up flash as a light source. This can be very convenient. And, like all diffusers, it also creates a soft pleasing light on your subject.
Filename: 'diffuser.stl'
Use clear PLA
Settings for Your Slicer

Filament:
PLA. However, if you have PETG or similar, you will get better wear from your parts.
Colour
Matt black. We make camera parts black because black reflects the least amount of light.
Layer height:
0.2mm. If your printer can print 0.1mm, then you will get a better definition on your thread.
(If you have a range-height function like PrusaSlicer, you can save print time by setting the layer height to 0.2 but choose 0.1 for the first three mm. I.e. the thread)
Support:
No. Support is not essential. Print in the orientation the file comes.
There is a small overhang on the bayonet blades. So you may get a little more definition on their lower edge if you use 'supports'. However, if you turn on 'supports', you will get support material between the walls on the lens side. This is very hard to clean up. Use 'blockers' or 'supporters' so that only the bayonet blades get support material.
Brim:
Yes. All items have a thin edge on the build plate. A 5 to 7mm brim will help to secure these.
Two Colours:
If you want two colour use the files with the "MMU' suffix
FDM is not as precise as the machining used to make cameras. Some tolerances on this project approach the limits of what FDM can do. Therefore you need to make sure your printer is well calibrated. (The manufacturer or user groups will have information on how to do this)
Post Processing

Cleaning up
FDM printers are not designed to create precision devices. However, carefully cutting off excess plastic and gently sanding any rough surfaces will improve precision.
If you haven't already started a collection of 3D printing cleanup tools, now is a good time to start. Below is a list of the tools I use. The most frequently used are at the top.
- Craft knife
- snips and needle-nosed pliers
- Needle files
- Sandpaper and emery paper
- Scalpel
- Deburring tool
- Rotary tool
Pay particular attention to threads.
Fit your reverse adaptor to the lens before you use it in the field. Take your time. This first fitting will help clean and cut your thread. Please don't force it, as you can damage the thread.
If the adaptor doesn't go on easily.;
- Check you haven't missed some stray excess plastic
- Check that the adaptor is parallel to the front of the lens
Next, screw the item on and off a couple of times. It should turn enough time to hold the lens safely. Test this over something soft. (The camera has more thread than a filter does.
Additional Work on the Lens Hood


The lens hood will function as is, but you can add refinements.
Reflector
Cut reflective material and glue to the lens hood. (Download the template above)
Silver vinyl is the easiest to use. (eBay). However, kitchen foil gives a softer look, and white paper is even softer. You can also paint it white.
Locknut
You'll need:
- 8mm M3 Socket Head Cap Screw. (eBay)
- Locking pin knob.stl
Downloads
Prepare Parts for Shooting

1. Prepare lens
- While still attached to the camera, set the lens to around F11
- While pushing the 'Depth of Field Preview" button and the 'Lens Lock' twist and remove the lens from the camera.
You don't have to do this if you have an old lens with a manual aperture, as it will work when the lens is reversed.
2. Attach reverse adaptor to the lens
Screw the reverse lens adaptor onto the front of your lens
Be careful that the thread engages, and it is screwed in firmly
3. Attach the Reverse lens hood
Fit the Reverse Lens hood to the back of the lens. Match the blue dot to the white dot on the lens and twist. When firm twist locking pin till firm
4. Attach to camera
- Align the blue dot on the adaptor with the white dot on the camera
- Press the lens gently in and twist
- After about a quarter turn, you should hear a distinct ‘click’*, and the lens will stop turning. This click means the lens is locked in place.
- Check that everything is firm and stable.
*If you don’t hear a distinct ‘click’, you may need to clean or slightly widen the hole for the locating pin.
5. Attach the diffuser
If you want to use the diffuser, push it onto the Reverse Lens Hood. It's a pressure fit. Then, twist the diffuser so that the gap is pointing down.
Finding a Subject


You may already know what you want to photograph: bugs, flowers or stamps. You may have seen awesome photo's of fungi, spiders and butterflies and want to replicate those. This is all fine, but you don't have to limit yourself. Macro photography can reveal amazing images taken from many things, even those within reach right now.
Finding a suitable subject requires:
- Focusing our attention on the detail our brain usually ignores
- Recognising potentially interesting: patterns, colour, novelty etc
- Working out how to capture an object, so its potential is revealed.
Related article, and here, and here
If you are starting out, keep it simple
Start with subjects that are easier to capture (fewer complications). You will be more likely to have a positive experience and get practice. Then when you are comfortable with the basic practice, you can continue to improve by taking on more difficult subjects.
To help beginners, I've listed some of the things that will make your life easier.
Subject Size: Start with the biggest small things!
Photographing a flower is only a little different to regular photography, but capturing an aphid on that flower is challenging despite both coming under the categories of close-up or macro photography.
When framing a tiny object, you can easily go past the point where you wanted to stop or bump the camera, so the subject is no longer in the frame. The smallest vibrations become noticeable. The depth of the field becomes razor-thin, making focus difficult Optical effects un-noticeable at a large scale can ruin your image on a small scale.
Subject Movement: The slower, the better. Dead is great.
You'll be surprised how quickly even an ant will move through your frame. You want a subject slow enough to frame, get focus and take an image before it goes. For faster subjects, you may have to click and hope. Fortunately, digital space is cheap. You may want to take advantage of 'burst' mode if your camera has it.
Depth of field: Flat and parallel to the camera.
A shallow depth of field has the same issues as a shallow shelf. A long object only goes along the shelf or is stood on its end. (In both cases, parallel to the wall behind the shelf). Same with a macro subject, rather than falling off a shelf, it falls out of focus if not parallel to the back of your camera.
To carry this analogy a little further, something big and flat like a painting will sit on a shelf. Likewise, butterfly wings, if parallel to the camera, will stay all in focus.
You can get around the depth of field issue using a technique call focus stacking, but for this, you need focus rails to mount your camera on. I've designed some focus rails. I'll release these in another Instructable.
Before you start
Macro photography requires a particular mental approach to succeed and be enjoyed. This is because each shot needs to be carefully considered. Each shot takes time. It's fiddly. Error margins are small so that the failure rate is high. However, accepting this as a given and taking a methodical approach its possible to sit back and enjoy the process and its rewards.
Set Up for a Shot

Think through the compositional choices
- Point of view: View subject from Above? Below? Left? Right, 3/4, Near, Far. Show all of the subject? Part of the subject?
- Frame: Centralised? On thirds?
- Light: Direction? Hard? Soft?
Organise support for camera and subject
If you can, use a camera tripod to take a chance and guesswork out of the equation.
You may also want to fix the subject with a specimen holder. I've designed one, which is available here on Thingiverse.
Set background.
Generally, you'll want a background that puts the subject in context and makes it easy to see. In a natural environment, you can pull branches into your shot or out of your shot. (Macro shooting ethics and public areas generally forbid breaking anything). You have more control in the studio, so you can usually place items where you want them. What you use is not critical. It will not be in focus anyway.
Some people use printed images that are just soft slashed of colour. These will create a more surreal atmosphere.
Organise the light.
This may mean.
- Moving your subject
- pulling a branch out of the way
- setting up artificial light
Set up tethering
If you are not hand-holding the camera, consider using a 'tether'. When the image is separated from the camera, you begin to see it more like the final image, which will influence how you create it.
Capturing the Image

Focus
Move the camera or subject back and forward till you get it to focus
Exposure
Adjust shutter speed, ASA or light source to get the correct exposure
If using a flash
- Set the shutter speed to the sync value of your camera. (Mine is 1/250th sec. See your camera manual)
- Set ASA to between 100 and 400 ASA
- Take a test image
- If the image is too dark
- Increase flash power
- Move the flash closer
- Add reflector
- Increase ASA
- Add another flash
- If the image is too light
- Decrease flash power
- Move the flash away
- Decrease ASA
- Add another flash
- Take another image and review if necessary
- Once the exposure is correct, examine your image and make adjustments as needed.
- Take another image Repeat till you are happy
Notes:
- Particularly if you are hand-holding your camera, you will miss the focus most of the time. This is normal. Be patient and repeat until you are satisfied you have a shot you want, in focus.
- Remember, the focus is hard to see on a small screen so use the zoom function of the screen to check focus.
- If your picture is cut off horizontally, reduce shutter speed below camera sync speed. (I found that my cheap flash remote causes this issue)
Post Production

Post-production refers to all the things you do after you capture the images. Since photography is digital all five steps are done using a computer. Below is a basic workflow.
Several software packages help you download, organise and edit your images. If you don't already use software like this, now is a good time to start as you are going to generate many images, and you will want to organise and keep track of them.
- Paid
- Adobe Lightroom: Most well known, comes with some Adobe packages
- ACDSee
- Free
- Canon Digital Photo Professional Free with Canon Camera, (Nikon will have similar)
- DigiKam: Free
- Darktable: Steep learning curve, but great software.
1.Download

2. Choose

The software package usually has a preview feature that shows full-sized images one at a time and lets you 'score' them according to their potential. Develop your own system for this. I tend to go through the whole lot and give anything remotely useful one star. I then go through the one-star images again and give the best of these two stars and so on. The aim is to select a small number of images with the most potential for fixing and improving.
3. Correcting Technical Quality

The next step is to 'correct' image quality. (This is a whole subject by itself, but there are plenty of YouTube tutorials on the subject). My basic workflow is;
- Crop
- Exposure/contrast
- Remove spots
4. Add or Enhance the Artistic Quality

The software used above is Photopea which works like Photoshop. Like Photoshop, it's designed to do creative manipulations. They can be subtle where the effect is there, but the audience doesn't see that it's a manipulation. Or, like this case obvious, I wanted to draw your attention to what happened to the light.
Once you have the best possible quality, you can turn your attention to creative adjustments. Here you might do things like:
- Create a subtle vignette. That is, darken the edges of the frame, so the eye is drawn to the subject.
- Add a warm or cool colour cast to change the mood
- Paint out parts that distract
BTW: As you invest time on an image its is worth saving off versions that you can go back to
5. Export

Export the image to a format the audience can easily access
See You Next Lesson

See you next time
In Part #3 'The Reverse Lens Adaptor' you will learn
- About an improved version of the revere adaptor
- How to print it
- How to use it
See you there