3 - Axial Tourbillion Watch Holder
by burhan2007 in Circuits > Clocks
4031 Views, 30 Favorites, 0 Comments
3 - Axial Tourbillion Watch Holder

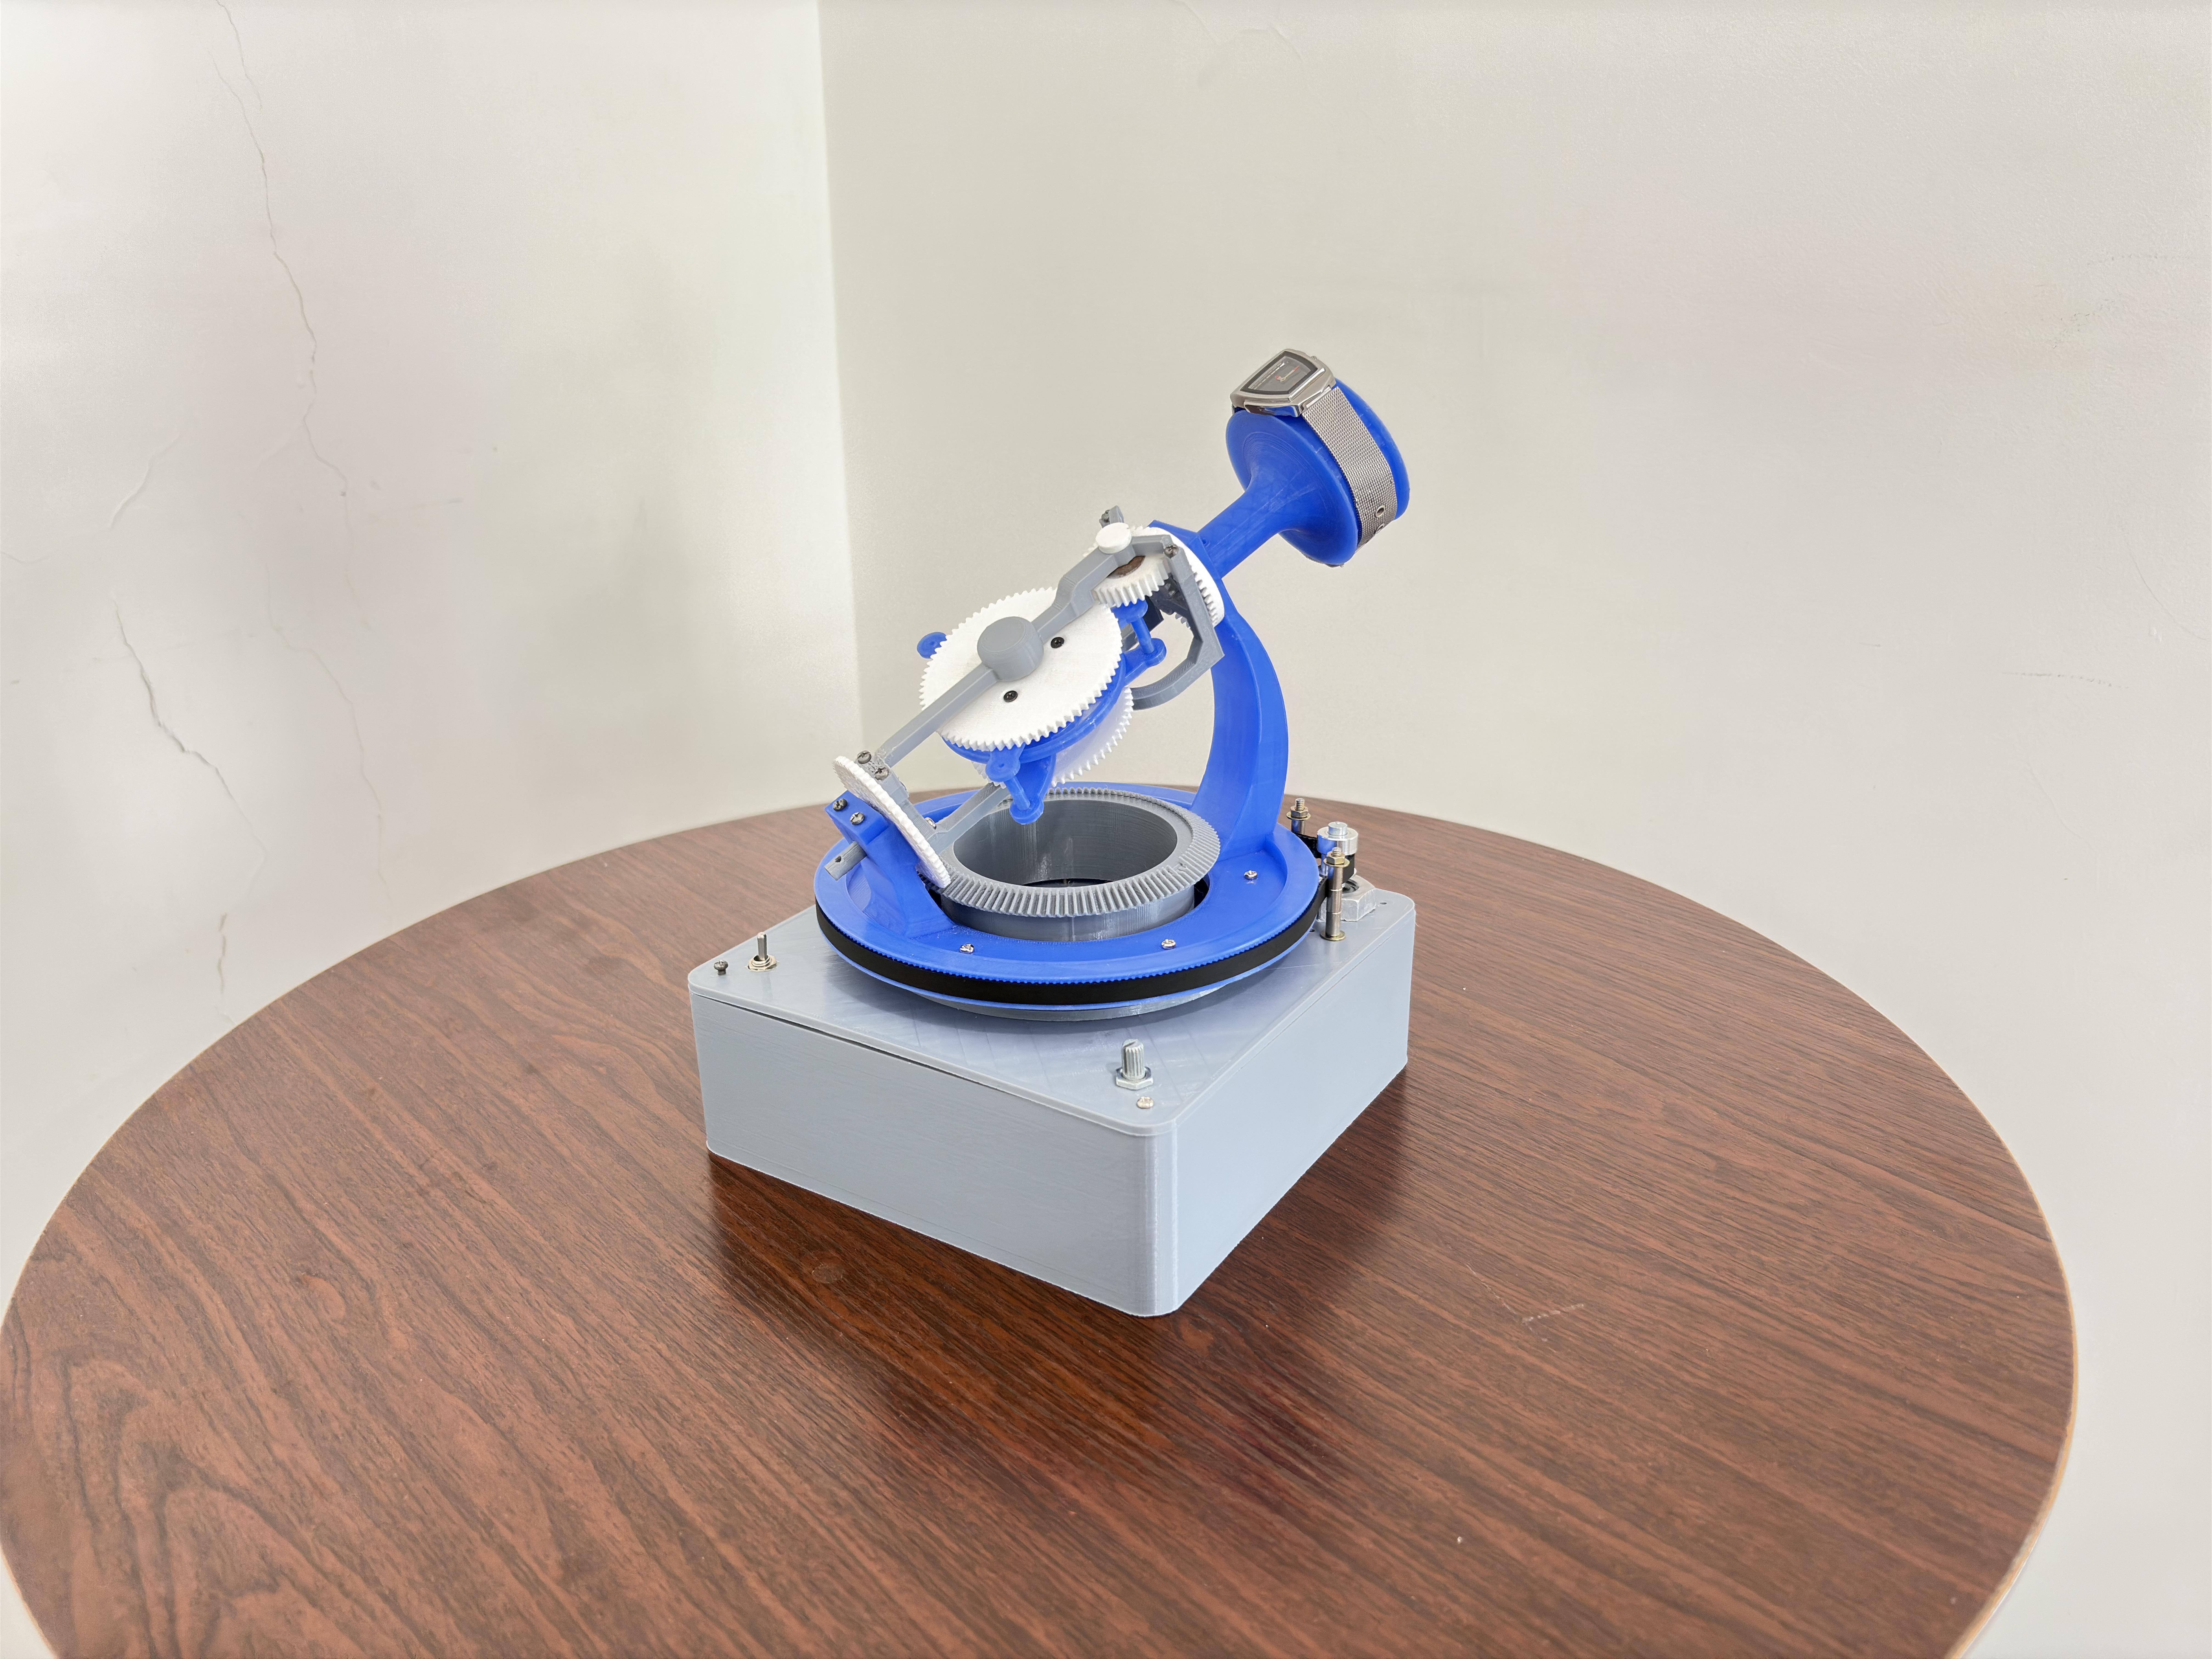

Have you ever stopped and considered the intricate dance of gears, springs, and levers inside a watch? Beneath its elegant exterior, a world of mechanical precision unfolds, where time itself is captured, measured, and displayed with remarkable accuracy. But there’s one particular feature in high-end watches that truly captivates me —the tourbillon. This hypnotic, rotating mechanism was originally designed to counteract the effects of gravity on a watch's accuracy, but beyond its technical brilliance, it’s a mesmerizing spectacle to behold. As the tourbillon rotates, it creates a gentle, almost meditative movement, with the watch's escapement spinning within a delicate cage. When I was little remember staring at this masterpiece on my father's watch for hours trying to figure out how it worked. So I researched how this tourbillion worked and after a lot of hours designing I was able to make this paragon.
In this guide, I’m going to show you how to build a 3-axis Tourbillion watch holder that brings this mesmerizing movement into full view. Apart from being a hypnotic artwork it also serves the purpose of holding your beautiful watch. By mounting your timepiece on a 3-axis stand, you'll be able to witness the elegant rotation of the tourbillon in a way that’s both engaging and awe-inspiring. Whether you're a horology enthusiast, a maker, or simply someone curious about the wonders of mechanical engineering, this project will allow you to showcase the fascinating inner workings of your watch in a truly unique way.
Disclaimer:
I’m neither a horologist nor a mechanical engineer with years of experience in that field. Hence this project has been a result of continuous trial and error. Due to the experimental nature of this project, I cannot guarantee that the components or the overall assembly will work as expected, especially on the first try. The guide provides the best possible solutions based on my experience, but each user’s results may vary. I have designed every signal gear and part myself in this build except the escapement wheel and escapement fork. I have also taken inspiration from amazing people online doing a similar project whose names and credit I will mention at last still if I’m missing someone please let me know. 3D printing technology, especially for complex mechanical systems such as a 3-axis tourbillon, may result in parts that lack the precision and durability of traditionally manufactured components you encounter issues not addressed in the guide, you will need to apply your knowledge and logic, and available resources to troubleshoot and find solutions.
3d printer settings:
I will mention the 3D printer setting and the materials I used for printing the parts. All the parts in blue, grey, and white have been printed in PLA. A layer height of 0.16/0.2 has been used with a nozzle diameter of 0.4mm. I have used 20 infill in almost all parts except the following parts, where you need to use 100% infill to increase the strength.
- crown gear
- Tourbillion T female and male parts
Points to note about this project:
- I have used machine screws to fix all the parts in the build. So when you start assembling the project make sure to use a 2.1mm drill bit to widen all the holes in all the parts. After that use the 2.5mm threading bit to create the threading in the holes. This will make the screws go in easily.
- If a part or a screw doesn't fit in properly please don't try to force it to fit because this will cause the 3d printed parts to crack or break. Instead, go back to the guide and see what you have done wrong.
- I have divided this building process into 3 assemblies. Each assembly is one step of the process. Each assembly will contain the necessary 3d printed parts. 3d vector of the assembly along with photos of me assembling all the parts. I have also mentioned the list of solutions to all the problems I faced during that assembly.
- You can also use any watch you like to be displayed on the tourbillon.
- The schematic of the wiring I have done will also be mentioned along with the integration of the three assemblies.
Supplies

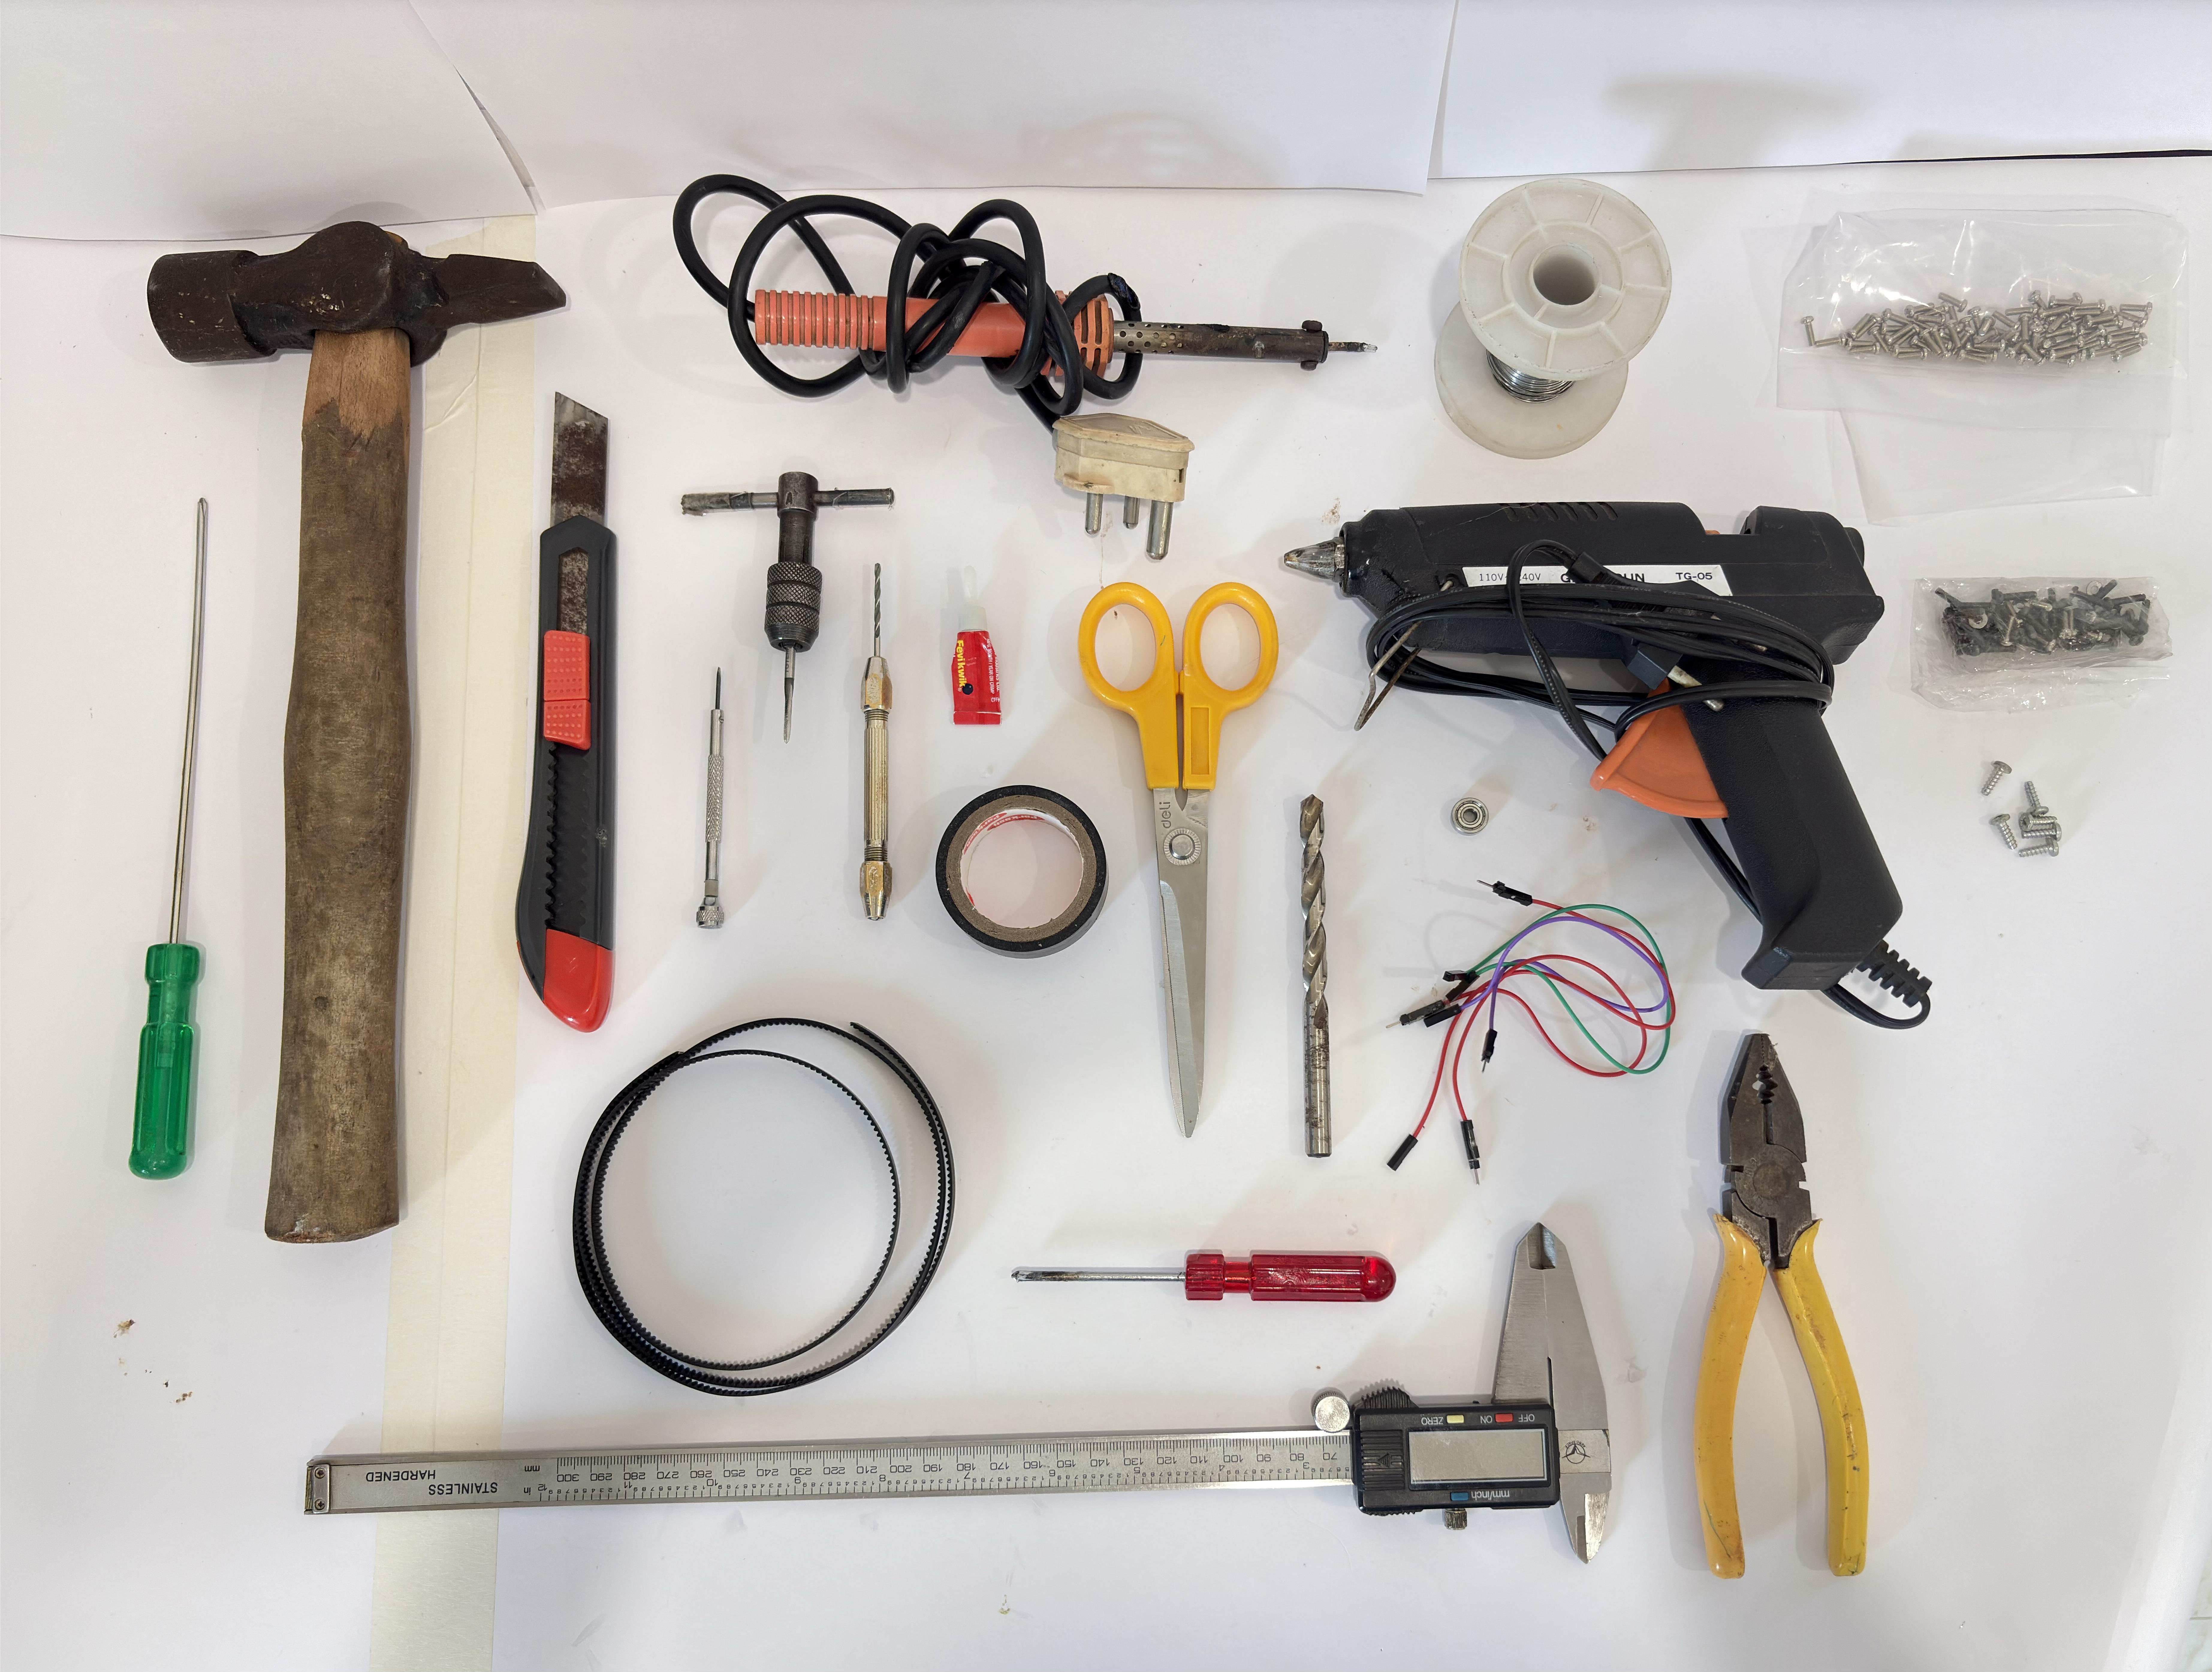

I have divided this section into 3 categories of parts you will need to make this build successful:
Electronics:
- You will need:
- A 12 volt (V) 1 ampere (A) adapter - https://thinkrobotics.com/products/15v-3-2a-adapter
- 6V 12V 24V 35V PMW DC motor speed regulator - https://robu.in/product/3v-6v-12v-24v-35v-pwm-dc-motor-speed-regulator/?gad_source=1&gclid=CjwKCAiA7Y28BhAnEiwAAdOJUI86omtJScATKtJmAAcR7C0-0dPfKTHG9Tvt7E408ghRxDB3pGyPAhoCg7MQAvD_BwE
- 60 rpm 12V dc motor - https://robu.in/product/60rpm-12v-low-noise-dc-motor-with-metal-gears-grade-a/?gad_source=1&gclid=CjwKCAiA7Y28BhAnEiwAAdOJUNWMaSTHRLcLbGkiwuR5zxNdZ7AisVZ3VtVKhxkPCHYf4JfYmHcu4xoCBHUQAvD_BwE
- DC power plug jack - https://thinkrobotics.com/products/dc-power-plug-jack-socket-adaptor-online?variant=39413759443030&country=IN¤cy=INR&utm_medium=product_sync&utm_source=google&utm_content=sag_organic&utm_campaign=sag_organic&utm_source=googleads&utm_medium=cpc&utm_campaign=allassests&gad_source=1&gclid=CjwKCAiA7Y28BhAnEiwAAdOJULTLDSDDkuZzemZD_7x4xPJLpw3ufaWA8YYZ5ScS4jGyx2w58h3bPhoCUvkQAvD_BwE
- 250V 1A on-off toggle switch - https://robu.in/product/toggle-switch-knx-100/?gad_source=1&gclid=CjwKCAiA7Y28BhAnEiwAAdOJUO7Sdrk-5q-JO9HhZSu0mlp2q1ZCgl6UkGhkGZ_ZeWVZbPnMNIdqQBoCEpgQAvD_BwE
- GT - 2 timer belts (2metres) - https://robu.in/product/1m-gt2-width-6mm-black-open-timing-belt-for-3d-printer/?gad_source=4&gclid=CjwKCAiA7Y28BhAnEiwAAdOJUJDSktlheBXfgylslVodFtxWRK32St-FnZ8oiVFh2F1TrV6YoiVsbhoC7vMQAvD_BwE
- GT - 2 timer belt pulley - https://robu.in/product/toggle-switch-knx-100/?gad_source=1&gclid=CjwKCAiA7Y28BhAnEiwAAdOJUO7Sdrk-5q-JO9HhZSu0mlp2q1ZCgl6UkGhkGZ_ZeWVZbPnMNIdqQBoCEpgQAvD_BwE
Tools:
- You will need:
- Hammer
- Cutter
- Screwdriver
- Cutter
- Soldering iron
- Solder wire
- Hot glue gun
- Hot glue sticks
- Fevi gel
- Scissors
- Pliers
- Pvc adhesive tape
- Manual drill
- 2.1mm drill bit
- Manual threading tool
- 2.5mm threading bit
- 2.5x8mm machine screws (30x)
- 2.5x13mm machine screws (15x)
- 3x6mm screws
- 5.5mm drill bit
- Wires
- 12x4x4mm ball bearings - https://www.amazon.in/ZUBSHA-ENTERPRISES-604-ZZ-Bearing-Stainless/dp/B0BHDG5QS2/ref=asc_df_B0BHDG5QS2/?tag=googleshopdes-21&linkCode=df0&hvadid=709963085912&hvpos=&hvnetw=g&hvrand=5531749281088067000&hvpone=&hvptwo=&hvqmt=&hvdev=c&hvdvcmdl=&hvlocint=&hvlocphy=9145612&hvtargid=pla-1985250407687&mcid=4e6af66dba7036e78b74bef1504d3ee6&gad_source=1&th=1
- Vernier calliper
- M4*5 Allen key tool
- M2.5 machine screw washers
- M4 machine screw washers
3d file:
Here are all the stl. files you will need for this project:
Downloads
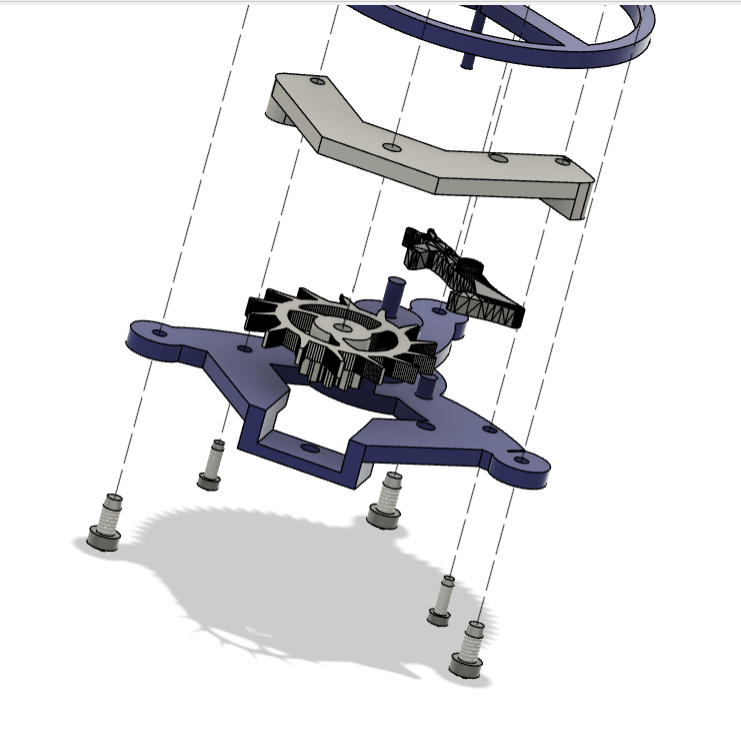
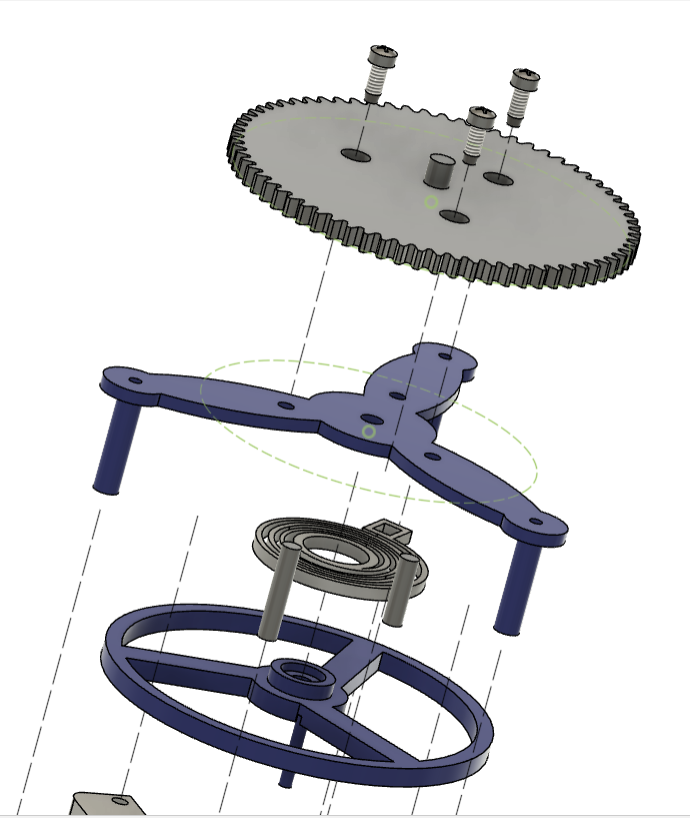
Assembly 1 (the Escapement Mechanism) :
.png)
.png)
.png)
.png)


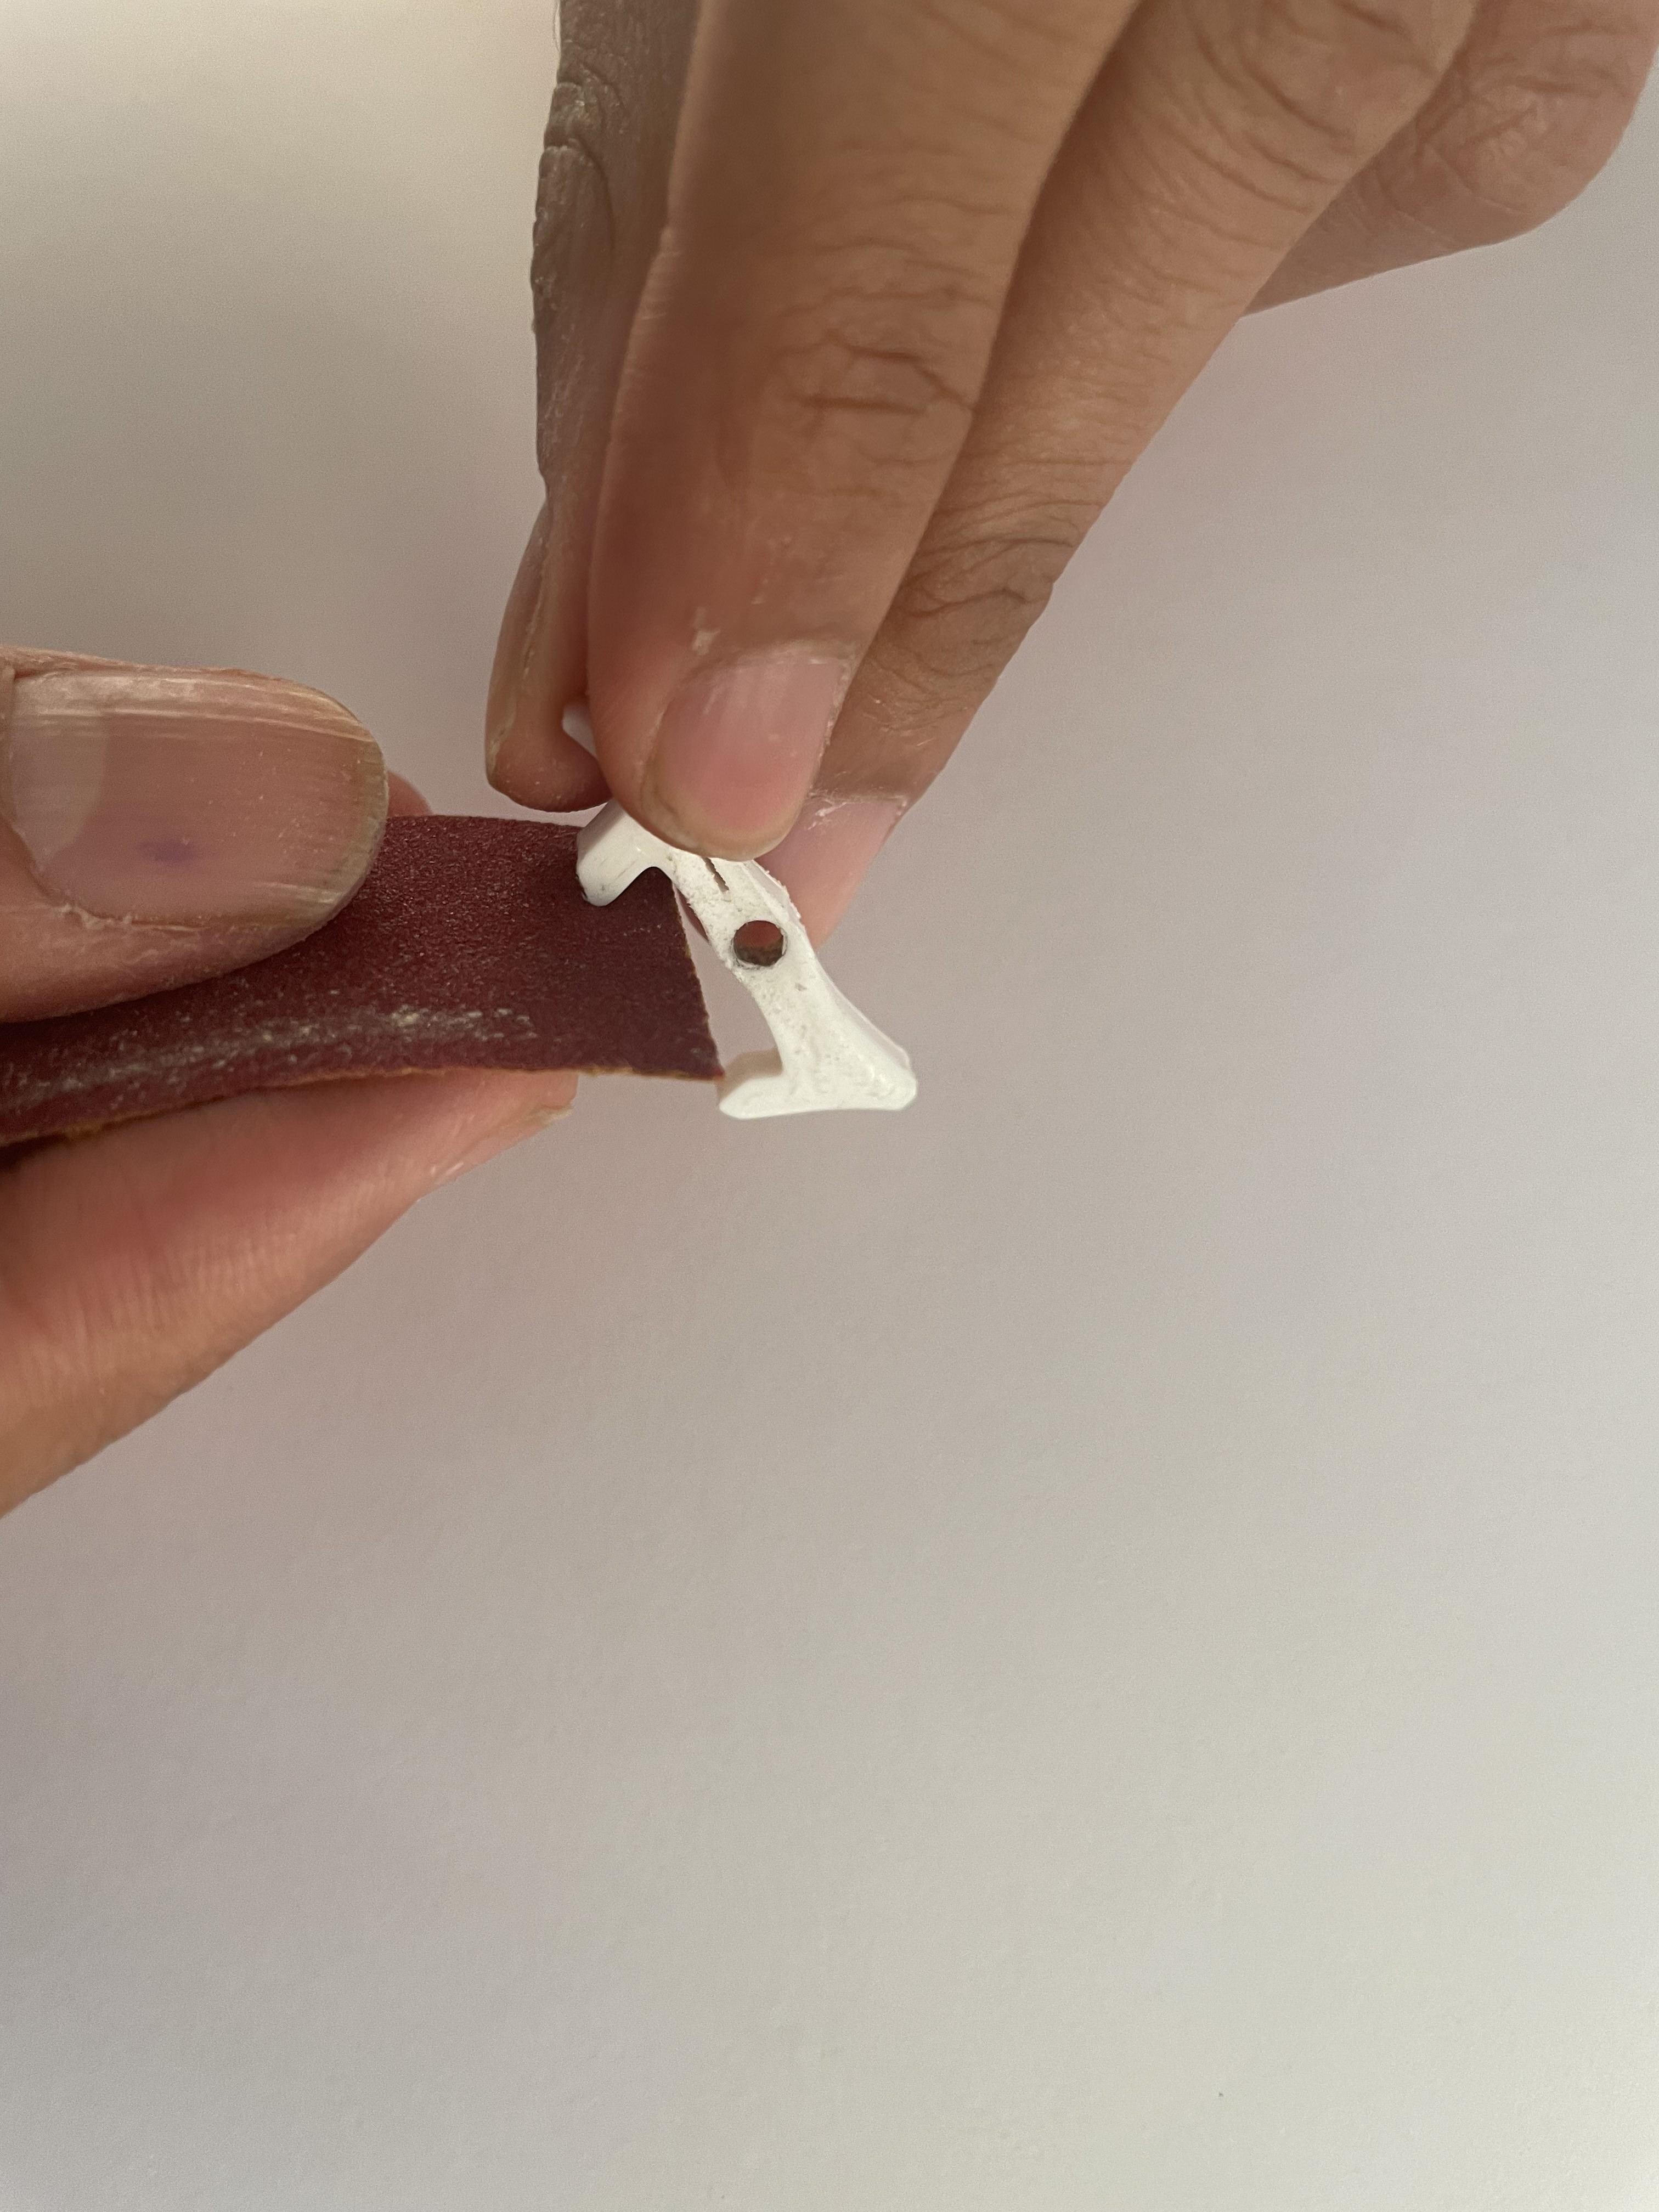


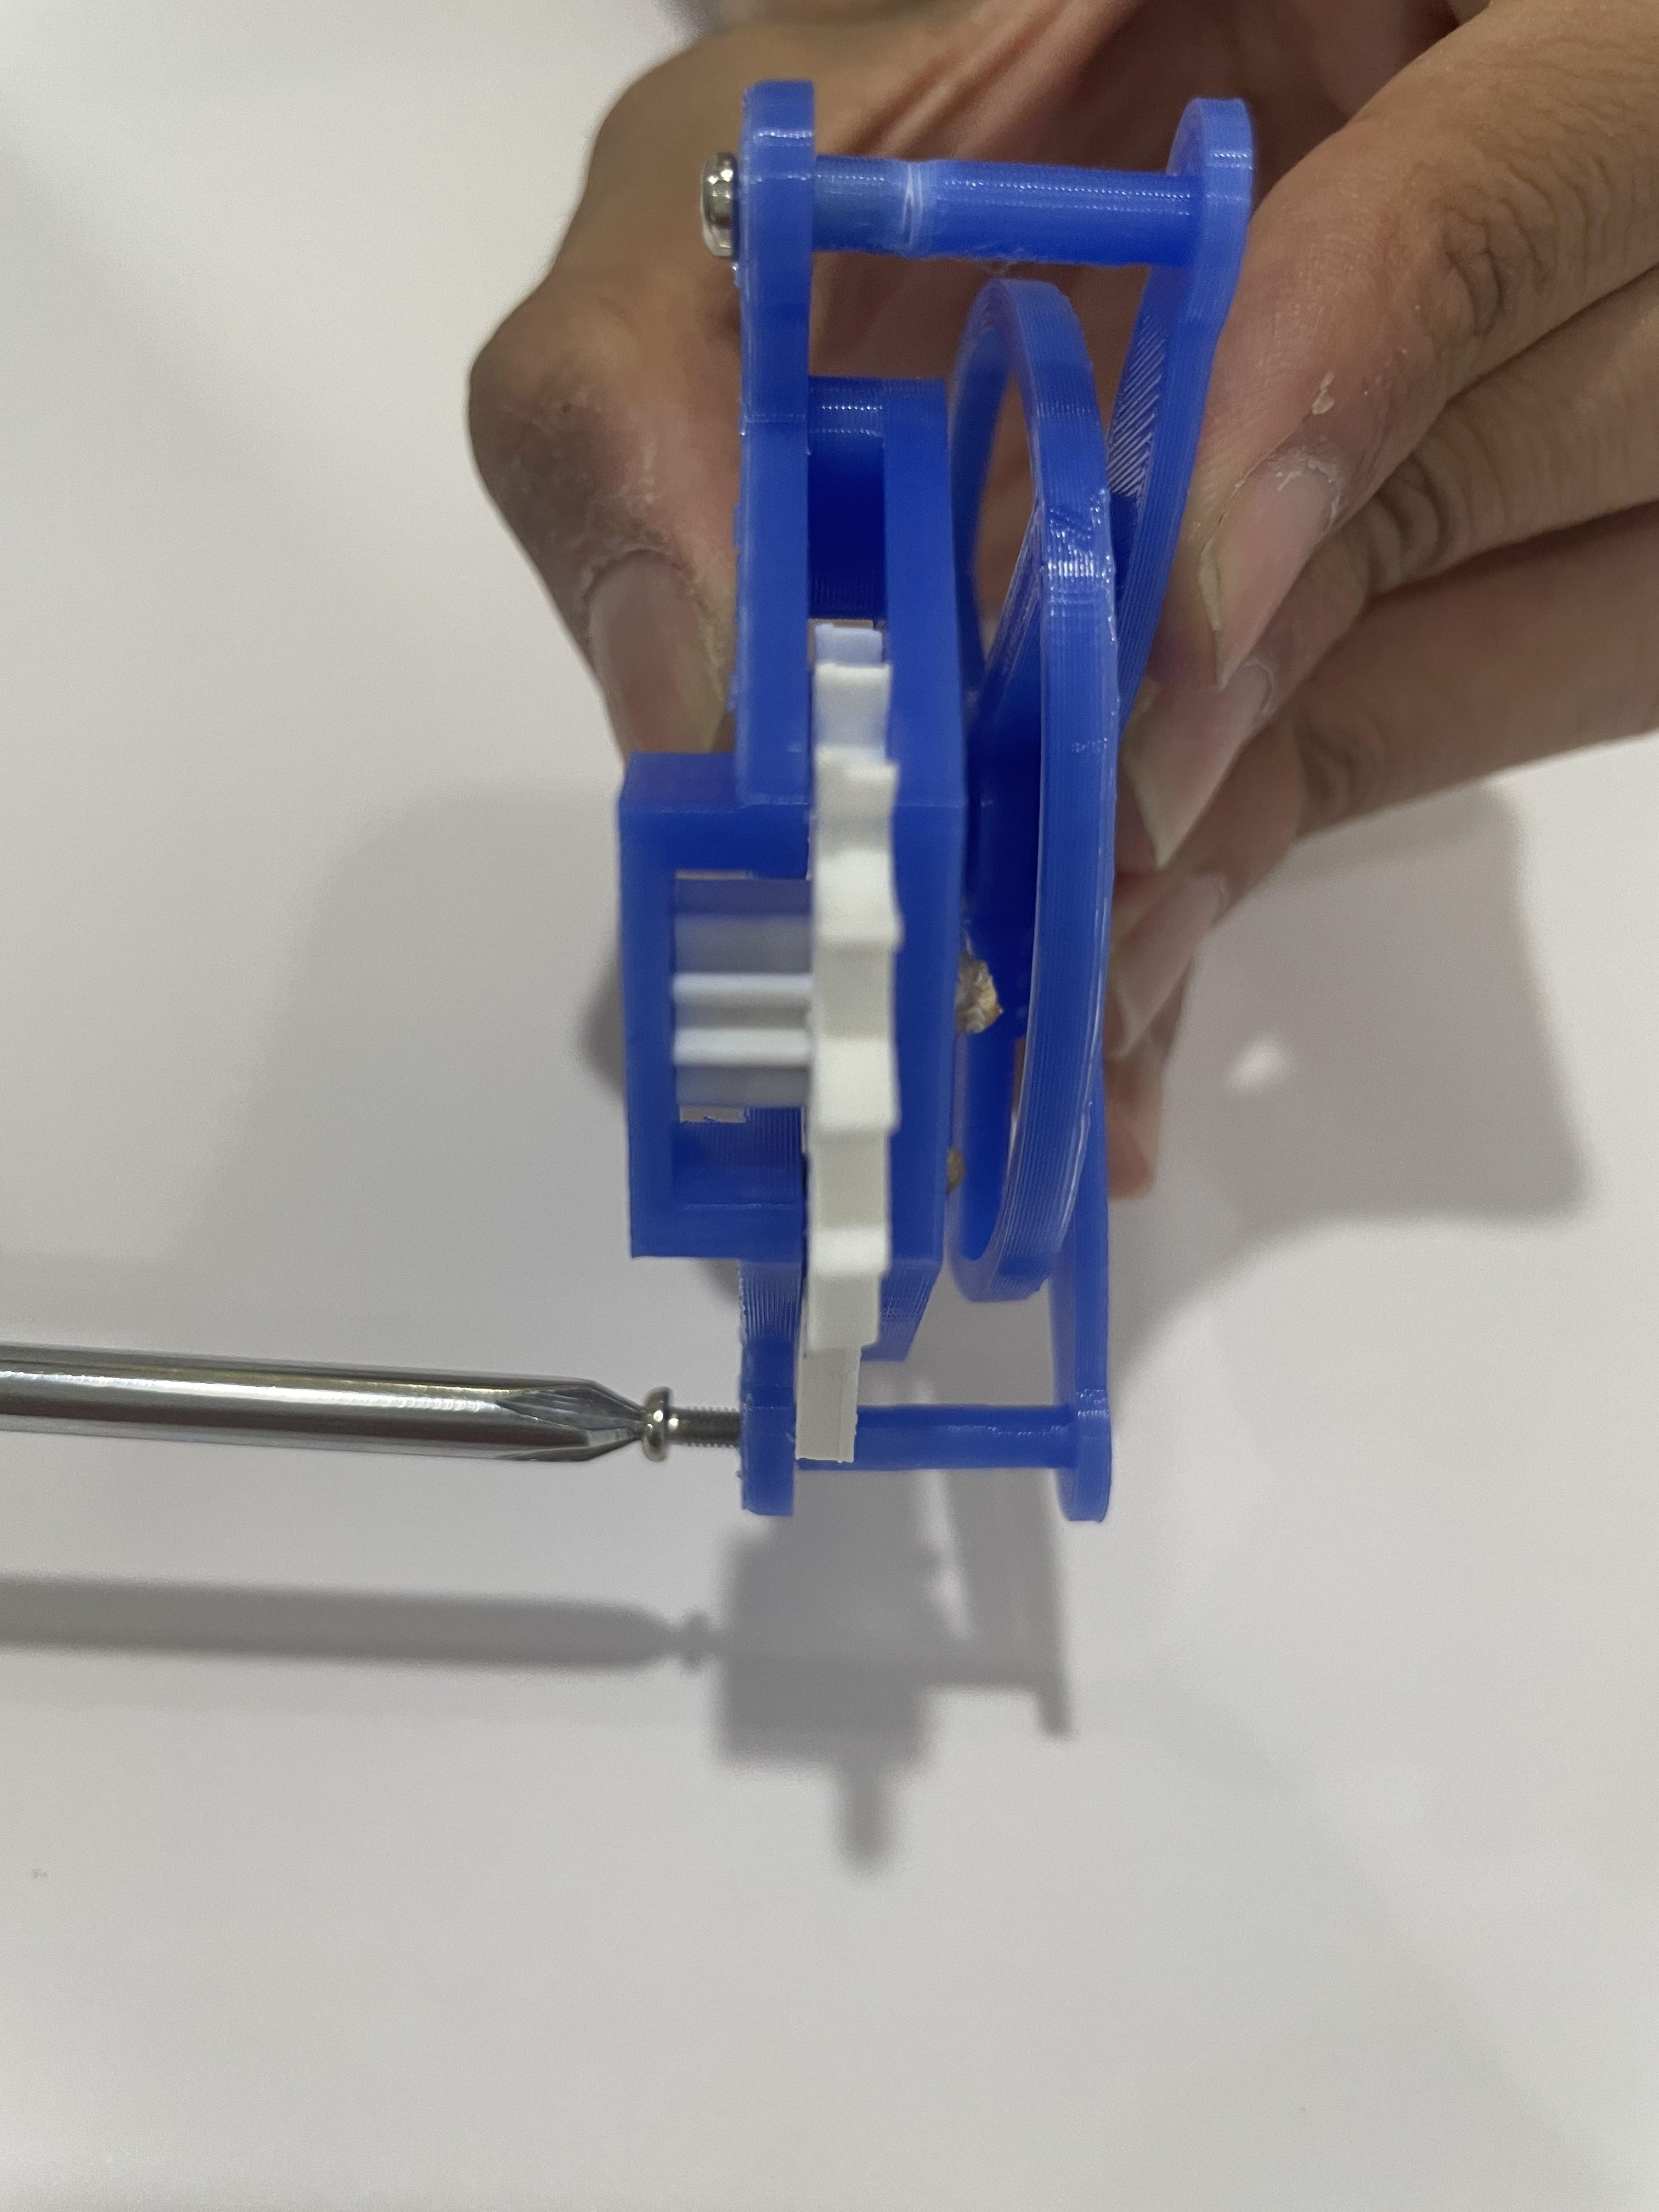


This step is critical to ensure the tourbillon functions smoothly. Getting the escapement mechanism right will ensure that the entire build works without unnecessary strain on the parts and motor. Here's a simplified explanation of each step:
1. Escapement Wheel and Fork Interaction:
- Goal: The escapement wheel must rotate clockwise, and it needs to work smoothly with the escapement fork.
- Action: You will need to sand the two arms of the escapement fork to ensure they can easily lock and unlock from the escapement wheel's teeth.
- How to do it: Look at the red lines shown in the provided photo. These are the areas of the fork arms that need sanding.
- Why: Sanding these areas will allow the fork to engage and disengage with the escapement wheel without resistance. This step is crucial for the smooth functioning of the entire system.
Important Tip: Do not move on to the next step until you are confident that the escapement fork's movement is smooth. You should feel minimal resistance, and the wheel should rotate smoothly when the fork locks and unlocks from the teeth.
2. Ensure Screws Are Flush with Parts:
- Goal: Prevent screws from interfering with other parts of the tourbillon during rotation.
- Action: When securing the inner tourbillion (female) to the IC gear, make sure the screws are flush with the surface of the connector gear.
- Why: If the screws protrude, they could interfere with the rotating parts, specifically the tourbillon (female). This could cause friction or stopage.
- Repeat the same step for the screws securing the escapement part holder to the inner tourbillion (male) part.
3. Securing the Inner tourbillion shaft:
- Goal: Secure the Inner tourbillion shaft firmly in place on the inner tourbillion (male) part.
- Action: Use Fevi Quick or another appropriate gel adhesive to secure the Inner tourbillion shaft to the inner tourbillion male.
4. Wooden Dowels as Shafts:
- Goal: The wooden dowels serve as the shaft for the escapement mechanism and must fit precisely.
- Action:
- Cut the wooden dowels to the required length.
- Ensure the bottom part of the dowel is flush with the surface of the inner tourbillion (male) part.
- Why: If the dowel is not flush with the surface, it could interfere with the rotation of the inner parts, leading to friction or stopage.
- Tip: Use a calliper to measure the exact length and ensure precise fitting.
5. Challenges and How to Solve Them:
- Screws Not Sitting Flush:
- Even though there are tapers in the parts designed to help the screws sit flush, sometimes they may still protrude. This can happen if the tapers are not deep enough.
- Solution: If the screws still don’t sit flush, you can deepen the taper by using a 5.5mm drill bit. This will allow the screws to sit properly without interfering with other parts.
- Tip: Be cautious when drilling; you want to widen the taper slightly but not overdo it. Test the screws after each adjustment to ensure the fit is perfect.
Summary of Key Points:
- Smooth Escapement Fork: Sand the arms of the fork to allow smooth locking and unlocking from the escapement wheel.
- Flush Screws: Ensure that all screws are flush with the surface of the parts they fasten to, especially where the connector gear and escapement chin holder meet the tourbillon.
- Use Adhesive: Secure the rotation T with Fevi Quick or gel adhesive to hold parts in place while allowing rotation.
- Accurate Dowels: Make sure the wooden dowels are cut to the right length and sit flush with the inner tourbillion male part to avoid interference during rotation.
- Deeper Tapers for Screws: If screws don’t sit flush, carefully use a 5.5mm drill bit to deepen the taper and ensure a proper fit.
By following these instructions carefully, the escapement mechanism should work seamlessly, ensuring the smooth operation of the entire tourbillon assembly. Let me know if you need further clarification on any step!
Assembly 2 (Electronics and Mechanism Setup) :
.png)
.png)
.png)
.png)
.png)
.png)


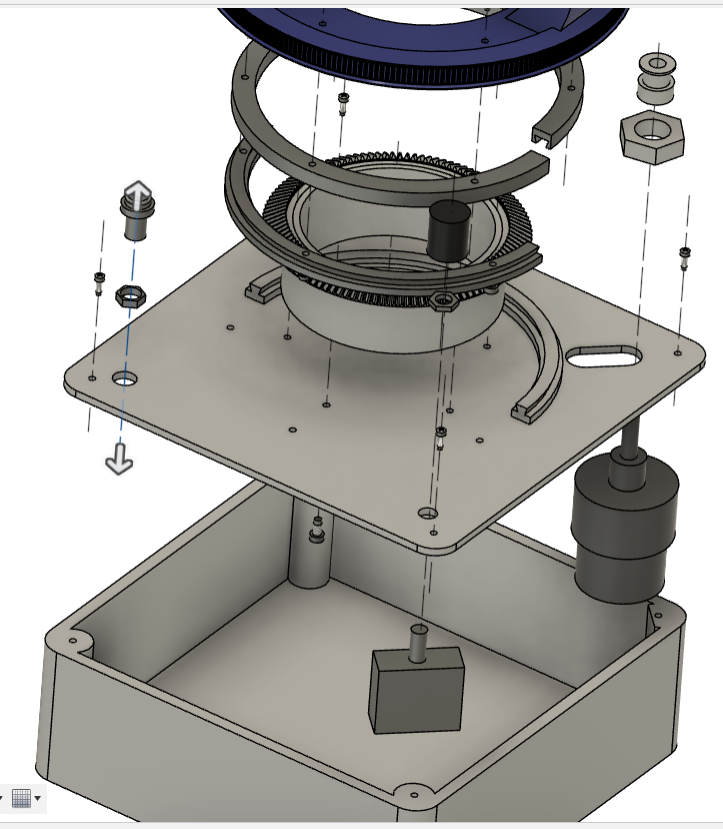
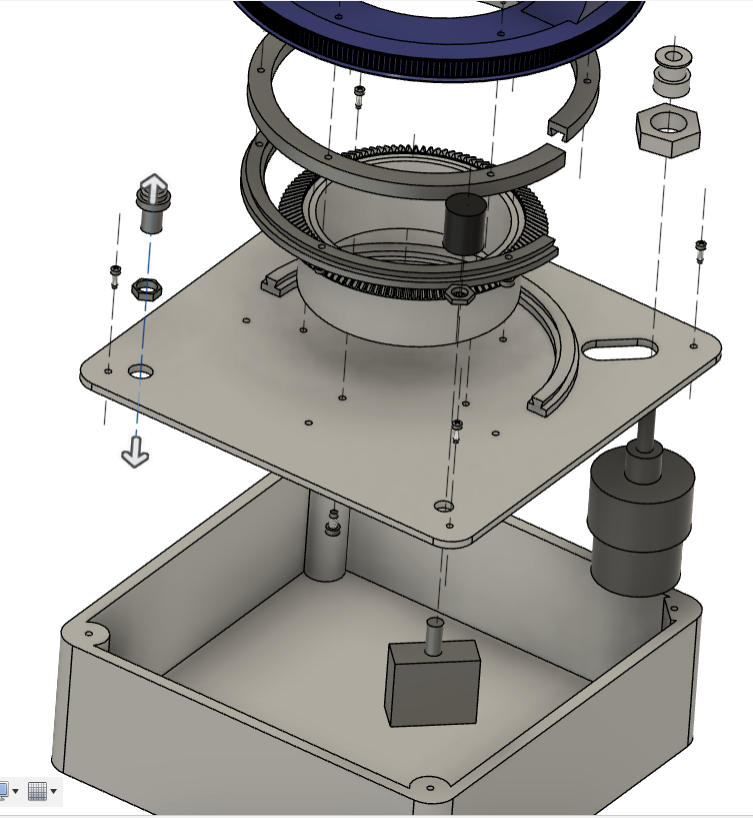
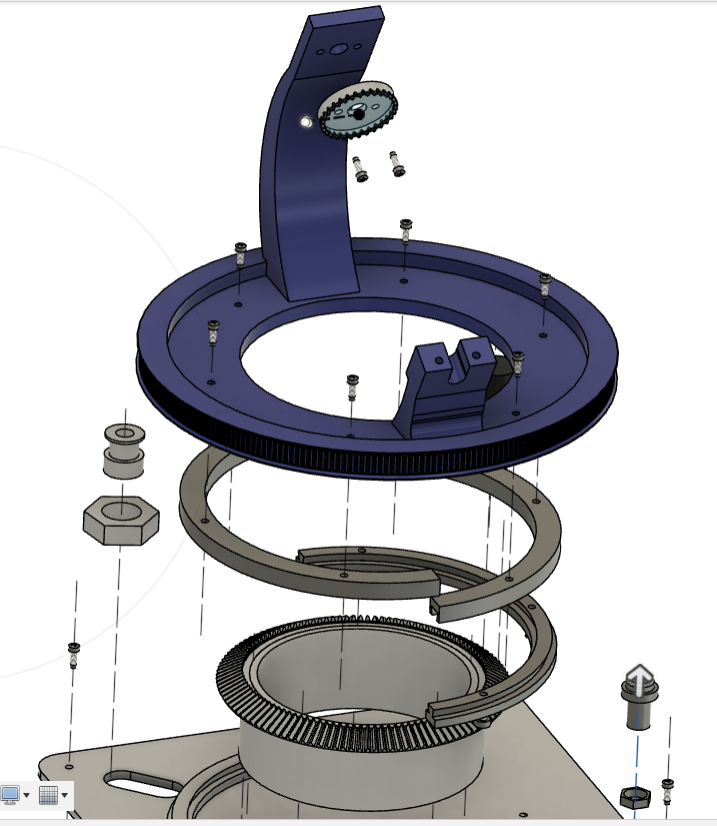
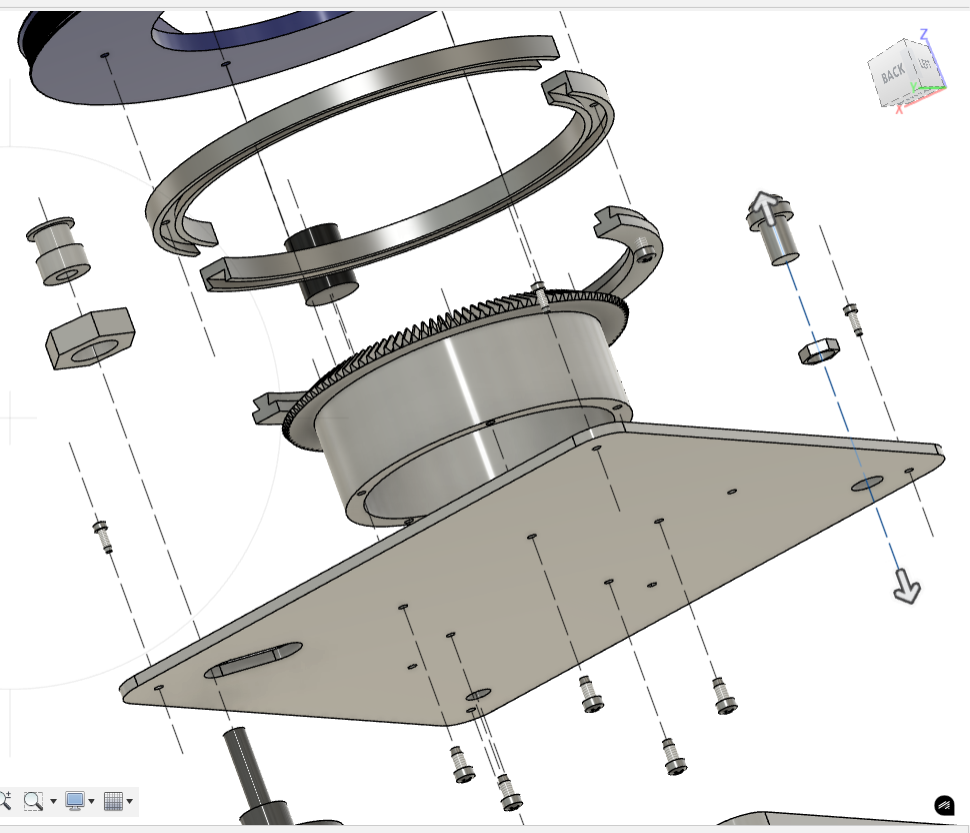
This part of the build involves attaching and securing the motor, speed controller, and other parts. While the steps are straightforward, there are some important details to keep in mind for smooth operation. Let’s walk through the process!
Step 1: Securing the Motor
- Goal: Attach the motor securely to the (base female) part of the structure.
- How to do it:
- Find the slot designed for the motor in the base part.
- Insert the motor into this slot. This slot allows the motor to move back and forth slightly, which is important for adjusting the tension of the timer belt (more on that later).
- Why: Adjusting the motor's position helps ensure that the motor's belt tension is just right, preventing slippage and making the tourbillon rotate smoothly.
Step 2: Securing the Speed Controller and Switch
- Goal: Attach the speed controller and switch to the build.
- How to do it:
- Follow the guide photo provided to position the speed controller and switch correctly.
Step 3: Making the CR system work (circular rail system)
- Goal: Make the circular rails rotate properly for the rotating platform to be mounted on.
- How to do it:
- Thread the holes in both parts (base and CR1 male part) before inserting the screws. Threading helps the screws fit easily and securely.
- Once threaded, secure the CR1 male part to the base using screws.
Note pls dont forget to slide the CR female parts over the CR male parts befoe screwing te screws on.
Step 4: Attaching the Rotating Platform
- Goal: Attach the rotating platform to the CR system.
- How to do it:
- Use screws to secure the rotating platform to the CR system (as shown in the guide photo).
- This is the part that will allow the tourbillon to rotate once everything is connected.
Step 5: Securing the crown gear
Please, use 3mm self-tapping screws here.
Step 6: Securing the Ring Gear
- Goal: Attach the ring gear to the base female part.
- How to do it:
- Once the rotating platform is secured, proceed to attach the ring gear.
- Use screws to firmly secure the ring gear to the base, ensuring it’s positioned properly for smooth rotation.
Challenges and Solutions:
- High Friction on Circular Rail Parts:
- Problem: The circular rail parts are made of plastic, and during rotation, friction can build up, causing resistance. This extra friction can put unnecessary strain on the motor.
- Solution: Use a lubricant to reduce the friction. You can use Vaseline (as mentioned) or any grease designed for mechanical parts.
- How to apply: Lightly apply the lubricant to the plastic circular rail parts before assembling them. This will make the movement smoother and reduce stress on the motor.
- Ring Gear Height Issue:
- Problem: If the height of the ring gear is too short or too tall, it may not properly engage with the RR gear, causing the tourbillon to either not rotate or misalign.
- Solution: Adjust the height of the ring gear using washers.
- If the ring gear height is too small: Add a washer underneath the ring gear to lift it.
- If the ring gear height is too big: Add a washer underneath the rotating platform to adjust the height and ensure proper gear contact.
Summary of Key Points:
- Motor Placement: Secure the motor in the base slot, making sure it can move slightly back and forth for belt tension adjustment.
- Speed Controller and Switch: Follow the guide photo to securely attach both components.
- CR1 Male Part: Thread the holes and secure the CR1 male part to the base female part.
- Rotating Platform: Attach it to the CR system using screws to allow the rotation of the tourbillon.
- Ring Gear Adjustment: Ensure the ring gear and RR gear mesh properly. Use washers to adjust the height if needed.
- Lubrication: Apply grease or Vaseline to the circular rail parts to reduce friction and prevent strain on the motor.
By following these steps carefully, you should be able to complete the assembly smoothly. The key is to make sure everything is aligned correctly, and don’t forget to lubricate moving parts for optimal performance!
Let me know if you need any further clarification on any step!
Assembly 3 (Final Gear and Bearing Setup) :
.png)


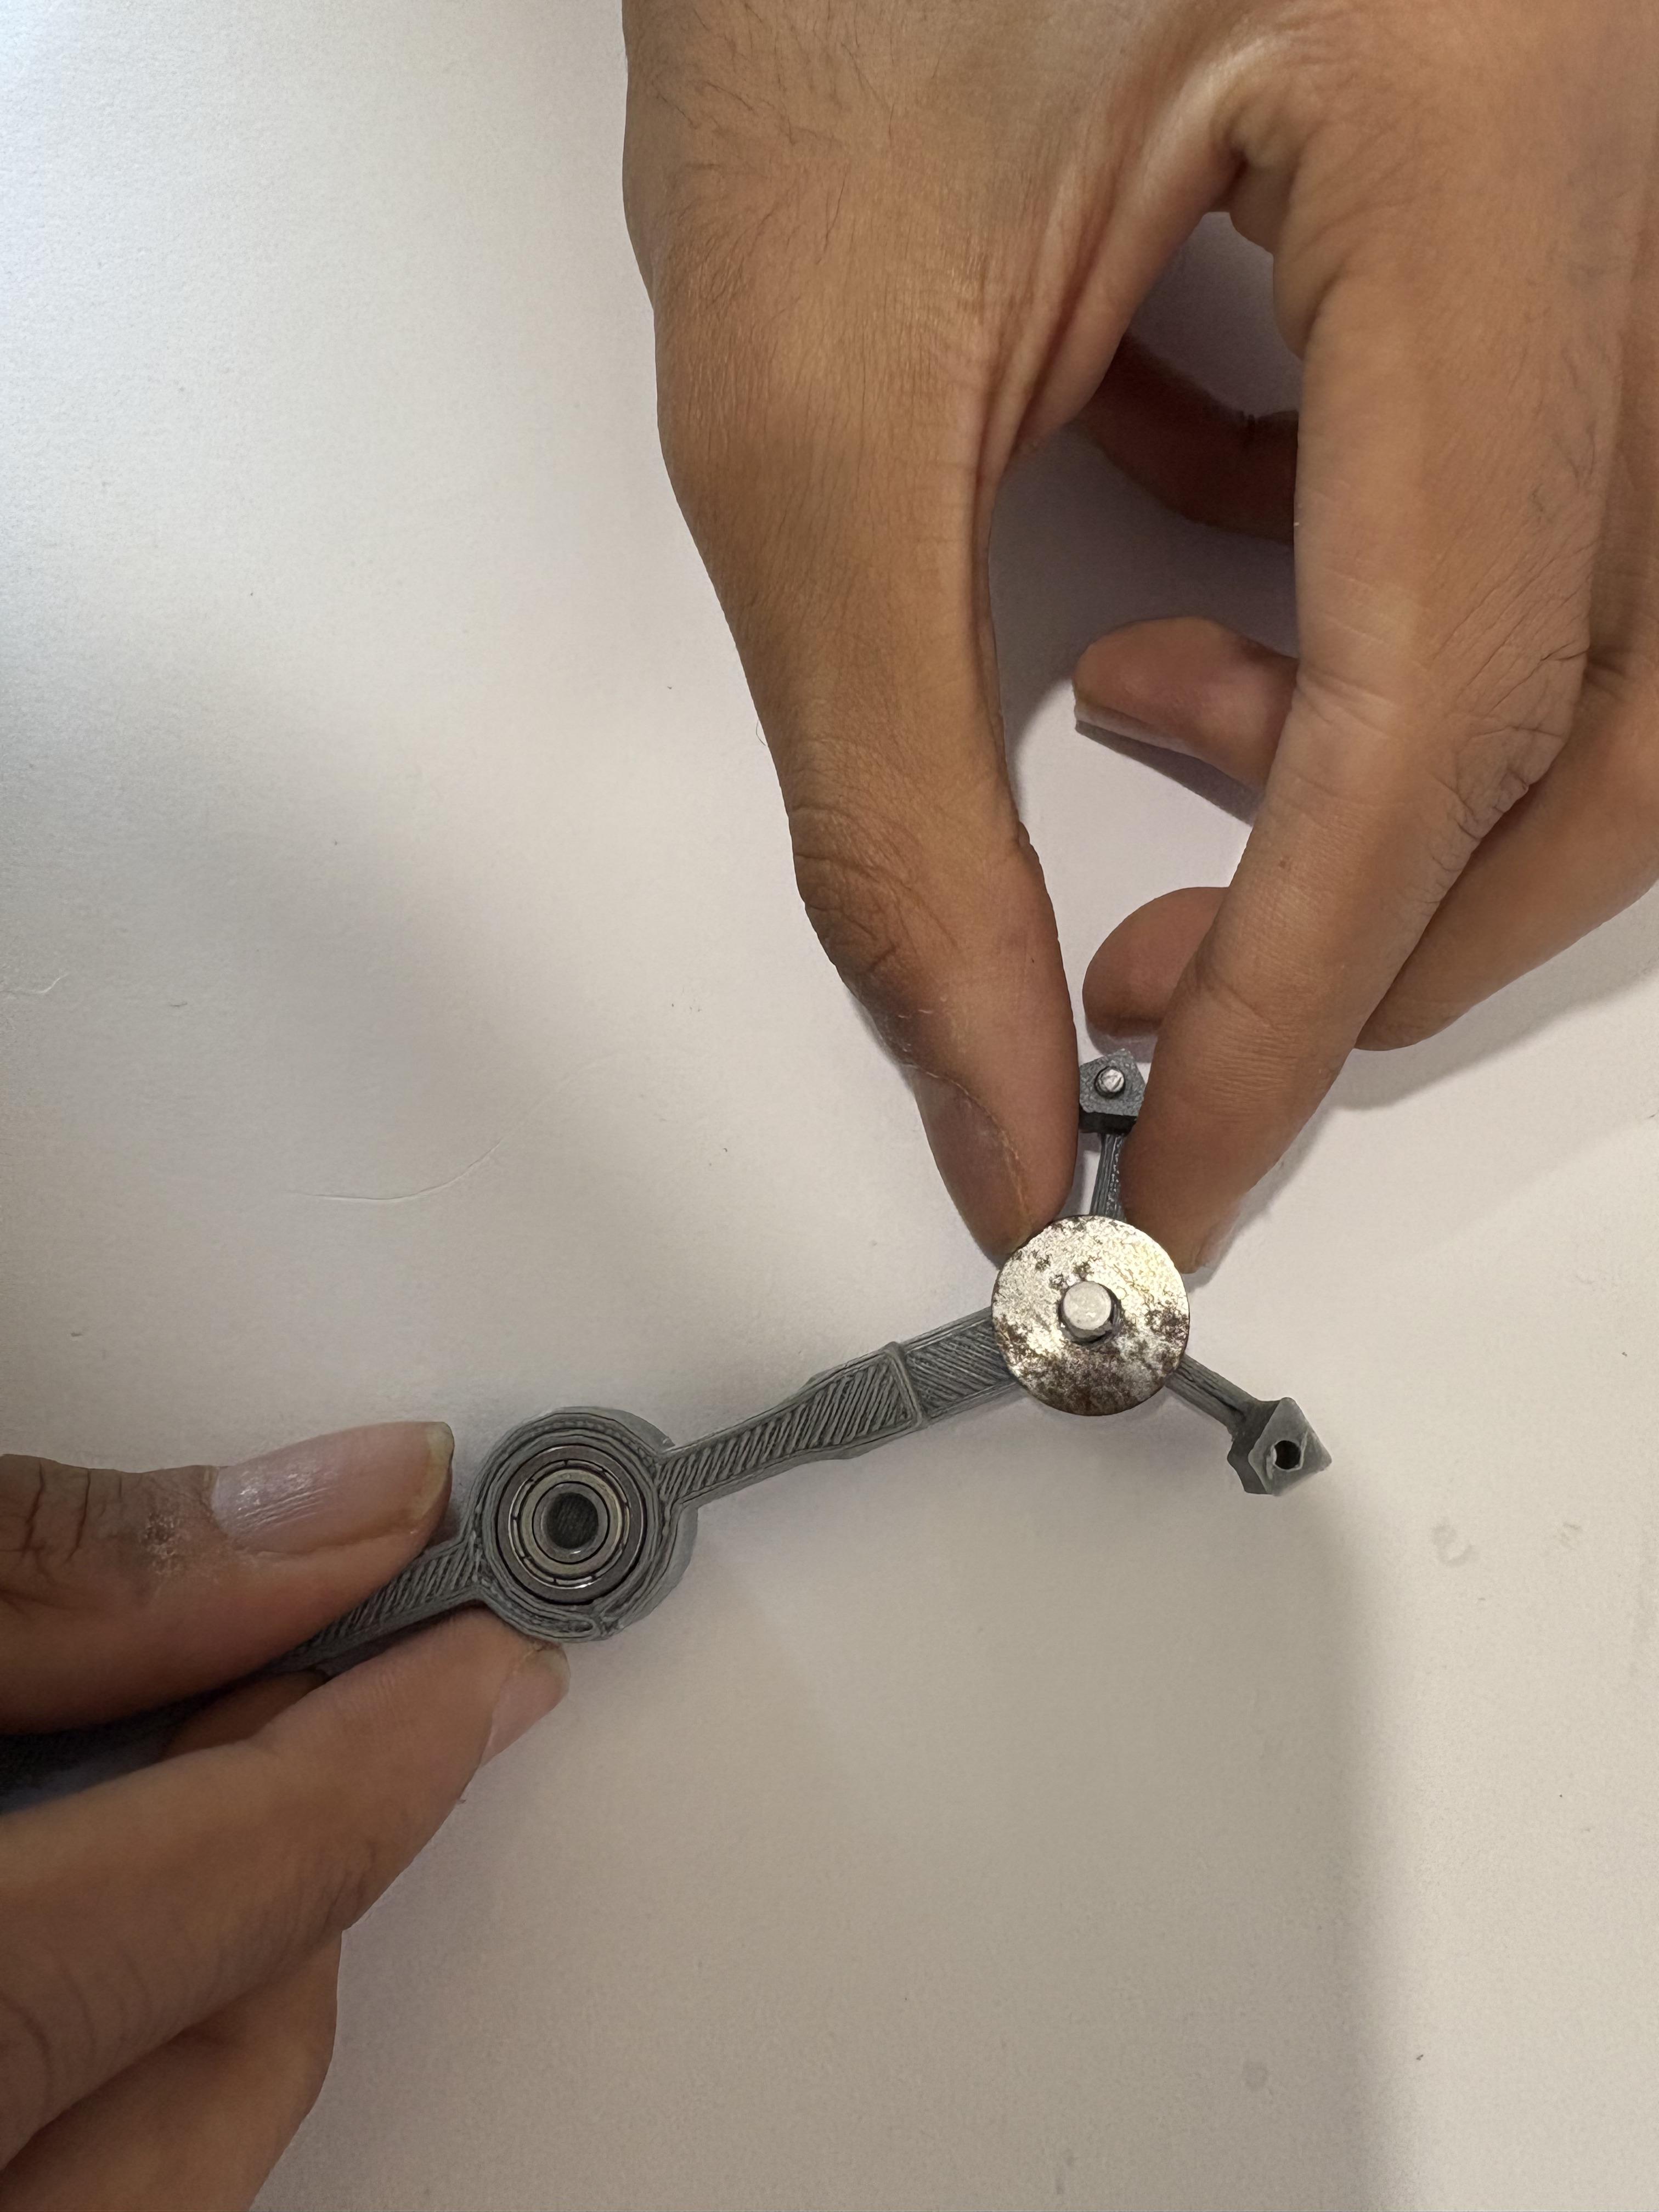

This part of the build is the easiest one, and once you complete it, you’ll move on to wiring and integrating everything. Although there aren’t many potential issues, a few challenges might come up—here’s how to tackle them!
Step 1: Securing the Ball Bearing to the CC Gear
- Goal: Attach the ball bearing to the CC gear.
- How to do it:
- Apply Fevi Quick or a similar adhesive to secure the ball bearing to the CC gear.
- Make sure the ball bearing is seated properly on the CC gear.
- Why: The ball bearing needs to stay in place for smooth rotation, and the adhesive helps keep it firmly attached.
Step 2: Installing Bearings in the Center of Tourbillon Parts
- Goal: Place the ball bearings inside the centre tourbillon T (female and male parts).
- How to do it:
- Put a ball bearing inside the female part of the tourbillon T and another one inside the male part.
- Use a hammer to gently press the bearings into place.
- Why: These bearings help the tourbillon rotate smoothly and reduce friction during movement.
Step 3: Ensuring Proper Gear Alignment
- Goal: Ensure the CC gear aligns properly with the IC gear.
- How to do it:
- If the CC gear does not align properly with the IC gear due to height differences, you will need to adjust the height.
- Use a washer to increase the height of either the CC gear to ensure that both gears are in proper contact.
- Why: Proper alignment between the gears is crucial for smooth and accurate movement.
Step 4: Keeping the CC Gear Flush with the IC Gear
- Goal: Ensure the CC gear sits flush with the IC gear.
- How to do it:
- The CC gear must be flush with the surface of the IC gear. This is important because if the CC gear is too low it will bump into the inner tourbillon during rotation, causing friction or misalignment.
- Why: A flush-fit ensures that the gears mesh smoothly and do not interfere with the rotating parts of the tourbillon.
Challenges and Solutions:
- Gear Alignment:
- Problem: The CC gear may not align properly with the IC gear because of height differences.
- Solution: Use washers to adjust the height of the gears. This will bring them into proper contact with each other and ensure smooth operation.
- Flush Fit of CT Gear:
- Problem: The CC gear may not sit flush with the IC gear, which could lead to it bumping into the inner tourbillon during rotation.
- Solution: Make sure the CC gear is perfectly aligned with the ITT gear, and adjust the height if needed to keep everything flush.
Summary of Key Points:
- Ball Bearing on CC Gear: Use Fevi Quick to attach the ball bearing to the CC gear.
- Bearings in CC Parts: Press the ball bearings into place in the female and male parts of the centre tourbillon T.
- Gear Alignment: Use washers to adjust the height of the gears if they don't align properly.
- Flush CT Gear: Ensure the CC gear is flush with the IC gear to avoid interference with the inner tourbillon during rotation.
Let me know if you need any more clarification on any step.
Wiring the Motor, Speed Controller, Switch, and Jack


This part of the build is straightforward. You'll be connecting the motor, speed controller, switch, and jack to control the motor speed and direction. Follow these easy steps to wire everything correctly:
Step 1: Check the Schematic
- Goal: Ensure you understand where each wire goes.
- Action: Refer to the wiring schematic provided. It will show you how the motor, speed controller, switch, and jack should be connected.
Step 2: Connect the Motor to the Speed Controller
- Goal: Connect the motor to the speed controller so you can adjust its speed.
- Action:
- Positive wire: Connect the positive wire (usually marked with a "+" sign) from the motor to the positive terminal of the speed controller.
- Negative wire: Connect the negative wire (usually marked with a "-" sign) from the motor to the negative terminal of the speed controller.
Step 3: Connect the Switch
- Goal: Add a switch to control turning the motor on and off.
- Action:
- Connect the positive terminal of the speed controller to one side of the switch.
- Connect the other side of the switch to the positive terminal on the jack.
Step 4: Connect the Jack
- Goal: Ensure the jack is connected so the motor gets power.
- Action:
- Connect the negative terminal of the jack to the negative terminal of the speed controller.
Step 5: Check the Polarities
- Goal: Make sure the motor rotates in the right direction.
- Action: Before you start soldering, double-check the polarities of the wires:
- The positive wire should go to the positive terminal, and the negative wire should go to the negative terminal.
- This is important because the motor must rotate clockwise for the escapement wheel to rotate in the correct direction.
Step 6: Solder the Wires
- Goal: Secure all the connections.
- Action: Once you’re sure everything is connected properly, solder the wires in place. Make sure the soldering is clean and solid to avoid any loose connections.
Integration: Putting It All Together
.png)


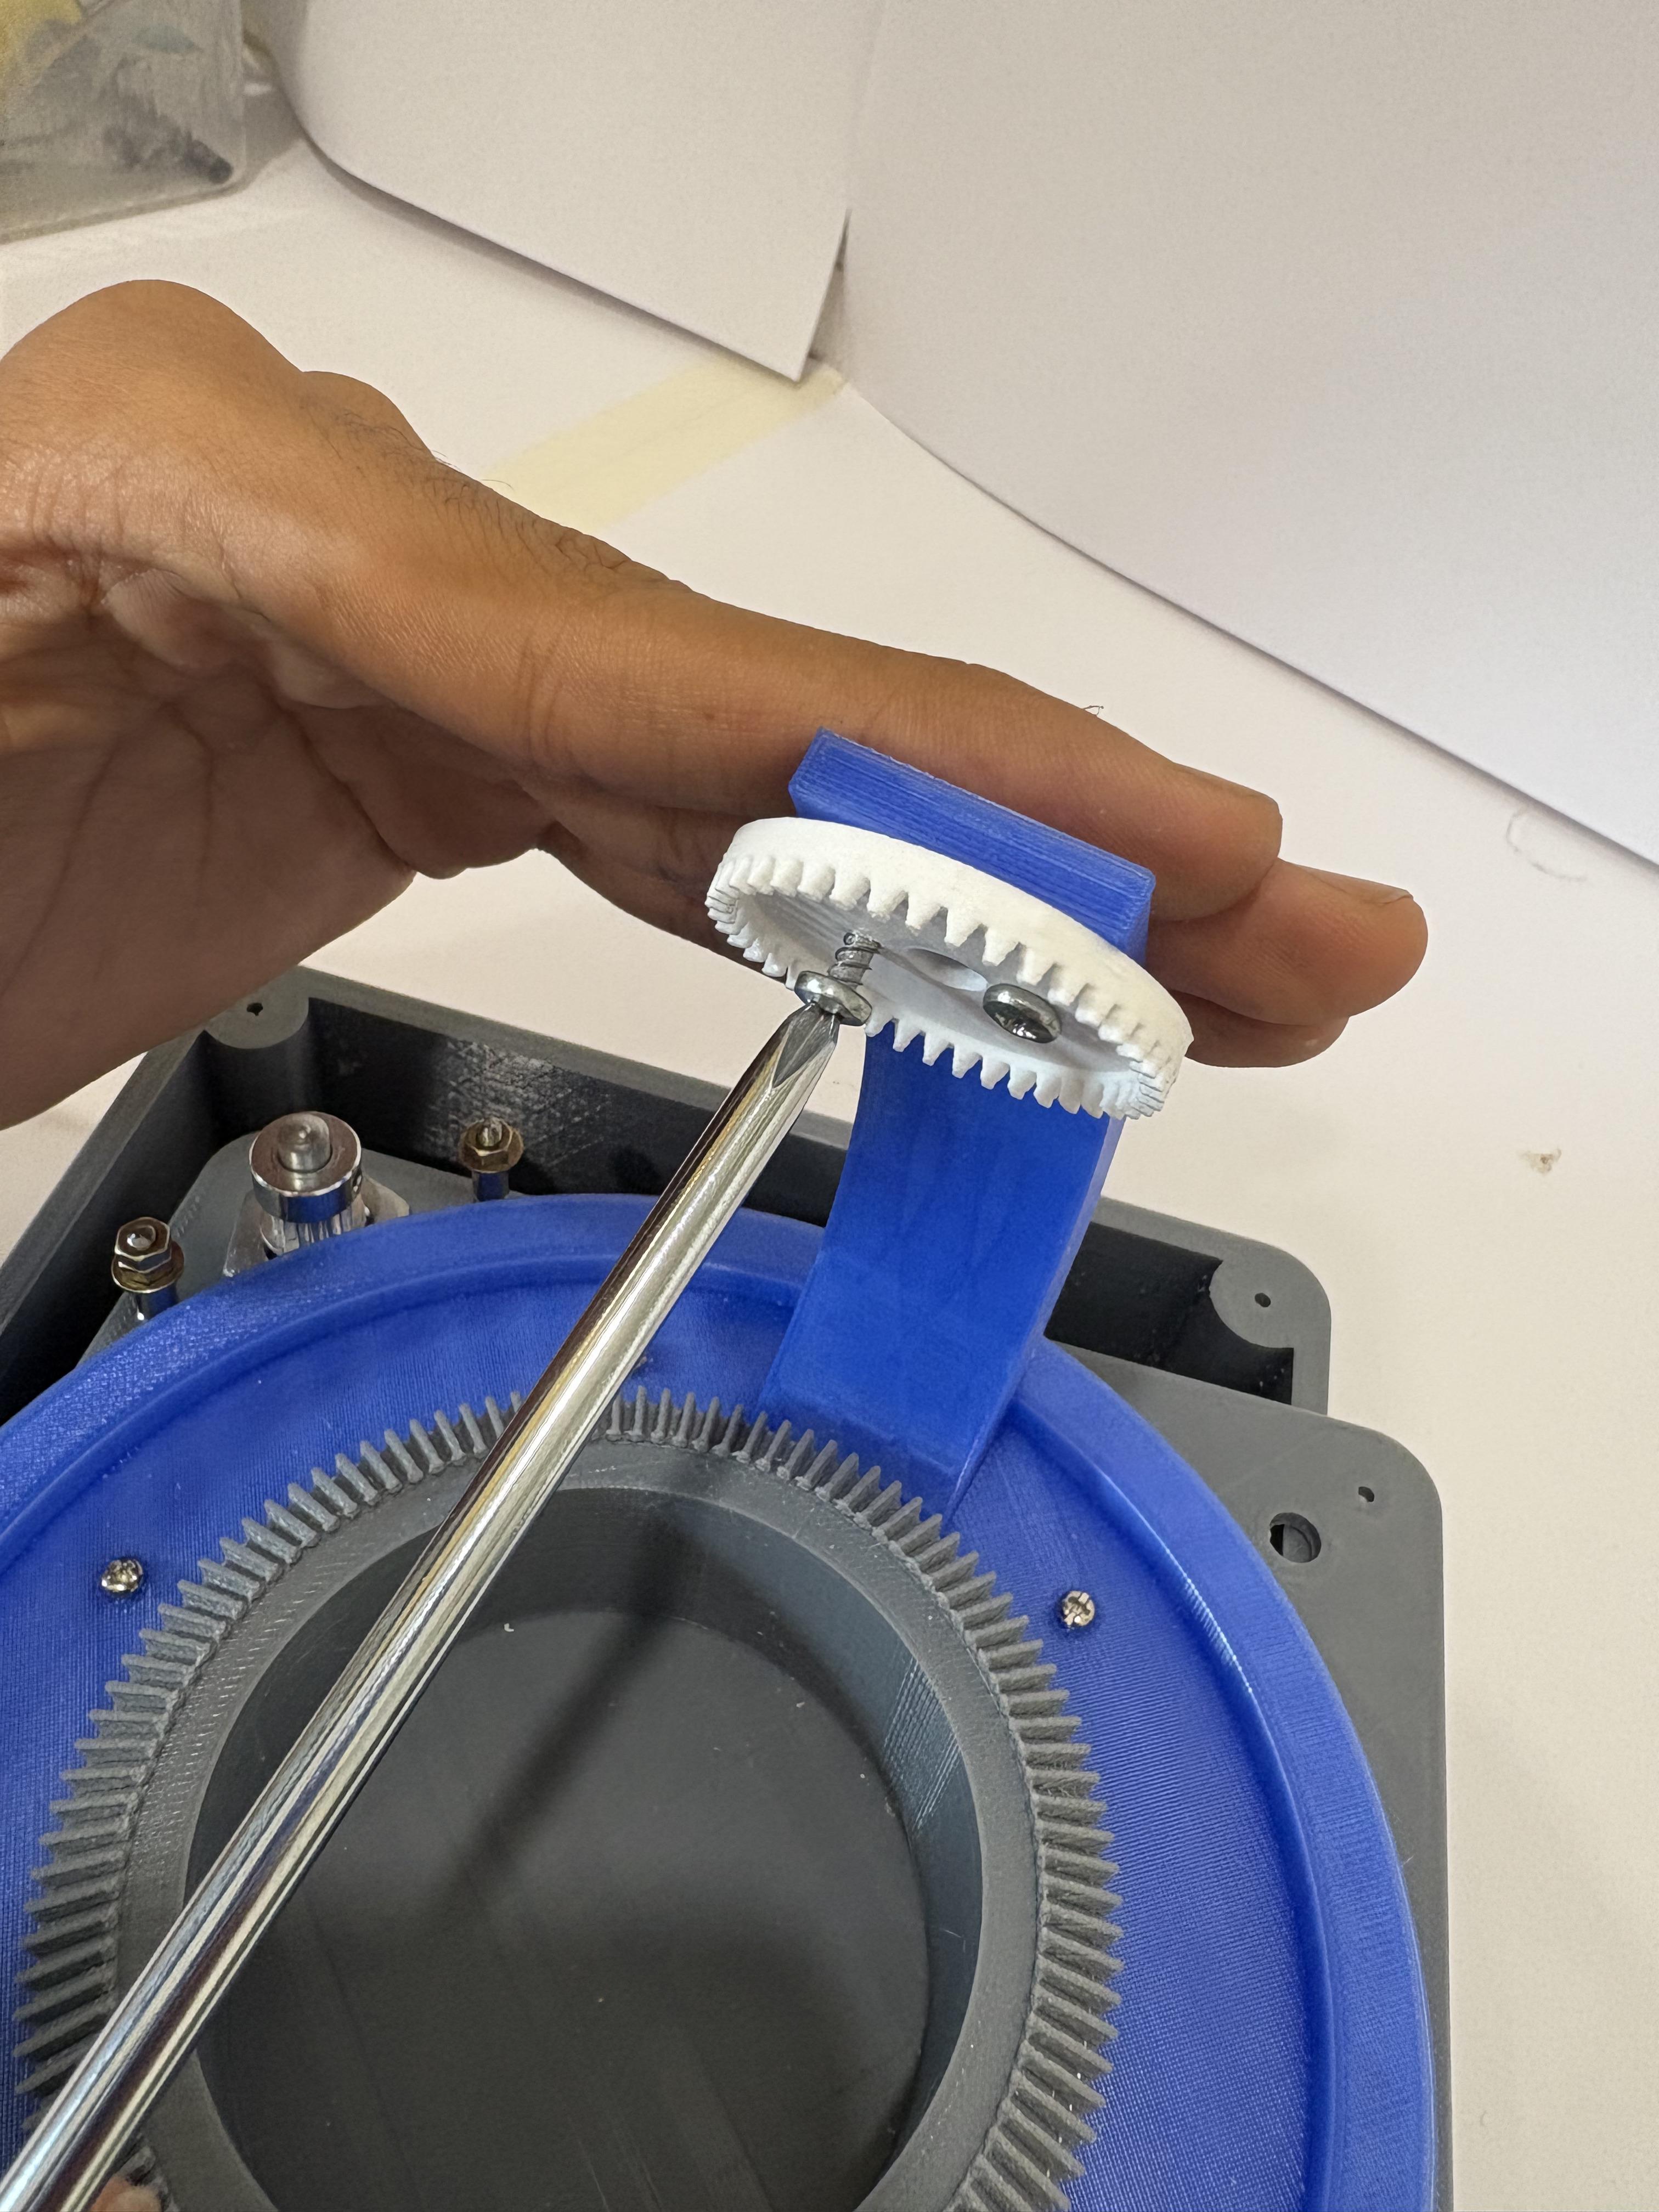
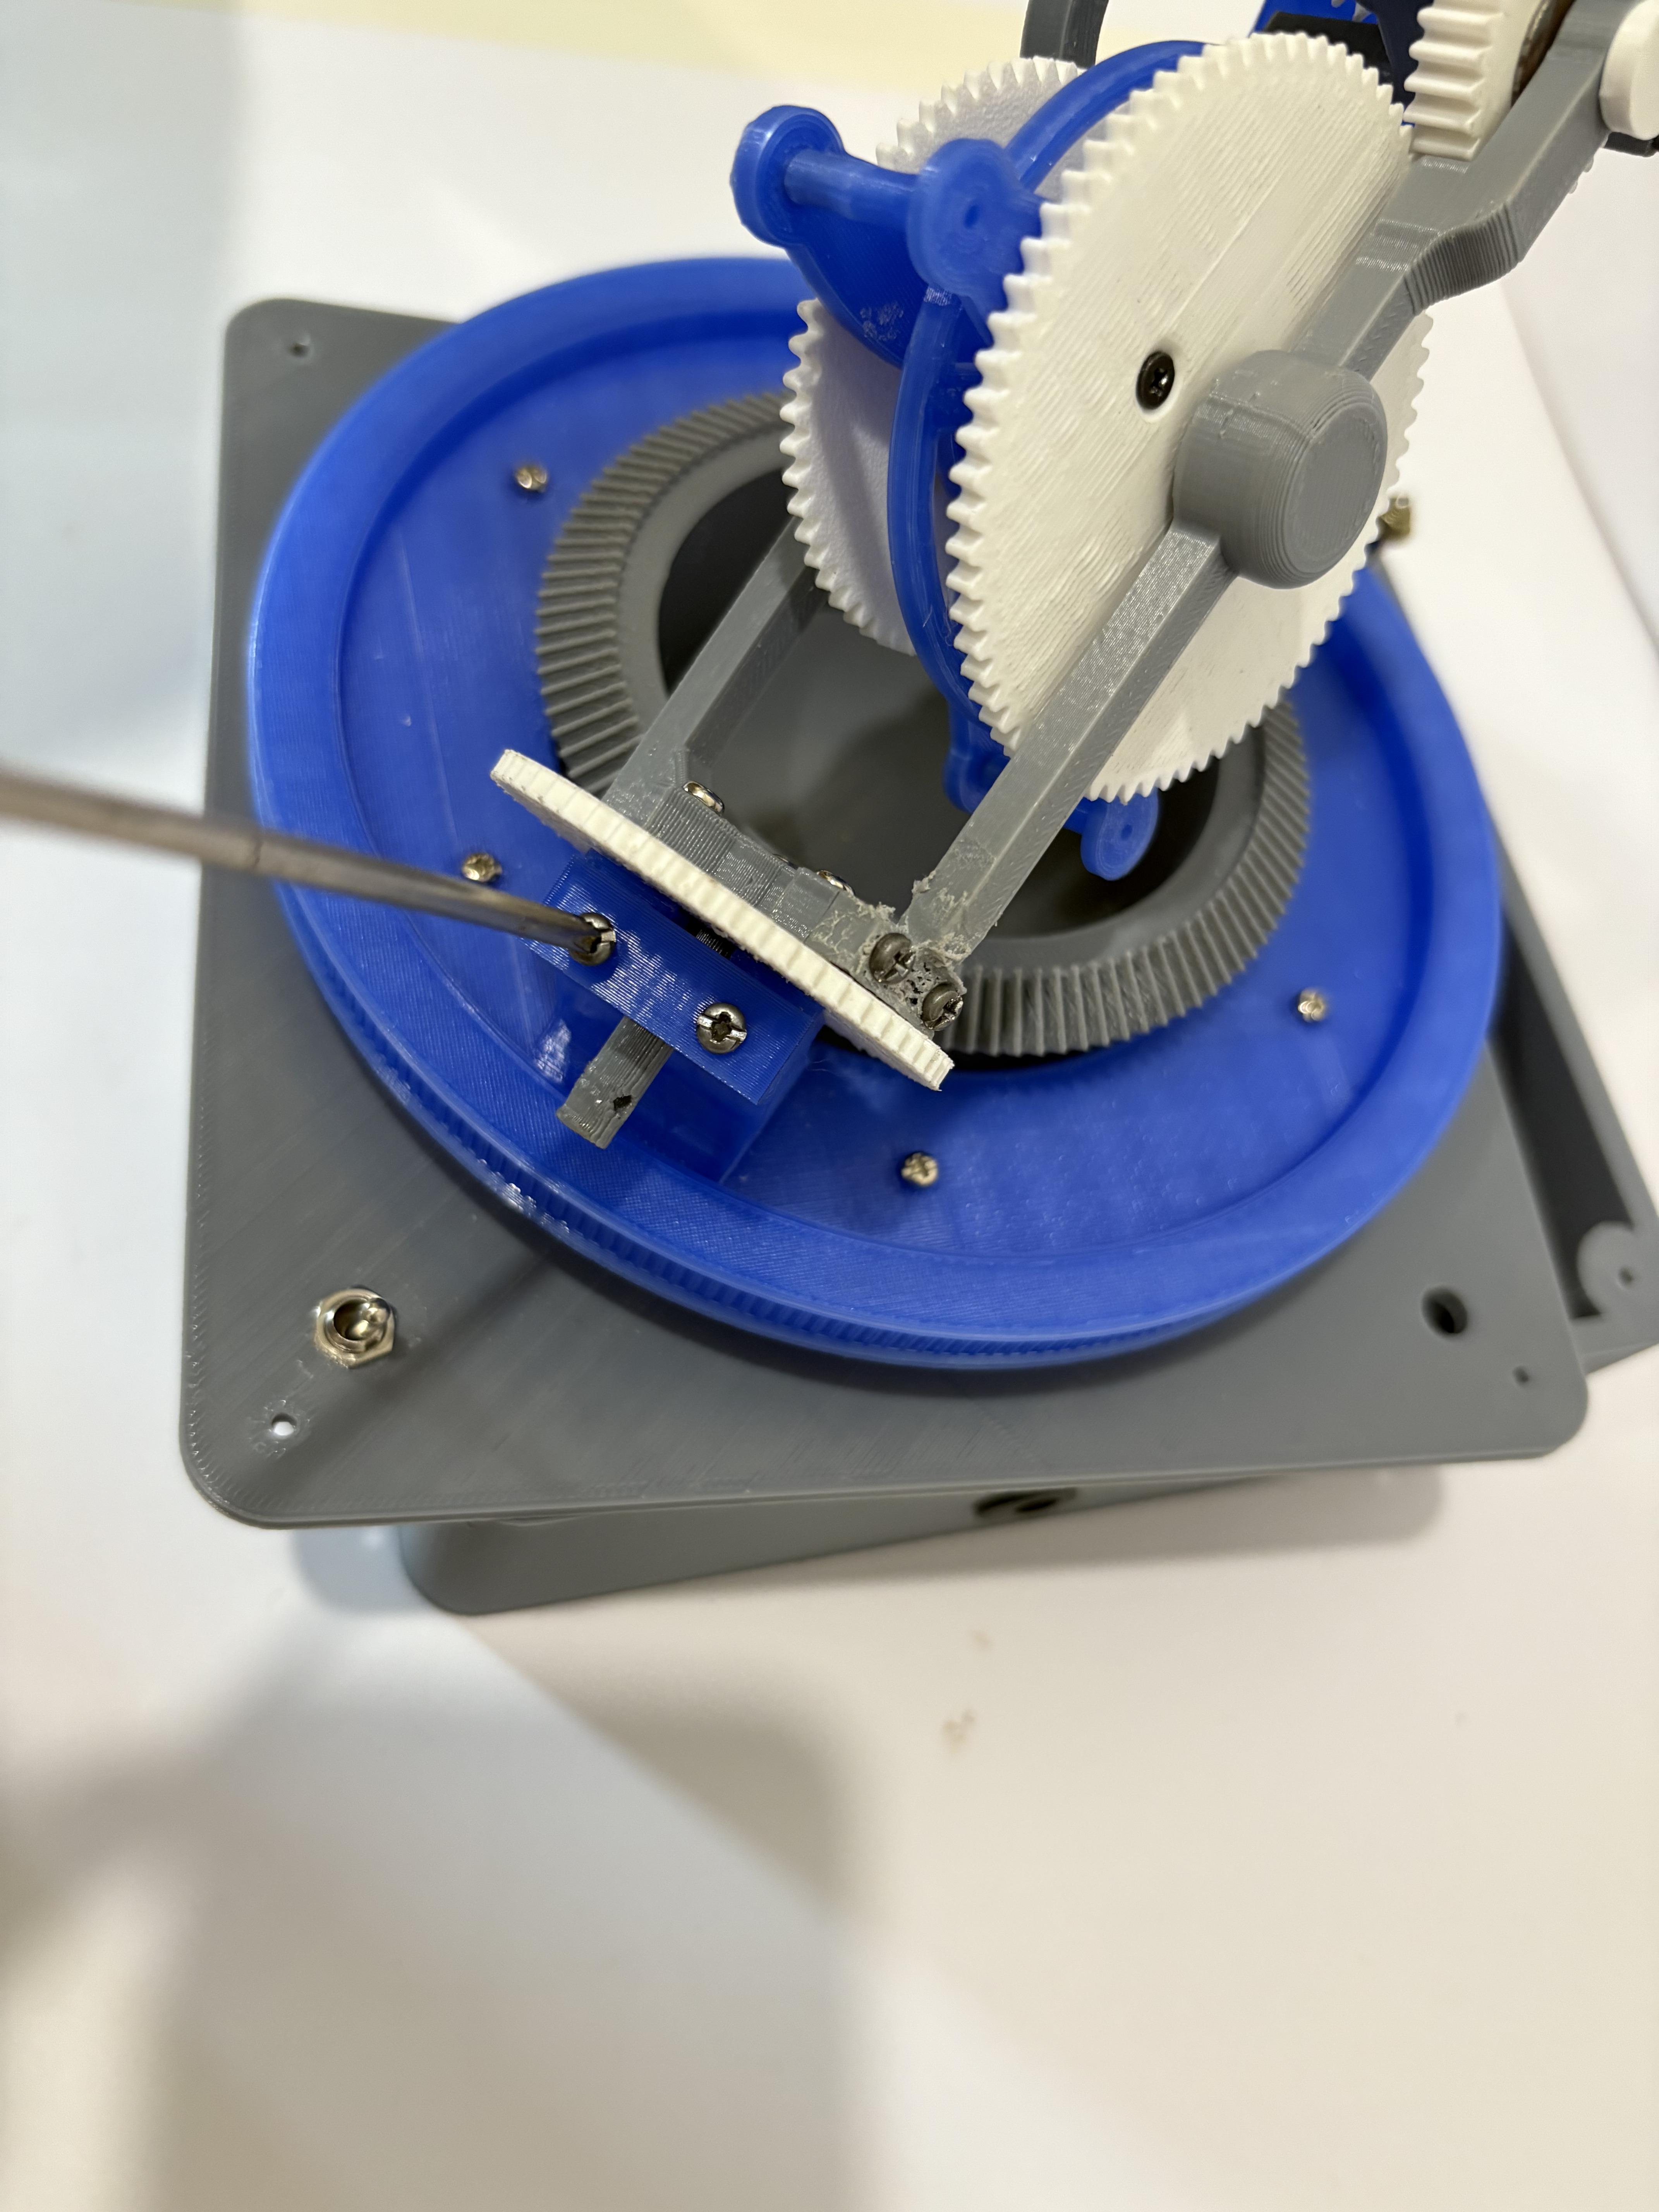

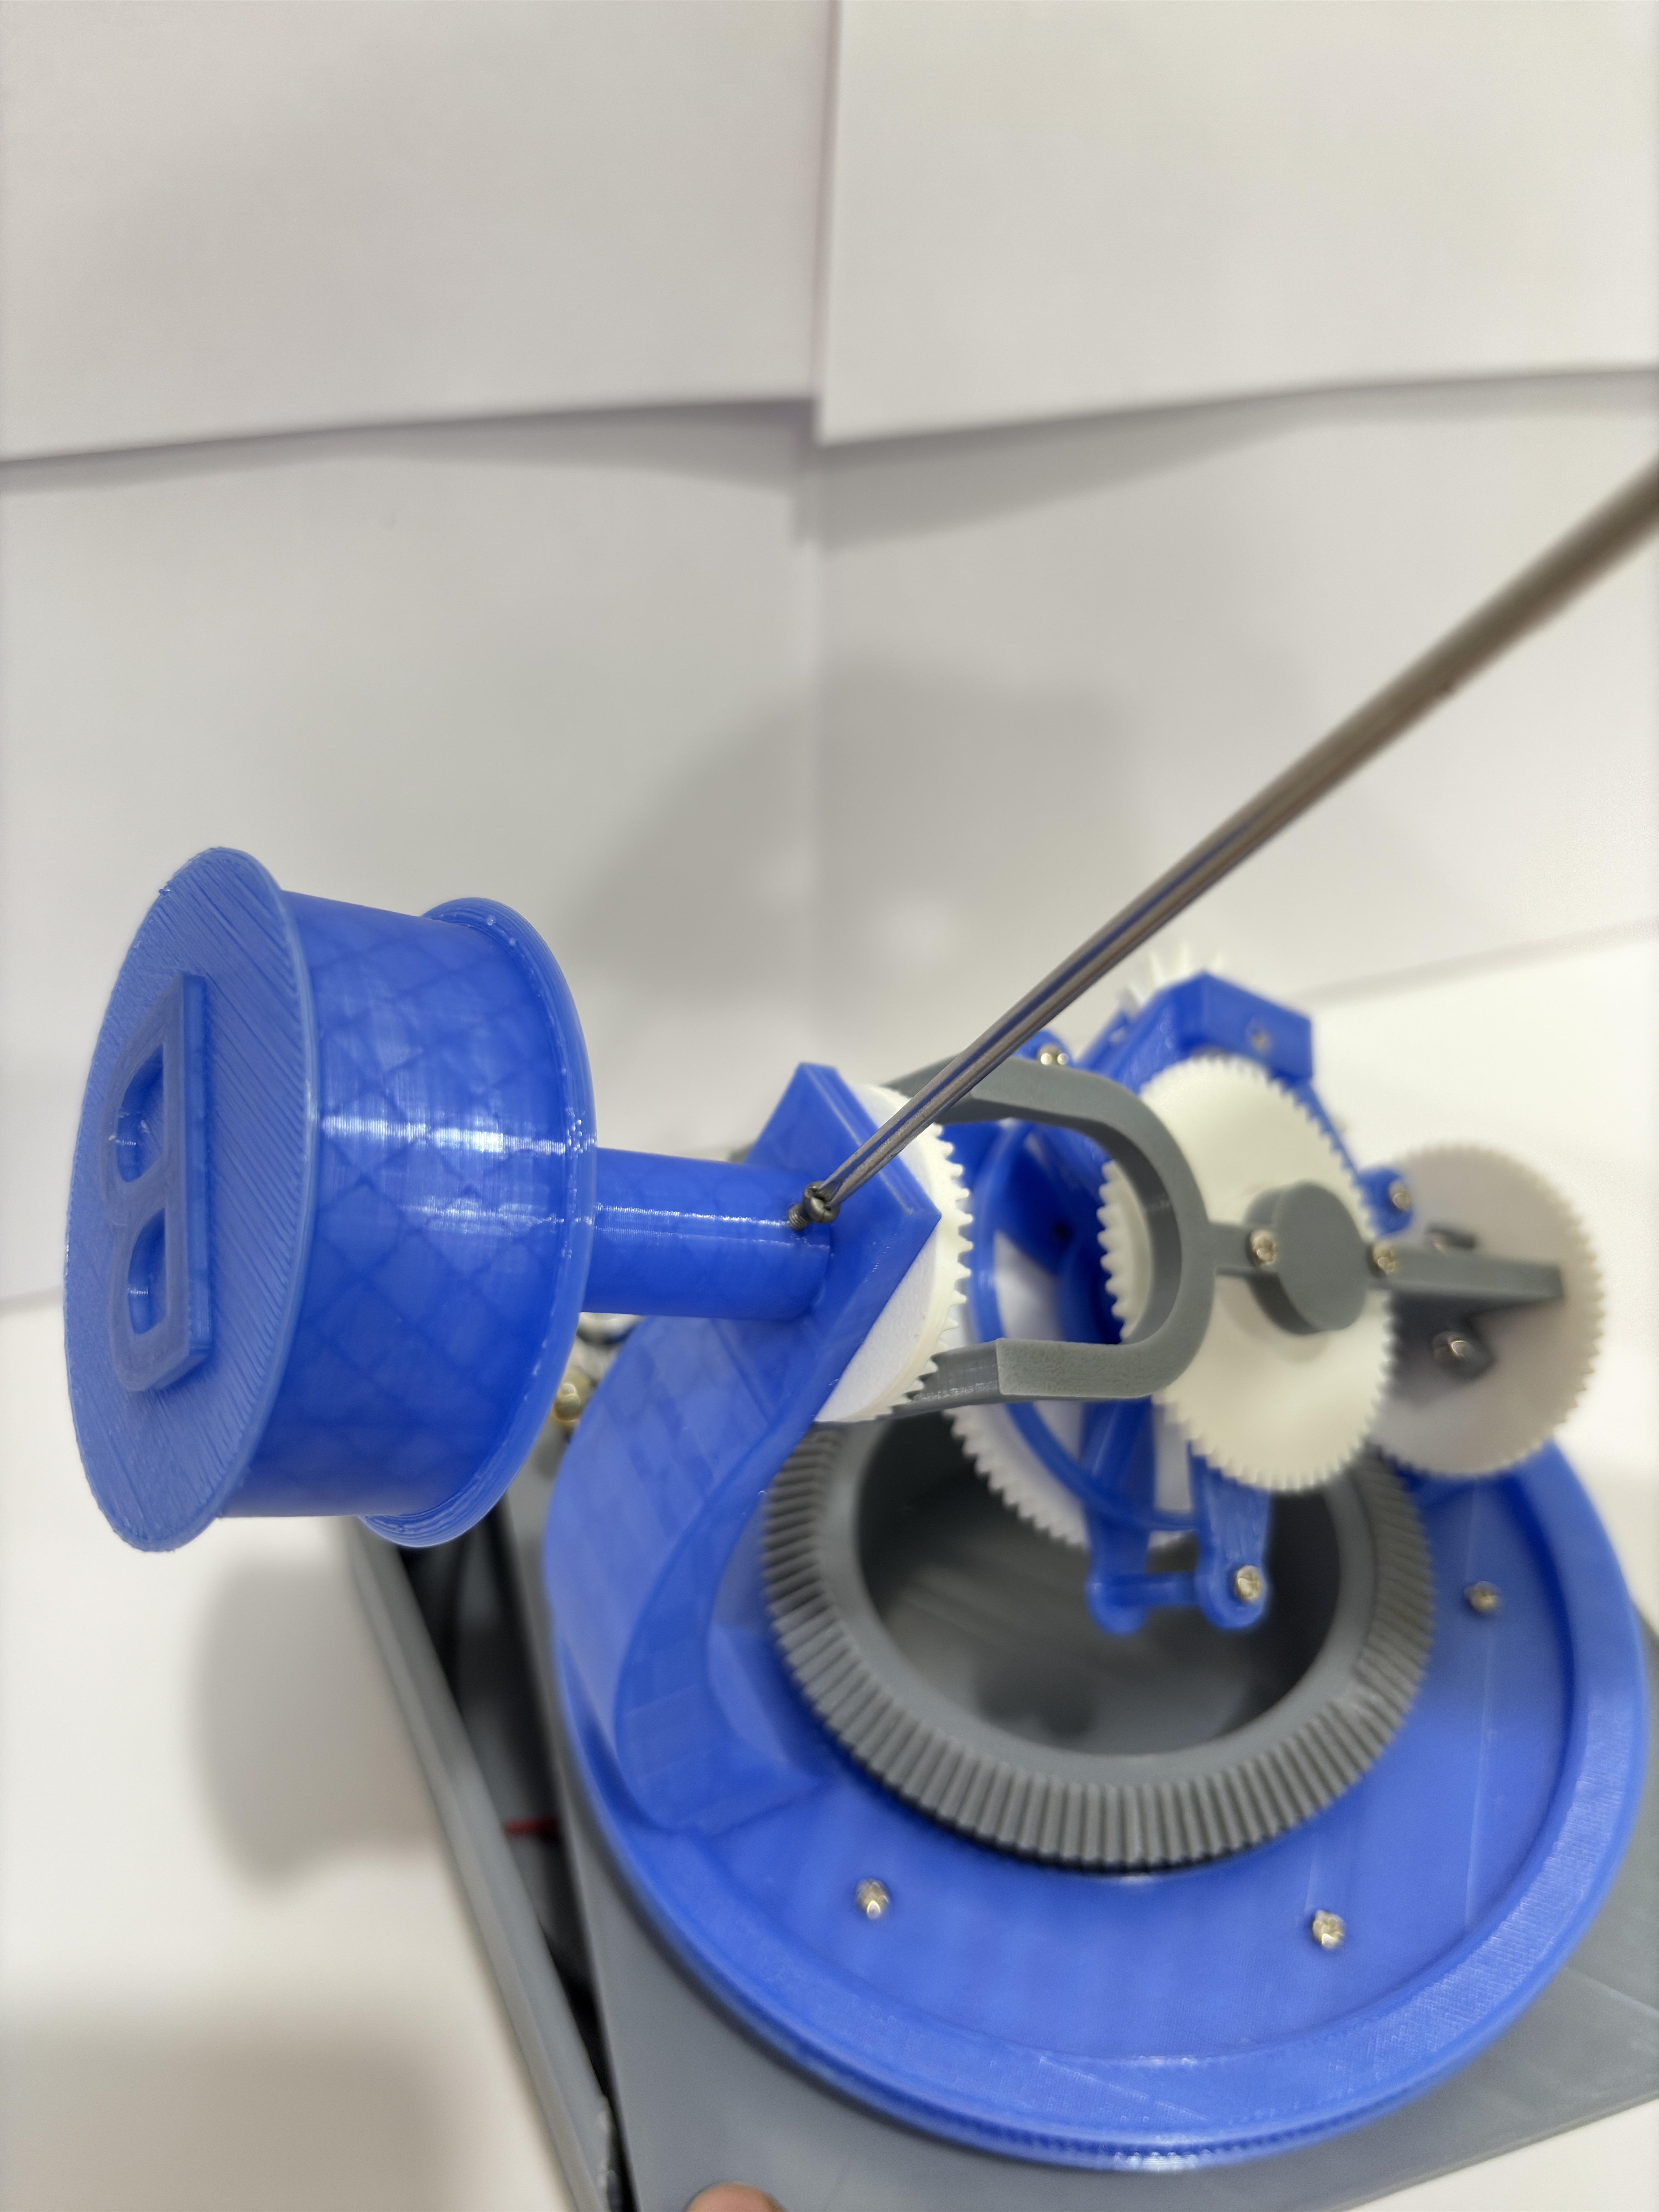

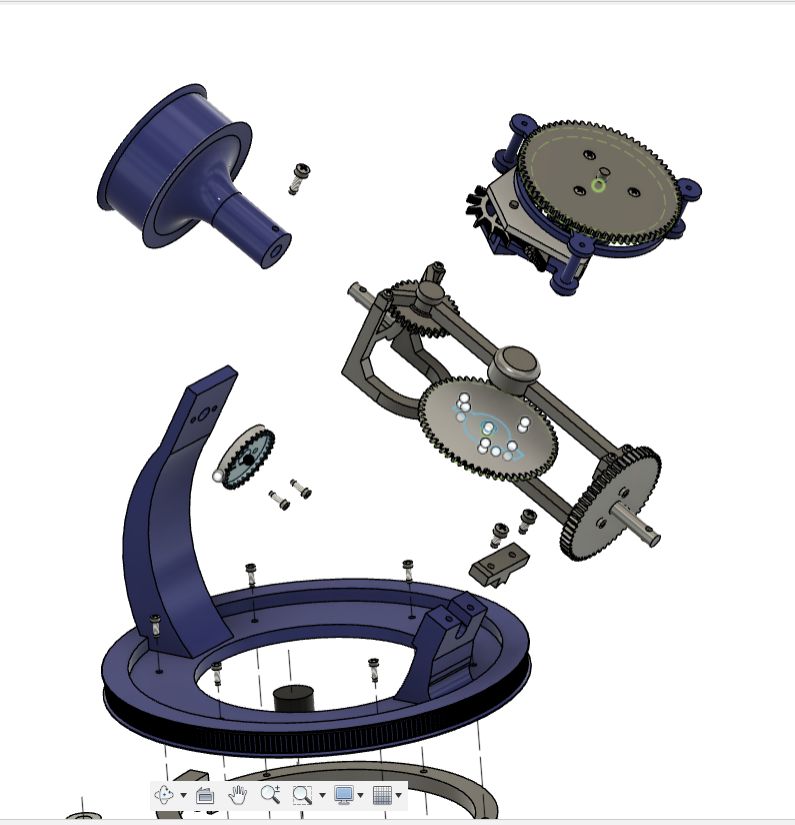
Congratulations on making it this far! You’re almost finished with your mesmerizing tourbillon watch holder. Now, let's integrate all the parts from the previous assemblies to complete the tourbillon.
Step 1: Securing the Inner Tourbillon
- Goal: Attach the inner tourbillon to the rest of the assembly.
- How to do it:
- Align the escapement wheel gear with the EC gear to ensure proper gear engagement.
- Secure the inner tourbillon in place with the tourbillon female part.
- Align the IC gear with the CC gear for smooth gear meshing.
- Check if Assembly 1 (escapement mechanism) rotates freely inside Assembly 2 without any obstruction.
Step 2: Attach the Tourbillon to the Rotating Platform
- Goal: Insert the tourbillon into the rotating platform from Assembly 2.
- How to do it:
- Slide the entire tourbillon through the holes in the rotating platform.
- Align the crown gear with the CC gear.
- Ensure that the RR gear meshes correctly with the ring gear.
- Check if everything spins smoothly. Rotate the platform to make sure the tourbillon is working properly, with all parts rotating as they should.
Step 3: Attach the Watch Drum
- Goal: Secure the watch drum to the assembly.
- How to do it:
- Simply screw the watch drum onto the assembly. This step locks the structure in place.
Step 4: Connect the Timer Belt
- Goal: Attach the timer belt to the motor pulley and adjust the tension.
- How to do it:
- Don’t secure the timer belt directly to the pulley, as it needs a minimum contact area to avoid slipping.
- Use long bolts as tensioners on either side of the motor to adjust the timer belt's tension. This ensures it stays in place and doesn’t slip.
- Adjust the tension of the belt, ensuring it’s not too tight or too loose.
Step 5: Secure the Base Parts
- Goal: Finalize the structure.
- How to do it:
- Screw the base female part to the base male part, securing the entire assembly.
- Your tourbillon should now be fully assembled and ready to work!
Step 6: Final Checks
- Goal: Make sure everything is working smoothly.
- How to do it:
- Test the 3 axial tourbillions to see if they rotate properly. If something isn’t working:
- Check if the gears are misaligned or if there's too much friction.
- Apply Vaseline or grease to reduce friction between gears.
- Double-check the motor’s polarity (it should rotate clockwise).
- Ensure the timer belt tension is adjusted correctly—not too tight or too loose.
Challenges and Solutions:
- Escapement Gear Misalignment:
- Problem: If the inner tourbillon gets stuck due to misalignment of the escapement gear and CC gear, the movement will be obstructed.
- Solution: Use Vaseline or grease to reduce friction and allow smoother rotation.
- Timer Belt Tension Issues:
- Problem: The timer belt might slip or not stay in place.
- Solution: Use long bolts (or any long rod) as tensioners. Secure them to the base female part and adjust the tension of the belt to prevent slippage.
Summary of Key Points:
- Align the Gears: Ensure the escapement wheel gear, EC gear, ITT gear, and CR gear are properly aligned for smooth rotation.
- Test Rotation: Make sure everything rotates freely and smoothly before moving on to the next step.
- Use Grease: Apply grease to reduce friction if parts are not rotating smoothly.
- Adjust Timer Belt Tension: Use tensioners (long bolts) to adjust the timer belt and ensure it doesn't slip.
- Check Motor Polarity: Ensure the motor rotates clockwise for proper gear direction.
Downloads
Conclusion:


Congratulations! You’ve successfully built your very own tourbillon watch holder. After following each step, you now have a mesmerizing piece of engineering art that not only showcases your craftsmanship but also your patience and dedication. The intricate mechanism, the precise gear alignment, and the smooth rotation of the tourbillon are all a testament to your hard work.
Now, it’s time to celebrate your achievement. This beautiful tourbillon holder is ready to display the watch of your choice. Whether it’s a cherished timepiece, a unique custom build, or a gift, place it proudly on your newly completed holder. Let your creation shine and become a conversation piece in any room!
You’ve crafted something truly special, and now it's time to enjoy the fruits of your labour. Well done, and thank you for trusting this guide throughout the process!
Credits:
https://www.thingiverse.com/thing:3615577 - mcmaven ( the escapement wheel and escapement fork are designed I have taken from him.
https://www.youtube.com/@mechanistic3d - I have used his videos as a reference.