🤩 21 Most Beautiful FastLED Arduino Projects 😍
by sharepksn in Circuits > Arduino
35 Views, 0 Favorites, 0 Comments
🤩 21 Most Beautiful FastLED Arduino Projects 😍

Smart LEDs or individually addressable LEDs are very easy to interface with. You only need one GPIO pin on the Arduino. There is a dedicated forum on reddit!
It is easy to learn as you can also tinker with the code online using the free arduino simulator. So, LED the show begin! (pun intended) 😀
Project 1 - Face on a LED Matrix Using Arduino

This project draws a face. The face blinks and stares at you always until you press one of the buttons. FastLED libraries are used in almost all projects extensively. Arduino simulator from wokwi is free and it is used to demonstrate the project to you. The simulator is a great deal as you to can tinker with eh provided code! for free.
Feel free to edit and share the new code (just hit save on the simulator menu bar). Share your creations in the comments below! I will surely reply to each comment!
Here is the LED face project. Open the link in a new window. Press on the Play button so that the simulation can run!
How does it look?
The code is given below:
#include "FastLED.h"
#include "faces.h"
// Matrix size
#define NUM_ROWS 28
#define NUM_COLS 26
// Define pins
#define DATA_PIN 3
#define BUTTON_0 9
#define BUTTON_1 10
#define BUTTON_2 11
// LED brightness
#define BRIGHTNESS 255
// Define the array of leds
#define NUM_LEDS NUM_ROWS * NUM_COLS
CRGB leds[NUM_LEDS];
// Animation controls
byte pressed = 1; // Tracks which face is currently being displayed
bool button0Pressed = false;
bool button1Pressed = false;
bool button2Pressed = false;
void setup() {
  pinMode(BUTTON_0, INPUT_PULLUP);
  pinMode(BUTTON_1, INPUT_PULLUP);
  pinMode(BUTTON_2, INPUT_PULLUP);
  FastLED.addLeds(leds, NUM_LEDS);
  FastLED.setBrightness(BRIGHTNESS);
  mid(); // Start the display with the forward-facing face
}
void loop() {
// Read the button inputs
button0Pressed = digitalRead(BUTTON_0) == LOW;
button1Pressed = digitalRead(BUTTON_1) == LOW;
button2Pressed = digitalRead(BUTTON_2) == LOW; // If an input occured AND it's different than the current face, display that face
if (button0Pressed && !(pressed == 0)) {
pressed = 0;
left();
}
if (button1Pressed && !(pressed == 1)) {
pressed = 1;
mid();
}
if (button2Pressed && !(pressed == 2)) {
pressed = 2;
right();
} // Blink the eyes ocassionally
EVERY_N_MILLISECONDS_I(blinktime, 1000) {
blinking();
// After blinking, return to the previous face
switch (pressed) {
case 0: left(); break;
case 1: mid(); break;
case 2: right(); break;
}
// Set the next blink delay
blinktime.setPeriod( random16(1000, 3000) );
}
}// Face-related functions:
void mid() {
// Read the forward face from PROGMEM, then display it.
for (int i = 0; i < NUM_LEDS; i++) {
leds[i] = pgm_read_dword_near(IdleFace + i);
}
FastLED.show();
}void left() {
// Read the left face from PROGMEM, then display it.
for (int i = 0; i < NUM_LEDS; i++) {
leds[i] = pgm_read_dword_near(LeftFace + i);
}
FastLED.show();
}void right() {
// Read the right face from PROGMEM, then display it.
for (int i = 0; i < NUM_LEDS; i++) {
leds[i] = pgm_read_dword_near(RightFace + i);
}
FastLED.show();
}void blinking() {
// Pick the appropriate blinking face based on the current facing
switch (pressed) {
case 0: leftB(); break;
case 1: midB(); break;
case 2: rightB(); break;
}
}void midB() {
// Read the right face from PROGMEM, then display it.
for (int i = 0; i < NUM_LEDS; i++) {
leds[i] = pgm_read_dword_near(IdleBlink + i);
}
FastLED.show();
// Hold the blink for 50 milliseconds so the blink is visible
delay(50);
}void leftB() {
// Read the right face from PROGMEM, then display it.
for (int i = 0; i < NUM_LEDS; i++) {
leds[i] = pgm_read_dword_near(LeftBlink + i);
}
FastLED.show();
// Hold the blink for 50 milliseconds so the blink is visible
delay(50);
}void rightB() {
// Read the right face from PROGMEM, then display it.
for (int i = 0; i < NUM_LEDS; i++) {
leds[i] = pgm_read_dword_near(RightBlink + i);
}
FastLED.show();
// Hold the blink for 50 milliseconds so the blink is visible
delay(50);
}Project 2: a LED Ring With 50 LEDs - FastLED Arduino Projects

The LED ring has 50 LEDs. you can change the number of the LEDs in the simulation window if you edit the diagram.json file.
Here is the direct project link you can edit the code in the same link and play with the simulation. Hope you too create something wonderful!
The simulation on the Arduino simulator looks like this
Code:
#include <FastLED.h>

#define LED_PIN     3
#define NUM_LEDS    50
#define BRIGHTNESS  255
#define LED_TYPE    WS2811
#define COLOR_ORDER GRB
CRGB leds[NUM_LEDS];
#define UPDATES_PER_SECOND 100
// This example shows several ways to set up and use 'palettes' of colors
// with FastLED.
//
// These compact palettes provide an easy way to re-colorize your
// animation on the fly, quickly, easily, and with low overhead.
//
// USING palettes is MUCH simpler in practice than in theory, so first just
// run this sketch, and watch the pretty lights as you then read through
// the code.  Although this sketch has eight (or more) different color schemes,
// the entire sketch compiles down to about 6.5K on AVR.
//
// FastLED provides a few pre-configured color palettes, and makes it
// extremely easy to make up your own color schemes with palettes.
//
// Some notes on the more abstract 'theory and practice' of
// FastLED compact palettes are at the bottom of this file.
CRGBPalette16 currentPalette;
TBlendType    currentBlending;
extern CRGBPalette16 myRedWhiteBluePalette;
extern const TProgmemPalette16 myRedWhiteBluePalette_p PROGMEM;
void setup() {
    delay( 3000 ); // power-up safety delay
    FastLED.addLeds(leds, NUM_LEDS).setCorrection( TypicalLEDStrip );
    FastLED.setBrightness(  BRIGHTNESS );
currentPalette = RainbowColors_p;
currentBlending = LINEARBLEND;
}void loop()
{
ChangePalettePeriodically(); static uint8_t startIndex = 0;
startIndex = startIndex + 1; /* motion speed */FillLEDsFromPaletteColors( startIndex);
    FastLED.show();
    FastLED.delay(1000 / UPDATES_PER_SECOND);
}
void FillLEDsFromPaletteColors( uint8_t colorIndex)
{
uint8_t brightness = 255; for( int i = 0; i < NUM_LEDS; i++) {
leds[i] = ColorFromPalette( currentPalette, colorIndex, brightness, currentBlending);
colorIndex += 3;
}
}// There are several different palettes of colors demonstrated here. // // FastLED provides several 'preset' palettes: RainbowColors_p, RainbowStripeColors_p, // OceanColors_p, CloudColors_p, LavaColors_p, ForestColors_p, and PartyColors_p. // // Additionally, you can manually define your own color palettes, or you can write // code that creates color palettes on the fly. All are shown here.
void ChangePalettePeriodically()
{
    uint8_t secondHand = (millis() / 1000) % 60;
    static uint8_t lastSecond = 99;
if( lastSecond != secondHand) {
lastSecond = secondHand;
if( secondHand == 0) { currentPalette = RainbowColors_p; currentBlending = LINEARBLEND; }
if( secondHand == 10) { currentPalette = RainbowStripeColors_p; currentBlending = NOBLEND; }
if( secondHand == 15) { currentPalette = RainbowStripeColors_p; currentBlending = LINEARBLEND; }
if( secondHand == 20) { SetupPurpleAndGreenPalette(); currentBlending = LINEARBLEND; }
if( secondHand == 25) { SetupTotallyRandomPalette(); currentBlending = LINEARBLEND; }
if( secondHand == 30) { SetupBlackAndWhiteStripedPalette(); currentBlending = NOBLEND; }
if( secondHand == 35) { SetupBlackAndWhiteStripedPalette(); currentBlending = LINEARBLEND; }
if( secondHand == 40) { currentPalette = CloudColors_p; currentBlending = LINEARBLEND; }
if( secondHand == 45) { currentPalette = PartyColors_p; currentBlending = LINEARBLEND; }
if( secondHand == 50) { currentPalette = myRedWhiteBluePalette_p; currentBlending = NOBLEND; }
if( secondHand == 55) { currentPalette = myRedWhiteBluePalette_p; currentBlending = LINEARBLEND; }
}
}// This function fills the palette with totally random colors.
void SetupTotallyRandomPalette()
{
for( int i = 0; i < 16; i++) {
currentPalette[i] = CHSV( random8(), 255, random8());
}
}// This function sets up a palette of black and white stripes,
// using code. Since the palette is effectively an array of
// sixteen CRGB colors, the various fill_* functions can be used
// to set them up.
void SetupBlackAndWhiteStripedPalette()
{
// 'black out' all 16 palette entries...
fill_solid( currentPalette, 16, CRGB::Black);
// and set every fourth one to white.
currentPalette[0] = CRGB::White;
currentPalette[4] = CRGB::White;
currentPalette[8] = CRGB::White;
currentPalette[12] = CRGB::White;}
// This function sets up a palette of purple and green stripes.
void SetupPurpleAndGreenPalette()
{
    CRGB purple = CHSV( HUE_PURPLE, 255, 255);
    CRGB green  = CHSV( HUE_GREEN, 255, 255);
    CRGB black  = CRGB::Black;
currentPalette = CRGBPalette16(
green, green, black, black,
purple, purple, black, black,
green, green, black, black,
purple, purple, black, black );
}// This example shows how to set up a static color palette
// which is stored in PROGMEM (flash), which is almost always more
// plentiful than RAM. A static PROGMEM palette like this
// takes up 64 bytes of flash.
const TProgmemPalette16 myRedWhiteBluePalette_p PROGMEM =
{
CRGB::Red,
CRGB::Gray, // 'white' is too bright compared to red and blue
CRGB::Blue,
CRGB::Black, CRGB::Red,
CRGB::Gray,
CRGB::Blue,
CRGB::Black, CRGB::Red,
CRGB::Red,
CRGB::Gray,
CRGB::Gray,
CRGB::Blue,
CRGB::Blue,
CRGB::Black,
CRGB::Black
};// Additional notes on FastLED compact palettes: // // Normally, in computer graphics, the palette (or "color lookup table") // has 256 entries, each containing a specific 24-bit RGB color. You can then // index into the color palette using a simple 8-bit (one byte) value. // A 256-entry color palette takes up 768 bytes of RAM, which on Arduino // is quite possibly "too many" bytes. // // FastLED does offer traditional 256-element palettes, for setups that // can afford the 768-byte cost in RAM. // // However, FastLED also offers a compact alternative. FastLED offers // palettes that store 16 distinct entries, but can be accessed AS IF // they actually have 256 entries; this is accomplished by interpolating // between the 16 explicit entries to create fifteen intermediate palette // entries between each pair. // // So for example, if you set the first two explicit entries of a compact // palette to Green (0,255,0) and Blue (0,0,255), and then retrieved // the first sixteen entries from the virtual palette (of 256), you'd get // Green, followed by a smooth gradient from green-to-blue, and then Blue.
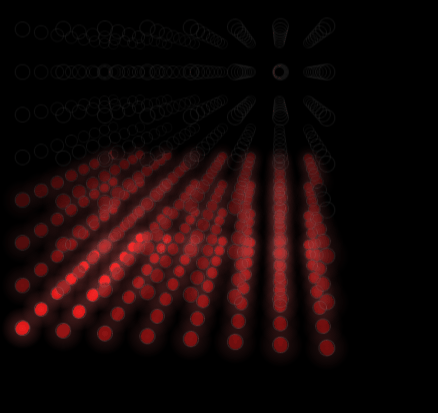
Project 3: 16 LED Strips With 16 LEDs Each - FastLED Arduino Projects

Enjoy this beautiful bunch of 16 strips. In total there are 256 LEDs. The LEDs are driven by Arduino Mega.
The code is given below. can you create one unique pattern? Have you wondered about power consumption or power dissipation?
The project link is here: 16 LED strips
Code:
#include

#define PIN 5
#define NUM_LEDS 256
CRGB leds[NUM_LEDS];
byte effect = 1;
void setup() {
  Serial.begin(9600);
  Serial.println("Initializing...");
  FastLED.addLeds(leds, NUM_LEDS).setCorrection(TypicalLEDStrip);
}
void loop() { if (effect > 5) {
effect = 1;
} Serial.print("Effect: ");
Serial.println(effect); switch (effect) { case 1: {
// CylonBounce - Color (red, green, blue), eye size, speed delay, end pause
cylonBounce(0xff, 0x00, 0x00, 4, 10, 10);
break;
} case 2: {
// colorWipe - Color (red, green, blue), speed delay
colorWipe(0xff, 0x00, 0x00, 10);
colorWipe(0x00, 0x00, 0x00, 10);
break;
} case 3: {
// FadeInOut - Color (red, green. blue)
fadeInOut(0xff, 0x00, 0x00); // red
break;
} case 4: {
// Strobe - Color (red, green, blue), number of flashes, flash speed, end pause
strobe(0xff, 0x00, 0x00, 10, 50, 1000);
break;
} case 5: {
// rainbowCycle - speed delay
rainbowCycle(10);
break;
}}
  effect++;
}
void fadeInOut(byte red, byte green, byte blue) {
  float r, g, b;
for (int k = 0; k < 256; k = k + 1) {
r = (k / 256.0) * red;
g = (k / 256.0) * green;
b = (k / 256.0) * blue;
setAll(r, g, b);
showStrip();
} for (int k = 255; k >= 0; k = k - 2) {
r = (k / 256.0) * red;
g = (k / 256.0) * green;
b = (k / 256.0) * blue;
setAll(r, g, b);
showStrip();
}
}void strobe(byte red, byte green, byte blue, int StrobeCount, int FlashDelay, int EndPause) {
for (int j = 0; j < StrobeCount; j++) {
setAll(red, green, blue);
showStrip();
delay(FlashDelay);
setAll(0, 0, 0);
showStrip();
delay(FlashDelay);
}delay(EndPause); }
void cylonBounce(byte red, byte green, byte blue, int EyeSize, int SpeedDelay, int ReturnDelay) { for (int i = 0; i < NUM_LEDS - EyeSize - 2; i++) {
setAll(0, 0, 0);
setPixel(i, red / 10, green / 10, blue / 10);
for (int j = 1; j <= EyeSize; j++) {
setPixel(i + j, red, green, blue);
}
setPixel(i + EyeSize + 1, red / 10, green / 10, blue / 10);
showStrip();
delay(SpeedDelay);
}delay(ReturnDelay);
  for (int i = NUM_LEDS - EyeSize - 2; i > 0; i--) {
    setAll(0, 0, 0);
    setPixel(i, red / 10, green / 10, blue / 10);
    for (int j = 1; j <= EyeSize; j++) {
      setPixel(i + j, red, green, blue);
    }
    setPixel(i + EyeSize + 1, red / 10, green / 10, blue / 10);
    showStrip();
    delay(SpeedDelay);
  }
delay(ReturnDelay); }
void colorWipe(byte red, byte green, byte blue, int SpeedDelay) {
  for (uint16_t i = 0; i < NUM_LEDS; i++) {
    setPixel(i, red, green, blue);
    showStrip();
    delay(SpeedDelay);
  }
}
void rainbowCycle(int SpeedDelay) {
byte *c;
uint16_t i, j; for (j = 0; j < 256 * 5; j++) { // 5 cycles of all colors on wheel
for (i = 0; i < NUM_LEDS; i++) {
c = wheel(((i * 256 / NUM_LEDS) + j) & 255);
setPixel(i, *c, *(c + 1), *(c + 2));
}
showStrip();
delay(SpeedDelay);
}
}// Used by rainbowCycle
byte * wheel(byte WheelPos) {
static byte c[3]; if (WheelPos < 85) {
c[0] = WheelPos * 3;
c[1] = 255 - WheelPos * 3;
c[2] = 0;
} else if (WheelPos < 170) {
WheelPos -= 85;
c[0] = 255 - WheelPos * 3;
c[1] = 0;
c[2] = WheelPos * 3;
} else {
WheelPos -= 170;
c[0] = 0;
c[1] = WheelPos * 3;
c[2] = 255 - WheelPos * 3;
}return c; }
// Apply LED color changes
void showStrip() {
  FastLED.show();
}
// Set a LED color
void setPixel(int Pixel, byte red, byte green, byte blue) {
leds[Pixel].r = red;
leds[Pixel].g = green;
leds[Pixel].b = blue;
}// Set all LEDs to a given color and apply it
void setAll(byte red, byte green, byte blue) {
for (int i = 0; i < NUM_LEDS; i++ ) {
setPixel(i, red, green, blue);
}
showStrip();
}Project 4: FastLED Fire Project on Arduino Simulator

This Project is awesome. It has an Arduino Mega interfaced to an RTC. The LED matrix is used to display the analog time, in a style!
The project like is here: FastLED Fire Clock project
Code:
#include
#include

#include
#include
// thanks to Emmett Lathrop Brown
#define ENABLE_FLUX_CAPACITOR 0
// RTC module at address 0x68
#define DS1307_ADDRESS 0x68
// LCD module at address 0x27
LiquidCrystal_I2C lcd(0x27, 20, 4);
uint8_t clear = 0x00;
#define WIDTH 32
#define HEIGHT 32
#define NUM_LEDS ((WIDTH) * (HEIGHT))
CRGB leds[NUM_LEDS + 1];
byte heat[WIDTH][HEIGHT];
byte *heat1d = (byte *) heat;
uint16_t XY(const uint8_t x, const uint8_t y) {
  if (x >= WIDTH) return NUM_LEDS;
  if (y >= HEIGHT) return NUM_LEDS;
  // if (y & 1)
  //   return (y + 1) * WIDTH - 1 - x;
  // else
  return y * WIDTH + x;
}
#include "wuLineAA.h"
struct DS1307_tm {
  union {
    struct {
      uint8_t seconds, minutes, hours;
      uint8_t wday, mday, month, year;
    };
    uint8_t raw[7];
  };
} tm;
void ds1307_read() {
// Read the values (date and time) of the DS1307 module
Wire.beginTransmission(DS1307_ADDRESS);
Wire.write(clear);
Wire.endTransmission();
Wire.requestFrom(DS1307_ADDRESS, 0x07); for (uint8_t i = 0; i < 7; i++)
tm.raw[i] = bcdToDec(Wire.read());
}void setup()
{
FastLED.addLeds(leds, NUM_LEDS);
Wire.begin();
Serial.begin(9600);
lcd.begin (16, 2);
lcd.backlight();
// Use a line below to customize a date and time
// sec, min, hour, wday, mday, month, year % 100
// setDateTime(50, 59, 23, 7, 28, 2, 21);
// setDateTime(00, 29, 04, 4, 21, 2, 15);
// setDateTime(00, 46, 07, 4, 21, 2, 15);
// setDateTime(00, 20, 01, 7, 26, 10, 85);
ds1307_read();
}void loop()
{
if (ENABLE_FLUX_CAPACITOR) {
tm.seconds += ENABLE_FLUX_CAPACITOR;
while (tm.seconds >= 60) ++tm.minutes, tm.seconds -= 60;
while (tm.minutes >= 60) ++tm.hours, tm.minutes -= 60;
while (tm.hours >= 24) ++tm.mday, ++tm.wday, tm.hours -= 24;
while (tm.wday >= 8) tm.wday -= 7;
while (tm.mday > 31) ++tm.month, tm.mday = 1; // i'm sure this is correct :p
while (tm.month > 12) ++tm.year, tm.month = 1;
ledclock(tm.hours, tm.minutes, tm.seconds);
} else
ds1307_read();// update LEDs regularly ledclock(tm.hours, tm.minutes, tm.seconds);
  // update LCD once per second
  static uint8_t last_seconds = 255;
  if (last_seconds == tm.seconds)
    return;
  last_seconds = tm.seconds;
// flash the time separator
char time_sep = ':';
if (tm.seconds & 1)
time_sep = ' '; // format the first line into a temporary buffer
char strbuf[17];
snprintf(strbuf, 17, "%02d%c%02d%c%02d",
tm.hours, time_sep, tm.minutes, time_sep, tm.seconds);
lcd.setCursor(4, 0);
lcd.print(strbuf); // update 2nd line only when it changes
static uint8_t last_wday = 255;
if (last_wday == tm.wday)
return;
last_wday = tm.wday; // format the second line
const char day_str[] = "NulSunMonTueWedThuFriSat";
uint16_t year = 2000 + tm.year;
if (year > 2038)
year -= 100;
snprintf(strbuf, 17, "%4d-%02d-%02d @@@",
year, tm.month, tm.mday);
memcpy(strbuf + 11, day_str + tm.wday * 3, 3);
lcd.setCursor(1, 1);
lcd.print(strbuf);
}// Set the date and time of the DS1307
void setDateTime(uint8_t seconds, uint8_t minutes, uint8_t hours,
uint8_t wday, uint8_t mday, uint8_t month, uint8_t year)
{
Wire.beginTransmission(DS1307_ADDRESS);
Wire.write(clear); // Write clear, so that it can receive data// The lines below write in the CI the date and time values // that were placed in the variables above Wire.write(decToBcd(seconds)); Wire.write(decToBcd(minutes)); Wire.write(decToBcd(hours)); Wire.write(decToBcd(wday)); Wire.write(decToBcd(mday)); Wire.write(decToBcd(month)); Wire.write(decToBcd(year)); Wire.write(clear); Wire.endTransmission(); }
uint8_t decToBcd(uint8_t value)
{
  // Converts the decimal number to BCD
  return ((value / 10 * 16) + (value % 10));
}
uint8_t bcdToDec(uint8_t value)
{
// Converts from BCD to decimal
return ((value / 16 * 10) + (value % 16));
}// LED matrix analogue clock
void wuVectorAA(const uint16_t x, const uint16_t y, const uint16_t length, const uint16_t theta, CRGB *col) {
int16_t dx, dy;
dx = ((int32_t)cos16(theta) * length) / 32768;
dy = ((int32_t)sin16(theta) * length) / 32768;
wuLineAA(x, y, x + dx, y + dy, col);
}void wuVectorAA8(const uint16_t x, const uint16_t y, const uint16_t length, const uint16_t theta) {
int16_t dx, dy;
dx = ((int32_t)cos16(theta) * length) / 32768;
dy = ((int32_t)sin16(theta) * length) / 32768;
wuLineAA8(x, y, x + dx, y + dy);
}void ledclock(const uint8_t &hours, const uint8_t &minutes, const uint8_t &seconds) {
// FastLED.clear();
// everything is fixed-point, with 8-bits of fraction
uint16_t centrex = WIDTH * 128 - 128;
uint16_t centrey = HEIGHT * 128 - 128;
uint16_t length = WIDTH * 128;
uint16_t base_theta = 65536 * 3 / 4; // second hand with sweep action
uint16_t theta = seconds * 65536 / 60;
static uint16_t sweep_theta = theta;
int32_t diff = theta - sweep_theta;
if (diff < 0)
diff += 65536;
sweep_theta += (diff + 8) / 16;
wuVectorAA8(centrex, centrey, length, base_theta + sweep_theta);// minute hand theta = (theta + minutes * 65536) / 60; uint16_t min_theta = theta; wuVectorAA8(centrex, centrey, length * 7 / 8, base_theta + theta);
  // hour hand
  theta = (theta + (hours % 12) * 65536) / 12;
  wuVectorAA8(centrex, centrey, length * 3 /4, base_theta + theta);
  for (int16_t i = NUM_LEDS; i--; )
    leds[i] = HeatColor(heat1d[i]);
CRGB col = 0x0; wuVectorAA(centrex, centrey, length, base_theta + sweep_theta, &col); wuVectorAA(centrex, centrey, length * 7 / 8, base_theta + min_theta, &col); wuVectorAA(centrex, centrey, length * 3 / 4, base_theta + theta, &col);
  FastLED.show();
  Fire2012(random(192));
}
void Fire2012(uint8_t activity) {
  for (uint8_t h = 0; h < WIDTH; h++) {
    // Step 1.  Cool down every cell a little
    for ( uint8_t i = 0; i < HEIGHT; i++) {
      heat[i][h] = qsub8( heat[i][h],  random8(33));
    }
// Step 2. Heat from each cell drifts 'up' and diffuses a little
uint8_t hleft = h > 0 ? (h - 1) : 0;
uint8_t hright = h < WIDTH - 1 ? (h + 1) : WIDTH - 1;
for ( uint8_t k = 0 ; k < HEIGHT - 1; k++) {
heat[k][h] = (heat[k][h]
+ heat[k + 1][hleft]
+ heat[k + 1][h]
+ heat[k + 1][hright] ) / 4;
} if ( random8() < activity ) {
heat[HEIGHT - 1][h] = qadd8( heat[HEIGHT - 1][h], random8(activity));
}} }
Project 5: Wonderful Sinusoid Project on Arduino Simulator With FastLEDs

who said math is difficult (everyone 😁) but it's beautiful too!!
The project link is here: Sinusoid!
Code:
#include "FastLED.h"
// Matrix size #define HEIGHT 16 #define WIDTH 16 #define NUM_LEDS WIDTH * HEIGHT #define MATRIX_TYPE 1 // LEDs pin #define DATA_PIN 3 // LED brightness #define BRIGHTNESS 255 // Define the array of leds CRGB leds[NUM_LEDS];
//// ----------------------------- Sinusoid ------------------------------ //(c)Stefan Petrick https://gist.github.com/StefanPetrick/dc666c1b4851d5fb8139b73719b70149 //https://editor.soulmatelights.com/gallery/587 //upd by Stepko bool loadingFlag = true;
uint8_t speed = 155; uint8_t scale = 55; uint8_t amplitude = 255; int8_t type = 0; //0-3 original/>3 other versions
static float fmap(const float x, const float in_min, const float in_max, const float out_min, const float out_max) {
return (out_max - out_min) * (x - in_min) / (in_max - in_min) + out_min;
}
const int8_t semiHeightMajor = HEIGHT / 2 + (HEIGHT % 2);
const int8_t semiWidthMajor = WIDTH / 2 + (WIDTH % 2);
float e_s3_speed;
float e_s3_size;
float _scale;
void Sinusoid() {
if (loadingFlag) {
e_s3_speed = 0.004 * speed + 0.015; // speed of the movement along the Lissajous curves
e_s3_size = fmap(amplitude, 1, 255, 3, 9); // amplitude of the curves
_scale = fmap(scale, 1, 255, 0.1, 3);
loadingFlag = false;
}
float time_shift = millis();
switch (type) {
case 0://Sinusoid I
for (uint8_t y = 0; y < HEIGHT; y++) {
for (uint8_t x = 0; x < WIDTH; x++) {
CRGB color;
float cx = y + float(e_s3_size * (sinf (float(e_s3_speed * 0.003 * time_shift)) ) ) - semiHeightMajor; // the 8 centers the middle on a 16x16
float cy = x + float(e_s3_size * (cosf (float(e_s3_speed * 0.0022 * time_shift)) ) ) - semiWidthMajor;
float v = 127 * (1 + sinf ( _scale * sqrtf ( ((cx * cx) + (cy * cy)) ) ));
uint8_t data = v;
leds[XY(x, y)].r = data;
cx = x + float(e_s3_size * (sinf (e_s3_speed * float(0.0021 * time_shift)) ) ) - semiHeightMajor;
cy = y + float(e_s3_size * (cosf (e_s3_speed * float(0.002 * time_shift)) ) ) - semiWidthMajor;
v = 127 * (1 + sinf( _scale * sqrtf ( ((cx * cx) + (cy * cy)) ) ));
data = v;
leds[XY(x, y)].b = data; }
}
break;
case 1://it's not sinusoid II
for (uint8_t y = 0; y < HEIGHT; y++) {
for (uint8_t x = 0; x < WIDTH; x++) {
float cx = y + float(e_s3_size * (sinf (float(e_s3_speed * 0.003 * time_shift)) ) ) - semiHeightMajor; // the 8 centers the middle on a 16x16
float cy = x + float(e_s3_size * (cosf (float(e_s3_speed * 0.0022 * time_shift)) ) ) - semiWidthMajor;
float v = 127 * (sin(float(0.001 * time_shift * e_s3_speed)) + sinf ( _scale * sqrtf ( ((cx * cx) + (cy * cy)) ) ));
uint8_t data = v;
leds[XY(x, y)].r = data;
cx = x + float(e_s3_size * (sinf (e_s3_speed * float(0.0021 * time_shift)) ) ) - semiHeightMajor;
cy = y + float(e_s3_size * (cosf (e_s3_speed * float(0.002 * time_shift)) ) ) - semiWidthMajor;
v = 127 * (sin(float(0.0025 * time_shift * e_s3_speed)) + sinf( _scale * sqrtf ( ((cx * cx) + (cy * cy)) ) ));
data = v;
leds[XY(x, y)].g = data;
  }
} break;
case 2://Sinusoid III
for (uint8_t y = 0; y < HEIGHT; y++) {
for (uint8_t x = 0; x < WIDTH; x++) { float cx = y + float(e_s3_size * (sinf (float(e_s3_speed * 0.003 * time_shift)) ) ) - semiHeightMajor; // the 8 centers the middle on a 16x16
float cy = x + float(e_s3_size * (cosf (float(e_s3_speed * 0.0022 * time_shift)) ) ) - semiWidthMajor;
float v = 127 * (1 + sinf (_scale * sqrtf ( ((cx * cx) + (cy * cy)) )));
uint8_t data = v;
leds[XY(x, y)].r = data; cx = x + float(e_s3_size * (sinf (e_s3_speed * float(0.0021 * time_shift)) ) ) - semiHeightMajor;
cy = y + float(e_s3_size * (cosf (e_s3_speed * float(0.002 * time_shift)) ) ) - semiWidthMajor;
v = 127 * (1 + sinf (_scale * sqrtf ( ((cx * cx) + (cy * cy)) )));
data = v;
leds[XY(x, y)].b = data; cx = x + float(e_s3_size * (sinf (e_s3_speed * float(0.0041 * time_shift)) ) ) - semiHeightMajor;
cy = y + float(e_s3_size * (cosf (e_s3_speed * float(0.0052 * time_shift)) ) ) - semiWidthMajor;
v = 127 * (1 + sinf (_scale * sqrtf ( ((cx * cx) + (cy * cy)) )));
data = v;
leds[XY(x, y)].g = data; }
} break;
case 3://Sinusoid IV
for (uint8_t y = 0; y < HEIGHT; y++) {
for (uint8_t x = 0; x < WIDTH; x++) { float cx = y + float(e_s3_size * (sinf (float(e_s3_speed * 0.003 * time_shift)) ) ) - semiHeightMajor; // the 8 centers the middle on a 16x16
float cy = x + float(e_s3_size * (cosf (float(e_s3_speed * 0.0022 * time_shift)) ) ) - semiWidthMajor;
float v = 127 * (1 + sinf (_scale * sqrtf ( ((cx * cx) + (cy * cy)) ) + float(0.01 * time_shift * e_s3_speed)));
uint8_t data = v;
leds[XY(x, y)].r = data; cx = x + float(e_s3_size * (sinf (e_s3_speed * float(0.0021 * time_shift)) ) ) - semiHeightMajor;
cy = y + float(e_s3_size * (cosf (e_s3_speed * float(0.002 * time_shift)) ) ) - semiWidthMajor;
v = 127 * (1 + sinf (_scale * sqrtf ( ((cx * cx) + (cy * cy)) ) + float(0.01 * time_shift * e_s3_speed)));
data = v;
leds[XY(x, y)].b = data; cx = x + float(e_s3_size * (sinf (e_s3_speed * float(0.0041 * time_shift)) ) ) - semiHeightMajor;
cy = y + float(e_s3_size * (cosf (e_s3_speed * float(0.0052 * time_shift)) ) ) - semiWidthMajor;
v = 127 * (1 + sinf (_scale * sqrtf ( ((cx * cx) + (cy * cy)) ) + float(0.01 * time_shift * e_s3_speed)));
data = v;
leds[XY(x, y)].g = data; }
} break;
case 4: //changed by stepko //anaglyph sinusoid
for (uint8_t y = 0; y < HEIGHT; y++) {
for (uint8_t x = 0; x < WIDTH; x++) { float cx = y + float(e_s3_size * (sinf (float(e_s3_speed * 0.003 * time_shift)) ) ) - semiHeightMajor; // the 8 centers the middle on a 16x16
float cy = x + float(e_s3_size * (cosf (float(e_s3_speed * 0.0022 * time_shift)) ) ) - semiWidthMajor;
float v = 127 * (1 + sinf (_scale * sqrtf ( ((cx * cx) + (cy * cy)) ) ));
uint8_t data = v;
leds[XY(x, y)].r = data; v = 127 * (1 + sinf (_scale * sqrtf ( ((cx * cx) + (cy * cy)) + float(0.01 * time_shift * e_s3_speed))));
data = v;
leds[XY(x, y)].b = data; v = 127 * (1 + sinf (_scale * sqrtf ( ((cx * cx) + (cy * cy)) + float(0.01 * time_shift * e_s3_speed))));
data = v;
leds[XY(x, y)].g = data; }
}
break;
case 5: //changed by stepko //colored sinusoid
for (uint8_t y = 0; y < HEIGHT; y++) {
for (uint8_t x = 0; x < WIDTH; x++) { float cx = y + float(e_s3_size * (sinf (float(e_s3_speed * 0.003 * time_shift)) ) ) - semiHeightMajor; // the 8 centers the middle on a 16x16
float cy = x + float(e_s3_size * (cosf (float(e_s3_speed * 0.0022 * time_shift)) ) ) - semiWidthMajor;
float v = 127 * (1 + sinf (_scale * sqrtf ( ((cx * cx) + (cy * cy)) ) ));
uint8_t data = v;
leds[XY(x, y)].r = data; v = 127 * (1 + sinf (_scale * sqrtf ( ((cx * cx) + (cy * cy)) + float(0.01 * time_shift * e_s3_speed))));
data = v;
leds[XY(x, y)].b = data; v = 127 * (1 + sinf (_scale * sqrtf ( ((cx * cx) + (cy * cy)) + float(0.025 * time_shift * e_s3_speed))));
data = v;
leds[XY(x, y)].g = data; }
}
break;
case 6: //changed by stepko //sinusoid in net
for (uint8_t y = 0; y < HEIGHT; y++) {
for (uint8_t x = 0; x < WIDTH; x++) { float cx = y + float(e_s3_size * (sinf (float(e_s3_speed * 0.003 * time_shift)) ) ) - semiHeightMajor; // the 8 centers the middle on a 16x16
float cy = x + float(e_s3_size * (cosf (float(e_s3_speed * 0.0022 * time_shift)) ) ) - semiWidthMajor;
float v = 127 * (1 + sinf (_scale * sqrtf ( ((cx * cx) + (cy * cy)) ) ));
uint8_t data = v;
leds[XY(x, y)].g = data; v = 127 * (1 + sinf (_scale * x * 10 + float(0.01 * time_shift * e_s3_speed)));
data = v;
leds[XY(x, y)].b = data; v = 127 * (1 + sinf (_scale * y * 10 + float(0.011 * time_shift * e_s3_speed)));
data = v;
leds[XY(x, y)].r = data; }
}
break;
case 7: //changed by stepko //spiral
for (uint8_t y = 0; y < HEIGHT; y++) {
for (uint8_t x = 0; x < WIDTH; x++) {
float cx = y + float(e_s3_size * (sinf (float(e_s3_speed * 0.003 * time_shift)) ) ) - semiHeightMajor; // the 8 centers the middle on a 16x16
float cy = x + float(e_s3_size * (cosf (float(e_s3_speed * 0.0022 * time_shift)) ) ) - semiWidthMajor;
float v = 127 * (1 + sinf (3 * atan2(cy, cx) + _scale * hypot(cy, cx) + float(0.01 * time_shift * e_s3_speed)));
uint8_t data = v;
leds[XY(x, y)].r = data; cx = x + float(e_s3_size * (sinf (e_s3_speed * float(0.0021 * time_shift)) ) ) - semiHeightMajor;
cy = y + float(e_s3_size * (cosf (e_s3_speed * float(0.002 * time_shift)) ) ) - semiWidthMajor;
v = 127 * (1 + sinf (3 * atan2(cy, cx) + _scale * hypot(cy, cx) + float(0.01 * time_shift * e_s3_speed)));
data = v;
leds[XY(x, y)].b = data; cx = x + float(e_s3_size * (sinf (e_s3_speed * float(0.0041 * time_shift)) ) ) - semiHeightMajor;
cy = y + float(e_s3_size * (cosf (e_s3_speed * float(0.0052 * time_shift)) ) ) - semiWidthMajor;
v = 127 * (1 + sinf (3 * atan2(cy, cx) + _scale * hypot(cy, cx) + float(0.01 * time_shift * e_s3_speed)));
data = v;
leds[XY(x, y)].g = data; }
}
break;
case 8: //changed by stepko //blobs
for (uint8_t y = 0; y < HEIGHT; y++) {
for (uint8_t x = 0; x < WIDTH; x++) {
float cx = y + float(e_s3_size * (sinf (float(e_s3_speed * 0.003 * time_shift)) ) ) - semiHeightMajor; // the 8 centers the middle on a 16x16
float cy = x + float(e_s3_size * (cosf (float(e_s3_speed * 0.0022 * time_shift)) ) ) - semiWidthMajor;
float v = 30 * (max(0, -hypot(cx, cy) + _scale * 2.5));
uint8_t data = v;
leds[XY(x, y)].r = data; cx = x + float(e_s3_size * (sinf (e_s3_speed * float(0.0021 * time_shift)) ) ) - semiHeightMajor;
cy = y + float(e_s3_size * (cosf (e_s3_speed * float(0.002 * time_shift)) ) ) - semiWidthMajor;
v = 30 * (max(0, -hypot(cx, cy) + _scale * 2.5));
data = v;
leds[XY(x, y)].b = data; cx = x + float(e_s3_size * (sinf (e_s3_speed * float(0.0041 * time_shift)) ) ) - semiHeightMajor;
cy = y + float(e_s3_size * (cosf (e_s3_speed * float(0.0052 * time_shift)) ) ) - semiWidthMajor;
v = 30 * (max(0, -hypot(cx, cy) + _scale * 2.5));
data = v;
leds[XY(x, y)].g = data; }
}
break;
        }
}void setup() {
//Serial.begin(250000);
FastLED.addLeds(leds, NUM_LEDS);
FastLED.setBrightness(BRIGHTNESS);
pinMode(2, INPUT_PULLUP);
}void loop() {
bool buttonPressed = digitalRead(2) == LOW;
Sinusoid();
if (buttonPressed) {
if (type >= 8) {
type = 0;
} else {
type += 1;
}
FastLED.clear();
delay(100);
} else {
FastLED.show();
FastLED.delay(1000 / 60);
}
} //loopuint16_t XY (uint8_t x, uint8_t y) {
return (y * WIDTH + x);
}Project 6 - Snake Game on FastLED and Arduino!

This project simulates a snake game. 4 buttons, a buzzer and the LED matrix is all you need. IF you are bored, you can start playing this game. You can also create your own games by following the project link below
code:
#include
#include "Snake.h"
#define NUM_LEDS      135
#define LEDS_PER_ROW  15
#define DATA_PIN      6
#define SPEAKER_PIN   8
#define BTN_LEFT      2
#define BTN_RIGHT     4
#define BTN_UP        5
#define BTN_DOWN      3
#define NOTE_G3  196
#define NOTE_C4  262
#define NOTE_C5  523
#define NOTE_E4  330
#define NOTE_G4  392
#define NOTE_G5  784
// Initialize the snake field with x=15, y=9, delay=10 ticks
Snake snakeGame(15, 9, 10);
CRGB leds[NUM_LEDS];
unsigned long timerTone = 0;
unsigned long timerReset = 0;
unsigned long timerRefresh = 0;
unsigned long timerMoveTone = 0;
unsigned long timerSnakeRose = 0;
bool isMoveTone = false;
bool isGameReset = false;
bool isMoveToneStop = false;
bool isSnakeRose = false;
bool isSnakeRoseEnd = false;
int lastSnakeLenght = 0;
uint8_t direction = 0;
uint8_t lastDirection = 0;
void setup() {
  pinMode(BTN_LEFT, INPUT_PULLUP);
  pinMode(BTN_RIGHT, INPUT_PULLUP);
  pinMode(BTN_UP, INPUT_PULLUP);
  pinMode(BTN_DOWN, INPUT_PULLUP);
snakeGame.setBodyColor(255, 0, 255); // Optionally set the color of the snakeparts snakeGame.setFoodColor(0, 60, 125); // Optionally set the color of the food snakeGame.setHeadColor(225, 20, 60); // Optionally set the color of the snakeparts lastSnakeLenght = snakeGame.getSnakeLenght();
delay(1000);
  FastLED.addLeds(leds, NUM_LEDS);
}
void inputEvent() { if (digitalRead(BTN_LEFT) == LOW) {
snakeGame.goLeft(); // Snake will go left on the next move
isMoveTone = true;
direction = LEFT;
} if (digitalRead(BTN_RIGHT) == LOW) {
snakeGame.goRight(); // Snake will go right on the next move
isMoveTone = true;
direction = RIGHT;
} if (digitalRead(BTN_UP) == LOW) {
snakeGame.goUp(); // Snake will go up on the next move
isMoveTone = true;
direction = UP;
} if (digitalRead(BTN_DOWN) == LOW) {
snakeGame.goDown(); // Snake will go down on the next move
isMoveTone = true;
direction = DOWN;
} // Checks whether the snake has changed position
if (isMoveTone && (direction != lastDirection)) {
isMoveTone = false;
isMoveToneStop = true;
lastDirection = direction;
tone(SPEAKER_PIN, NOTE_G4);
timerMoveTone = millis();
} if ((isMoveToneStop) && ((millis() - timerMoveTone) >= 30)) {
isMoveToneStop = false;
noTone(SPEAKER_PIN);
}
}byte setPixel(byte x, byte y, byte r, byte g, byte b)
{
byte ledID = NUM_LEDS - (y * LEDS_PER_ROW) - x - 1 ;
leds[ledID].setRGB(r, g, b);
return ledID;
}void changeRGBtoGBR()
{
for (int whiteLed = 0; whiteLed < NUM_LEDS; whiteLed++)
{
leds[whiteLed].setRGB(leds[whiteLed].g, leds[whiteLed].b, leds[whiteLed].r);
}
}void clearScreen()
{
for (int whiteLed = 0; whiteLed < NUM_LEDS; whiteLed++)
{
leds[whiteLed].setRGB( 3, 3, 3);
}
}void loop()
{
inputEvent(); if (!snakeGame.wasGameReset() && (millis() - timerRefresh > 30)) {
timerRefresh = millis(); // This needs to be updated every frame
Snake::pixel* snakeLimbs = snakeGame.getSnakeLimbs();
Snake::pixel* snakeFood = snakeGame.getFoodPositions();clearScreen();
setPixel(snakeFood[0].posX, 8 - snakeFood[0].posY, snakeFood[0].pixelColor.r, snakeFood[0].pixelColor.g, snakeFood[0].pixelColor.b); // display the food
    for (int i = 0; i < snakeGame.getSnakeLenght(); i++)
    {
      // Display the snake, my setpixel method has x=0, y=0 at the top left, but the library has it at bottom left, so I invert the Y-Axis:
      setPixel(snakeLimbs[i].posX, 8 - snakeLimbs[i].posY, snakeLimbs[i].pixelColor.r, snakeLimbs[i].pixelColor.g, snakeLimbs[i].pixelColor.b);
    }
if (lastSnakeLenght != snakeGame.getSnakeLenght()) {
lastSnakeLenght = snakeGame.getSnakeLenght();
isSnakeRose = true;
tone(SPEAKER_PIN, NOTE_G4);
timerSnakeRose = millis();
} FastLED.show();
snakeGame.tick(); // Main loop for the snake library
} if ((isSnakeRose) && (millis() - timerSnakeRose) >= 30) {
isSnakeRose = false;
tone(SPEAKER_PIN, NOTE_G5);
isSnakeRoseEnd = true;
timerSnakeRose = millis();
} if ((isSnakeRoseEnd) && (millis() - timerSnakeRose) >= 30) {
isSnakeRoseEnd = false;
noTone(SPEAKER_PIN);
} // If the snake bit itself or the wall, flash a little
if (snakeGame.wasGameReset()) {
changeRGBtoGBR();
FastLED.show();
isGameReset = true;
tone(SPEAKER_PIN, NOTE_G3);
timerReset = millis();
} if ((isGameReset) && (millis() - timerReset) >= 200) {
isGameReset = false;
noTone(SPEAKER_PIN);
}
}Project 7 - Wokwi Arduino Simulator and Cube Project Using FastLED
would need so much time to build this in real! LED cube project on the Arduino simulator for real! Here is the project link!
Project 8 - Water Simulator!

Water simulation on LED Matrix using Arduino simulator and smart LEDs. Click here to go the project online
Project 9 - Kreigsmann Swirl FastLED Project on Arduino Simulator

Look at the amazing project. The link is here. One of the best features of an online Arduino simulator is the option to share the projects with others. so easy and so much helpful to showcase your nice creations!
Project 10 - S-Marley FastLED Basics - Color-temp Project
The project link is here. This project simulates the various colour temperature of the lighting LEDs we see!
Project 11 - Basic Fire Project! on Arduino Simulator

This is from S-Marley from the FastLED basics - tutorials. The project link is here: basic Fire project using smartLEDs
Project 12 - Fire on Concentric Rings!

The project link is here. this has the fire project but on gorgeous looking concentric LED strips
Project 13 - Flying Circular Pattern Using FastLEDs and Arduino Simulator

Here is the project link. can you create your own pattern? share the new patterns you create in the link
Project 14 - Clock and Counter on Arduino Simulator Using FastLED Library

Here is the project link. can you edit to improvise the project to show something more?
Project 15 - Fibonacci Planar Splendid Project Using SmartLEDs and Arduino Simulator

The project link is here: What can you change to make it a new project?
Code:
#import

#define NUM_COLS 20
#define NUM_ROWS 20
#define NUM_LEDS 256
CRGB leds [256+1];
void setup()
{LEDS.addLeds(leds,256);}
void loop() {
uint16_t ms = millis();
for (byte j = 0; j < NUM_ROWS; j++) {
for (byte i = 0; i < NUM_COLS; i++) {leds[XY_fibon(i, j)] = CHSV(i*8+j*8+ms/16,255,255); // with palette
}
}FastLED.show(); }
uint16_t XY_fibon(byte x, byte y) {
static const uint16_t FibonPlanarTable[]={
256, 256, 256, 256, 256, 256, 256, 256, 247, 213, 234, 255, 256, 256, 256, 256, 256, 256, 256, 256,
256, 256, 256, 256, 256, 239, 205, 226, 192, 256, 179, 200, 221, 242, 256, 256, 256, 256, 256, 256,
256, 256, 256, 256, 218, 184, 256, 171, 137, 158, 124, 145, 166, 187, 208, 229, 256, 256, 256, 256,
256, 256, 256, 252, 197, 163, 150, 116, 256, 103, 256, 111, 132, 153, 174, 195, 250, 256, 256, 256,
256, 256, 231, 176, 142, 256, 129, 95, 82, 69, 90, 77, 98, 119, 140, 161, 216, 237, 256, 256,
256, 244, 210, 155, 121, 108, 74, 61, 48, 256, 56, 256, 64, 85, 106, 127, 182, 203, 256, 256,
256, 223, 189, 134, 100, 87, 53, 40, 27, 35, 256, 43, 51, 72, 93, 114, 148, 169, 224, 256,
256, 202, 168, 113, 79, 66, 256, 32, 19, 14, 22, 30, 38, 59, 80, 256, 135, 256, 190, 245,
236, 181, 147, 92, 256, 58, 45, 256, 11, 6, 9, 17, 25, 46, 256, 101, 256, 156, 256, 211,
215, 160, 126, 256, 71, 256, 37, 24, 3, 256, 1, 4, 12, 33, 67, 256, 122, 256, 177, 232,
249, 194, 139, 105, 256, 50, 29, 16, 8, 0, 2, 7, 20, 41, 54, 88, 256, 143, 198, 253,
228, 173, 256, 118, 84, 63, 42, 21, 13, 5, 256, 15, 28, 256, 62, 75, 109, 164, 219, 256,
256, 207, 152, 256, 97, 76, 55, 34, 26, 18, 10, 23, 36, 49, 83, 96, 130, 185, 240, 256,
256, 241, 186, 131, 110, 89, 68, 47, 256, 39, 31, 44, 57, 70, 104, 117, 151, 206, 256, 256,
256, 256, 220, 165, 144, 256, 256, 256, 60, 256, 52, 65, 78, 91, 125, 138, 172, 227, 256, 256,
256, 256, 254, 199, 178, 123, 102, 81, 94, 73, 86, 256, 99, 112, 146, 159, 193, 248, 256, 256,
256, 256, 256, 233, 212, 157, 136, 115, 128, 107, 256, 120, 133, 167, 256, 180, 214, 256, 256, 256,
256, 256, 256, 256, 256, 191, 170, 149, 256, 162, 141, 154, 188, 256, 201, 235, 256, 256, 256, 256,
256, 256, 256, 256, 256, 246, 225, 204, 183, 196, 175, 209, 256, 222, 256, 256, 256, 256, 256, 256,
256, 256, 256, 256, 256, 256, 256, 238, 217, 251, 230, 256, 243, 256, 256, 256, 256, 256, 256, 256 };
return (FibonPlanarTable[y*20+x]);
}
Project 16 - Simulating Graphics Using FastLED Arduino Simulator

The project link is here. To kee the article less boring, I will not insert code. THe code can be always accessed using the project link!!!
Project 17 - Rolling Eyes Using SmartLED FastLED Arduino Simulator

The project can be accessed here: Rolling eyes!
Project 18 - Bengal Fire on Arduino Simulator and FastLEDs

The project link is here: you can always play with the code and see the effects immediately, wherever you are. whatever device you are on! that is the benefit of an Arduino simulator!
Project 19 - Sinusoid Atom Project on Arduino Simulator

project link: sin atom
Project 20 - Wandering Souls Project on Arduino Simulator and FastLED

Project 21 - Scrolling Text Using FastLED SmartLEDs on an Arduino Simulator

The project link is here
Also, time to say bye for now 😀
please visit https:/wokwi.com - a Free Arduino simulator as well as a learning guide for more 😃
If you have any questions hop on to Discord server for discussions